remp / crm-application-module
CRM Application Module
Installs: 52 401
Dependents: 1
Suggesters: 0
Security: 0
Stars: 0
Watchers: 5
Forks: 7
Open Issues: 0
pkg:composer/remp/crm-application-module
Requires
- php: ^8.1
- ext-curl: *
- ext-dom: *
- ext-filter: *
- ext-hash: *
- ext-iconv: *
- ext-json: *
- ext-pdo: *
- ext-simplexml: *
- ext-zip: *
- composer/composer: ^2.0
- contributte/forms-multiplier: ^4.0
- contributte/translation: ^2.0
- fakerphp/faker: ^1.13
- kdyby/autowired: ^3.0
- latte/latte: ^3.0
- league/csv: ^9.6
- league/event: ~2.1
- league/flysystem: ^3.0
- malkusch/lock: ^3.0
- monolog/monolog: ^1.23|^2.3|^3.5
- nette/application: ^3.2
- nette/bootstrap: ^3.1
- nette/caching: ^3.1
- nette/database: ^3.1
- nette/di: ^3.0
- nette/forms: ^3.1
- nette/http: ^3.1
- nette/mail: ^4.0
- nette/robot-loader: ^4.0
- nette/security: ^3.1 <3.2
- nette/utils: ^4.0
- odan/phinx-migrations-generator: ^6.1
- phpoffice/phpspreadsheet: ^5.0
- predis/predis: ^1.0
- robmorgan/phinx: 0.16.5
- symfony/console: ^6.4
- symfony/yaml: ^6.4
- tomaj/hermes: ^4.0
- tomaj/nette-bootstrap-form: ^2.1
- tracy/tracy: ^2.8
- twig/twig: ^3.14
- vlucas/phpdotenv: ^5.3
- dev-master
- 4.4.0
- 4.3.0
- 4.2.0
- 4.1.0
- 4.0.0
- 3.7.0
- 3.6.1
- 3.6.0
- 3.5.2
- 3.5.1
- 3.5.0
- 3.4.1
- 3.4.0
- 3.3.0
- 3.2.0
- 3.1.2
- 3.1.1
- 3.1.0
- 3.0.0
- 2.11.2
- 2.11.1
- 2.11.0
- 2.10.0
- 2.9.0
- 2.8.0
- 2.7.0
- 2.6.0
- 2.5.0
- 2.4.1
- 2.4.0
- 2.3.0
- 2.2.0
- 2.1.1
- 2.1.0
- 2.0.0
- 1.2.1
- 1.2.0
- 1.1.0
- 1.0.4
- 1.0.2
- 1.0.1
- 1.0.0
- 1.0.0-beta2
- 1.0.0-beta1
- 0.39.0
- 0.38.0
- 0.37.0
- 0.36.0
- 0.35.1
- 0.35.0
- 0.34.0
- 0.33.2
- 0.33.1
- 0.33.0
- 0.32.0
- 0.31.0
- 0.30.1
- 0.30.0
- 0.29.0
- 0.28.0
- 0.27.0
- 0.26.0
- 0.25.0
- 0.24.0
- 0.23.0
- 0.22.0
- 0.21.1
- 0.21.0
- 0.20.3
- 0.20.2
- 0.20.0
- 0.18.0
- 0.17.0
- 0.16.0
- 0.15.0
- 0.14.0
- 0.13.0
- 0.12.0
- 0.11.0
- 0.10.0
- 0.9.0
- 0.8.2
- 0.8.1
- 0.8.0
- 0.7.0
- 0.6.0
- 0.5.0
- 0.4.2
- 0.4.1
- 0.4.0
- 0.3.2
- 0.3.1
- 0.3.0
- 0.2.10
- 0.2.9
- 0.2.8
- 0.2.7
- 0.2.5
- 0.2.4
- 0.2.3
- 0.2.2
- 0.2.1
- 0.2.0
- 0.1.1
This package is auto-updated.
Last update: 2026-02-12 09:03:51 UTC
README
Configuration
Redis
You can configure default Redis keys prefix, which is used if implementation using RedisClientTrait enables prefixing via useRedisKeysPrefix() method.
crm_application:
    redis_client_factory:
        prefix: foo_
You can turn on prefixing for specific service using RedisClientTrait by calling useRedisKeysPrefix() method in configuration.
configsCache:
		setup:
			- useRedisKeysPrefix()
Replication
CRM supports Redis replication with use of Redis Sentinel. To enable the use of sentinel, add following to your config.neon:
crm_application:
	redis_client_factory:
		replication:
			service: my-sentinel-service
			sentinels:
				- [scheme: tcp, host: sentinel-host-a, port: 26379]
				- [scheme: tcp, host: sentinel-host-b, port: 26379]
				- [scheme: tcp, host: sentinel-host-c, port: 26379]
Database
Replication
CRM allows you to configure secondary database connections used for read-only queries to lower the load of the primary database server. Add these blocks to your CRM configuration:
# replica connection parameters
parameters:
	database:
		replica:
			adapter: @environmentConfig::get('CRM_DB_REPLICA_ADAPTER') # ENV variables are arbitrary, feel free to change them
			host: @environmentConfig::get('CRM_DB_REPLICA_HOST')
			name: @environmentConfig::get('CRM_DB_REPLICA_NAME')
			user: @environmentConfig::get('CRM_DB_REPLICA_USER')
			password: @environmentConfig::get('CRM_DB_REPLICA_PASS')
			port: @environmentConfig::get('CRM_DB_REPLICA_PORT')

# configure replicas so the CRM is aware of them; add as many instances as you need, each under its own key
database:
	replica:
		dsn: ::sprintf("%s:host=%s;dbname=%s;port=%s", %database.replica.adapter%, %database.replica.host%, %database.replica.name%, %database.replica.port%)
		user: %database.replica.user%
		password: %database.replica.password%
		options:
			lazy: yes

# configure repositories to use replicaConfig (otherwise all queries would go to the primary database)
decorator:
	Crm\ApplicationModule\Models\Database\Repository:
		setup:
			- setReplicaConfig(@replicaConfig) # this enables the support for reading from replicas

services:
	replicaConfig:
		setup:
			# configure application which of the known replica DBs can be used for reads
			- addReplica(@database.replica.context)

			# configure application which DB tables can be used for replica reads
			# by default, every query still goes to the primary DB server; you need to explicitly allow tables, which are safe to be queried from replica
			- addTable(configs)
			- addTable(config_categories)
			- addTable(countries)
			- addTable(api_tokens)
			- addTable(admin_access)
			- addTable(admin_groups_access)
Commands
application:heartbeat
If your Hermes worker (application:hermes_worker) is losing connection to MySQL after a long period of inactivity, add application:heartbeat into your scheduler (e.g. crontab) with small interval (e.g. 1 minute).
WARNING: Change paths to PHP and command.php according to your installation.
# emit heartbeat event
*/1 * * * * /usr/bin/php /var/www/html/bin/command.php application:heartbeat
Event is handled by HeartbeatMysql handler which pings MySQL. This simple process keeps Hermes worker alive.
application:hermes_shutdown
Command application:hermes_shutdown can be used to gracefully shutdown Hermes worker and all other workers which integrate Hermes' RestartInterface (eg. Scenarios worker present in ScenariosModule). This can be used after CRM update when it's needed to reload all workers to new version.
WARNING: Change paths to PHP and command.php according to your installation.
/usr/bin/php /var/www/html/bin/command.php application:hermes_shutdown
User confirmation is required to proceed with shutdown of all worker.
In case you need to run this command without user interaction (eg. CI, tests), use --assume-yes flag:
/usr/bin/php /var/www/html/bin/command.php application:hermes_shutdown --assume-yes
application:cleanup
Command can be used to clean up data from repositories, which you don't need to keep forever (i.e. logs).
By default, the command deletes data older than 2 months (based on the created_at column). You can change the default threshold time before which the command deletes old repository data, and also column which it uses by using (in your project configuration file):
autoLoginTokensRepository:
	setup:
		- setRetentionThreshold('now', 'valid_at')
changePasswordsLogsRepository:
	setup:
		- setRetentionThreshold('-12 months')
userActionsLogRepository:
	setup:
		- setRetentionThreshold('-12 months')
Components
AjaxDataPaginator
Reusable AJAX pagination system for widgets and listing components.
Basic usage example
use Crm\ApplicationModule\Components\AjaxDataPaginator\PaginatedComponent;
use Crm\ApplicationModule\Components\AjaxDataPaginator\PaginatesDataTrait;

class UserSubscriptionsListing extends BaseLazyWidget implements DetailWidgetInterface, PaginatedComponent
{
    use PaginatesDataTrait;

    public function render(int $id): void
    {
        $totalSubscriptions = $this->subscriptionsRepository
            ->userSubscriptions($id)
            ->count();

        $paginator = $this->getAjaxPaginator(
            snippetName: 'subscriptionsTable',
            itemCount: $totalSubscriptions,
        );

        $subscriptions = $this->subscriptionsRepository
            ->userSubscriptions($id)
            ->limit($paginator->getLimit(), $paginator->getOffset());

        $this->template->subscriptions = $subscriptions;
        $this->template->paginator = $paginator;
        $this->template->render();
    }
}
{snippet subscriptionsTable}
    <table class="table">
        <tr n:foreach="$subscriptions as $subscription">
            <td>{$subscription->subscription_type->name}</td>
        </tr>
    </table>
    {$paginator->render()}
{/snippet}
Multiple paginators example
Each paginator requires a unique snippetName.
use Crm\ApplicationModule\Components\AjaxDataPaginator\PaginatedComponent;
use Crm\ApplicationModule\Components\AjaxDataPaginator\PaginatesDataTrait;

class UserPaymentsListing extends BaseLazyWidget implements DetailWidgetInterface, PaginatedComponent
{
    use PaginatesDataTrait;

    public function render($id): void
    {
        $totalPayments = $this->paymentsRepository
            ->userPayments($id)
            ->count();

        $paymentsTablePaginator = $this->getAjaxPaginator(
            snippetName: 'paymentsTable',
            itemCount: $totalPayments,
        );

        $payments = $this->paymentsRepository
            ->userPayments($id)
            ->limit($paymentsTablePaginator->getLimit(), $paymentsTablePaginator->getOffset());

        $totalRecurrentPayments = $this->recurrentPaymentsRepository
            ->userRecurrentPayments($id)
            ->count();

        $recurrentTablePaginator = $this->getAjaxPaginator(
            snippetName: 'recurrentTable',
            itemCount: $totalRecurrentPayments,
        );

        $recurrentPayments = $this->recurrentPaymentsRepository
            ->userRecurrentPayments($id)
            ->limit($recurrentTablePaginator->getLimit(), $recurrentTablePaginator->getOffset());

        $this->template->payments = $payments;
        $this->template->recurrentPayments = $recurrentPayments;
        $this->template->paymentsTablePaginator = $paymentsTablePaginator;
        $this->template->recurrentTablePaginator = $recurrentTablePaginator;
        $this->template->render();
    }
}
{snippet paymentsTable}
    <table class="table">
        <tr n:foreach="$payments as $payment">
            <td>{$payment->variable_symbol}</td>
        </tr>
    </table>
    {$paymentsTablePaginator->render()}
{/snippet}

{snippet recurrentTable}
    <table class="table">
        <tr n:foreach="$recurrentPayments as $recurrent">
            <td>{$recurrent->cid}</td>
        </tr>
    </table>
    {$recurrentTablePaginator->render()}
{/snippet}
FrontendMenu
User-facing frontend menu expected to be used in your application layout.
Example use
Use within your layout by using:
{control fronendMenu}
You can override the default layout of menu in your config.local.neon:
# ...
services:
    frontendMenu:
        setup:
            - setTemplate('../../../../../app/modules/DemoModule/templates/frontend_menu.latte')
# ...
FrontendMenuDataProviderInterface
Interface which dataproviders have to implement to be able to edit FrontendMenu items. Dataproviders have to be attached to frontend_menu dataproviders placeholder.
Example use
In this example DemoFrontendMenuDataProvider removes menu item from frontend menu by link.
use Crm\ApplicationModule\DataProvider\DataProviderManager;

class DemoModule
{
    public function registerDataProviders(DataProviderManager $dataProviderManager)
    {
        $dataProviderManager->registerDataProvider(
            'frontend_menu',
            $this->getInstance(DemoFrontendMenuDataProvider::class)
        );
    }
}
use Crm\ApplicationModule\DataProvider\DataProviderException;
use Crm\ApplicationModule\DataProvider\FrontendMenuDataProviderInterface;
use Crm\ApplicationModule\Menu\MenuContainerInterface;

class DemoFrontendMenuDataProvider implements FrontendMenuDataProviderInterface
{

    public function provide(array $params): void
    {
        if (!isset($params['menuContainer'])) {
            throw new DataProviderException('missing [menuContainer] within data provider params');
        }

        /** @var MenuContainerInterface $menuContainer */
        $menuContainer = $params['menuContainer'];
        $menuContainer->removeMenuItemByLink(':Invoices:Invoices:invoiceDetails');
    }
}
Graphs
Following is a set of various charts provided by the ApplicationModule out of the box.
GoogleBarGraph
Simple bar graph based on Google charts. Usually used within GoogleBarGraphGroup component, but can be also used separately if you need to manage your groups (keys within $data parameter) manually.
Example use
To use the chart, create similar method in your presenter or widget:
namespace Crm\DemoModule\Presenters;

class DemoPresenter extends \Crm\AdminModule\Presenters\AdminPresenter
{
    // ...
    public function renderDefault()
    {
    }

    public function createComponentGoogleUserSubscribersRegistrationSourceStatsGraph()
    {
        $control = $this->factory->create();

        $results = $this->database->table('subscriptions')
            ->where('subscriptions.start_time < ?', $this->database::literal('NOW()'))
            ->where('subscriptions.end_time > ?', $this->database::literal('NOW()'))
            ->group('user.source')
            ->select('user.source, count(*) AS count')
            ->order('count DESC')
            ->fetchAll();

        $data = [];

        foreach ($results as $row) {
            $data[$row['source']] = $row['count'];
        }

        $control->addSerie($this->translator->translate('dashboard.users.active_sub_registrations.serie'), $data);

        return $control;
    }
    // ...
}
In your templates/Demo/default.latte template, use the component as needed:
<div class="row">
    <div class="col-md-12">
        {control googleUserSubscribersRegistrationSourceStatsGraph}
    </div>
</div>
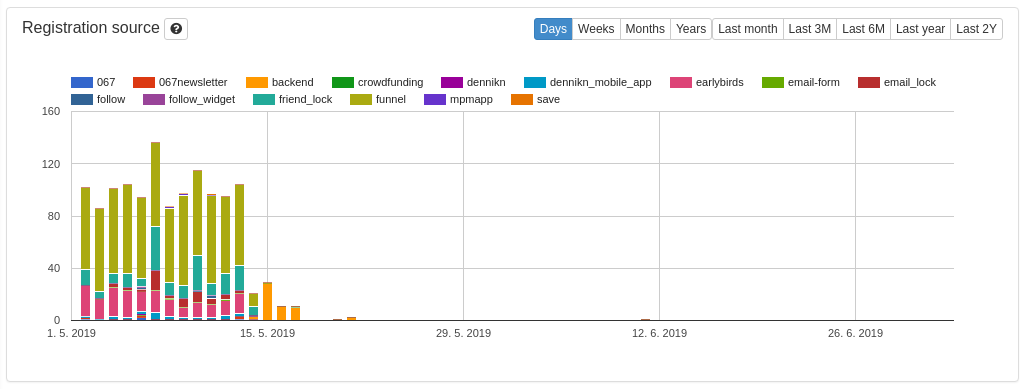
GoogleBarGraphGroup
Simple bar graph based on Google charts. Component is able to create multiple groups based on ->setGroupBy method and results of your query. Internally uses GoogleBarGraph to render the chart.
example
namespace Crm\DemoModule\Presenters;

class DemoPresenter extends \Crm\AdminModule\Presenters\AdminPresenter
{
    // ...
    public function renderDefault()
    {
    }

    public function createComponentGoogleUserActiveSubscribersRegistrationsSourceStatsGraph(GoogleBarGraphGroupControlFactoryInterface $factory)
    {
        $graphDataItem = new GraphDataItem();

        $graphDataItem->setCriteria(
            (new Criteria)->setTableName('payments')
                ->setTimeField('created_at')
                ->setJoin('JOIN users ON payments.user_id = users.id')
                ->setWhere("AND payments.status = '" . PaymentsRepository::STATUS_PAID . "'")
                ->setGroupBy('users.source') // <-- THIS LINE DEFINES THE GROUPPING
                ->setSeries('users.source') // <-- THIS LINE DEFINES CHART SERIES
                ->setValueField('count(*)')
                ->setStart(DateTime::from($this->dateFrom))
                ->setEnd(DateTime::from($this->dateTo))
        );

        $control = $factory->create();
        $control->setGraphTitle($this->translator->translate('dashboard.payments.registration.title'))
            ->setGraphHelp($this->translator->translate('dashboard.payments.registration.tooltip'))
            ->addGraphDataItem($graphDataItem);

        return $control;
    }
In your templates/Demo/default.latte template, use the component as needed:
<div class="row">
    <div class="col-md-12">
        {control googleUserActiveSubscribersRegistrationsSourceStatsGraph}
    </div>
</div>
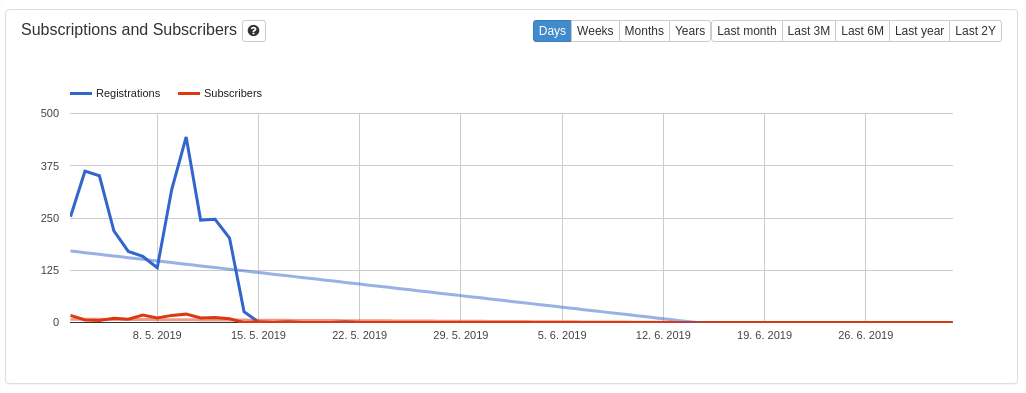
GoogleLineGraph
Simple line graph based on Google charts. This component is only being used by GoogleLineGraphGroup and is not advised to be used directly unless you really need to provide raw data for the chart.
GoogleLineGraphGroup
Simple line graph based on Google charts. Component is able to create multiple series based on data grouped within built query.
example
namespace Crm\DemoModule\Presenters;

class DemoPresenter extends \Crm\AdminModule\Presenters\AdminPresenter
{
    // ...
    public function renderDefault()
    {
    }

    public function createComponentGoogleSubscriptionsEndGraph(GoogleLineGraphGroupControlFactoryInterface $factory)
    {
        $items = [];

        $graphDataItem = new GraphDataItem();
        $graphDataItem->setCriteria((new Criteria())
            ->setTableName('subscriptions')
            ->setTimeField('end_time')
            ->setValueField('count(*)')
            ->setStart($this->dateFrom)
            ->setEnd($this->dateTo));
        $graphDataItem->setName($this->translator->translate('dashboard.subscriptions.ending.now.title'));
        $items[] = $graphDataItem;

        $graphDataItem = new GraphDataItem();
        $graphDataItem->setCriteria((new Criteria())
            ->setTableName('subscriptions')
            ->setWhere('AND next_subscription_id IS NOT NULL')
            ->setTimeField('end_time')
            ->setValueField('count(*)')
            ->setStart($this->dateFrom)
            ->setEnd($this->dateTo));
        $graphDataItem->setName($this->translator->translate('dashboard.subscriptions.ending.withnext.title'));
        $items[] = $graphDataItem;

        $control = $factory->create()
            ->setGraphTitle($this->translator->translate('dashboard.subscriptions.ending.title'))
            ->setGraphHelp($this->translator->translate('dashboard.subscriptions.ending.tooltip'));

        foreach ($items as $graphDataItem) {
            $control->addGraphDataItem($graphDataItem);
        }
        return $control;
    }
    // ...
}
In your templates/Demo/default.latte template, use the component as needed:
<div class="row">
    <div class="col-md-12">
        {control googleSubscriptionsEndGraph}
    </div>
</div>
InlineBarGraph
Inline bar chart is meant to be used directly within grids or with other inline bar charts to provide quick information about the data.
example
Following is example of multiple inline bar charts that are displayed in the grid listing of available payment gateways.
namespace Crm\DemoModule\Presenters;

class DemoPresenter extends \Crm\AdminModule\Presenters\AdminPresenter
{
    /** @var \Crm\ApplicationModule\Graphs\GraphData\GraphData @inject */
    public $graphData;

    // ...
    public function renderDefault()
    {
    }

    public function createComponentSmallGraph()
    {
        return new Multiplier(function ($id) {
            $control = new InlineBarGraph;

            $graphDataItem = new GraphDataItem();
            $graphDataItem
                ->setCriteria(
                    (new Criteria())
                        ->setTableName('payments')
                        ->setWhere('AND payment_gateway_id = ' . $id)
                        ->setGroupBy('payment_gateway_id')
                        ->setStart('-3 months')
                );

            $this->graphData->clear();
            $this->graphData->addGraphDataItem($graphDataItem);
            $this->graphData->setScaleRange('day');

            $data = $this->graphData->getData();
            if (!empty($data)) {
                $data = array_pop($data);
            }

            $control->setGraphTitle($this->translator->translate('payments.admin.payment_gateways.small_graph.title'))
                ->addSerie($data);
            return $control;
        });
    }
    // ...
}
In your templates/Demo/default.latte template, use the component as needed:
<div class="row">
    {foreach $paymentGateways as $gateway}
    <div class="col-md-3">
        {control smallGraph-$gateway->id}
    </div>
    {/foreach}
</div>
SmallBarchart
SmallBarChart is targeted to be used within widgets across the CRM admin, but can be also used in user-facing frontend to provide simple countable information.
example
namespace Crm\DemoModule\Presenters;

class DemoPresenter extends \Crm\AdminModule\Presenters\AdminPresenter
{
    // ...
    public function renderDefault()
    {
    }

    public function createComponentPaidPaymentsSmallBarGraph(SmallBarGraphControlFactoryInterface $factory)
    {
        return $this->generateSmallBarGraphComponent(PaymentsRepository::STATUS_PAID, 'Paid', $factory);
    }

    private function generateSmallBarGraphComponent($status, $title, SmallBarGraphControlFactoryInterface $factory)
    {
        $data = $this->paymentsHistogramFactory->paymentsLastMonthDailyHistogram($status);

        $control = $factory->create();
        $control->setGraphTitle($title)->addSerie($data);

        return $control;
    }
    // ...
}
In your templates/Demo/default.latte template, use the component as needed:
<div class="row">
    <div class="col-md-3">
        {control paidPaymentsSmallBarGraph}
    </div>
</div>
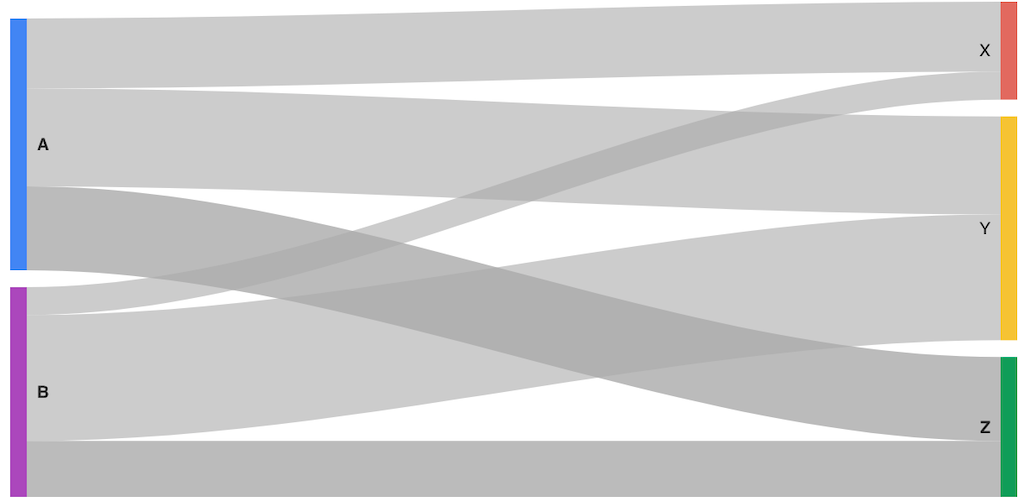
GoogleSankeyGraphGroup
A sankey graph is a component based on Google Sankey diagram. It's used to depict a flow from one set of values to another.
example
namespace Crm\DemoModule\Presenters;

class DemoPresenter extends \Crm\AdminModule\Presenters\AdminPresenter
{
    // ...
    public function renderDefault()
    {
    }

    public function createComponentGoogleSankeyGraph(GoogleSankeyGraphGroupControlFactoryInterface $factory)
    {
        $graph = $factory->create();
        $graph->setGraphHelp($this->translator->translate('Graph help');
        $graph->setGraphTitle($this->translator->translate('Graph title');
        $graph->setRows([
            ['A', 'X', 1],
            ['A', 'Y', 3],
            ['A', 'Z', 2],
            ['B', 'X', 4],
            ['B', 'Y', 2],
            ['B', 'Z', 2],
        ]);
        $graph->setColumnNames('From', 'To', 'Count');
        return $graph;
    }
    // ...
}
In your templates/Demo/default.latte template, use the component as needed:
<div class="row">
    <div class="col-md-12">
        {control googleSankeyGraph}
    </div>
</div>
VisualPaginator
Paginator is used to limit and offset your results displayed in lists all around the system. Paginator keeps the current page/limit and provides the information to your data-fetching blocks of code.
example
Following is a paginator usage for scenarios listing.
namespace Crm\DemoModule\Presenters;

class DemoPresenter extends \Crm\AdminModule\Presenters\AdminPresenter
{
    // ...
    public function renderDefault()
    {
        $scenarios = $this->scenariosRepository->all();

        $filteredCount = $this->template->filteredCount = $products->count('*');

        $vp = new VisualPaginator();
        $this->addComponent($vp, 'scenarios_vp');
        $paginator = $vp->getPaginator();
        $paginator->setItemCount($filteredCount);
        $paginator->setItemsPerPage(50);

        $this->template->vp = $vp;
        $this->template->scenarios = $scenarios->limit($paginator->getLength(), $paginator->getOffset());
    }
    // ...
}
In your templates/Demo/default.latte template, use the component as needed (usually below or above the listing). Name of the control should be the same as you used within ->addComponent 2nd argument.
{control scenarios_vp}
Widgets
Following is a set of widget wrappers provided by ApplicationModule to be used by your widgets. Application provides three set of wrappers:
SimpleWidget
Simple widget is the component allowing simple extension of modules's view by other modules. Module can provide placeholder for widgets in the action's template (in .latte file) and other module can register their implementations of widget in their Module class.
You can read more about creating and registering widgets in CRM skeleton documentation available at github.com/remp2020/crm-skeleton.
SingleStatWidget
Widget provides wrapper for simple table with single statistic - each provided by separate widget implementation. The primary scenario for this use are dashboards.
AuditLogHistoryWidget
This widget provides ability to show changes from audit log in formatted way as component in any entity administration.
To use this widget you need 2 things:
- register this widget in your module:
$widgetManager->registerWidget(
    'admin.payments.show.left',
    AuditLogHistoryWidget::class,
);
- create and register data provider which initializes and returns array of customized AuditLogHistoryDataProviderItem instances:
class PaymentAuditLogHistoryDataProvider implements AuditLogHistoryDataProviderInterface
{
    ...
    public function provide(string $tableName, string $signature): array
    {
        // provide data only if its for your table
        if ($tableName !== 'payments') {
            return [];
        }

        // fetch audit log history items
        $paymentHistory = $this->auditLogRepository->getByTableAndSignature($tableName, $signature)
            ->order('created_at DESC, id DESC')
            ->fetchAll();

        $results = [];
        foreach ($paymentHistory as $item) {
            $auditLogHistoryDataProviderItem = new AuditLogHistoryDataProviderItem(
                $item->created_at,
                $item->operation,
                $item->user,
            );

            // set color of change indicator in widget (timeline)
            $auditLogHistoryDataProviderItem->setChangeIndicator(AuditLogHistoryItemChangeIndicatorEnum::Warning)

            // set customized change message
            $auditLogHistoryDataProviderItem->addMessage(
                'your_module.translation.key',
                [
                    'translation_param_1' => 'Test 1',
                    'translation_param_2' => 'Test 2',
                ]
            );
        }

        return $results;
    }
    ...
}
Database tables migration
Because of need of changing primary keys (int -> bigint), in tables that contain lots of data (or have risk of overflowing primary key if its int), we had to create migration process. Since some tables are very exposed and cannot be locked for more than a couple of seconds, we decided to create new tables, migrate the data manually and keep the old and new table in sync while migrating.
This migration process is necessary only for installations after specific version for specific table, and is two steps process.
Audit logs migration (installed before 2.5.0)
Consists of audit_logs table migration.
Steps:
- Run phinx migrations command
phinx:migrate, which creates new tableaudit_logs_v2(in case there is no data in table, migration just changes type of primary key and next steps are not needed). - Run command
application:convert_audit_logs_to_bigint, which copies data from old table to new (e.g.audit_logstoaudit_logs_v2). Command will after successful migration atomically rename tables (e.g.audit_logs->audit_logs_oldandaudit_logs_v2->audit_logs), so when the migration ends only new tables are used.
It's recommended to run application:bigint_migration_cleanup audit_logs command, at least 2 weeks (to preserve backup data, if some issue emerges) after successful migration to drop left-over tables.


