statikbe / laravel-filament-flexible-content-blocks
The Laravel Filament Flexible Content Blocks package helps you to easily create content in Filament for any model, with predefined or custom blocks, and foreach block an extendable Blade view component.
Maintainers
Package info
github.com/statikbe/laravel-filament-flexible-content-blocks
pkg:composer/statikbe/laravel-filament-flexible-content-blocks
Requires
- php: ^8.3
- dereuromark/media-embed: ^0.6
- filament/filament: ^4.0|^5.0
- filament/spatie-laravel-media-library-plugin: ^4.0|^5.0
- illuminate/contracts: ^11.28|^12.0|^13.0
- lara-zeus/spatie-translatable: ^1.0|^2.0
- openai-php/laravel: ^0.19
- spatie/laravel-medialibrary: ^11.0
- spatie/laravel-package-tools: ^1.13
- spatie/laravel-sluggable: ^3.4
- spatie/laravel-translatable: ^6.3
Requires (Dev)
- filament/upgrade: ^4.0|^5.0
- larastan/larastan: ^2.0|^3.0
- laravel/pint: ^1.0
- nunomaduro/collision: ^8.4
- orchestra/testbench: ^9.0|^10.0|^11.0
- pestphp/pest: ^4.4
- pestphp/pest-plugin-laravel: ^4.1
- phpstan/extension-installer: ^1.1
- phpstan/phpstan-deprecation-rules: ^1.0|^2.0
- phpstan/phpstan-phpunit: ^1.0|^2.0
- phpunit/phpunit: ^12.0
This package is auto-updated.
Last update: 2026-07-22 13:46:34 UTC
README

Laravel Filament Flexible Content Blocks
The Laravel Filament Flexible Content Blocks package helps you to easily create content in Filament for any model, with predefined blocks, and for each block an extendable Blade view component.
You can use this opinionated package to create a basic CMS, by setting up your own page model and implementing the predefined traits to select the functionality you need, then quickly setup a Filament resource by implementing the ready-made fields. Or you can add flexible content to a model for your specific business case, for instance to allow the flexible creation of a product description. Each project is different and to foster changing requirements, the focus is on the building blocks and not a default implementation for a CMS-like page.
The key goals of this package are:
- provide a quick way to add content to a model through reusable fields and content blocks
- quickly set up the frontend and allow different frontend stylings for each block
- have fully-working, extendable Blade view components with basic Tailwind styling
- allow the liberty to pick and choose which fields and blocks you need for your requirements
- provide easy configuration to override the behaviour of the fields, blocks and image conversions
- support SEO
- support overview fields to display the content in a list with custom title, image and description
- support content translations
- provide a start set of content blocks for most general requirements
✨ New features:
- Improved styling of the blocks in Filament to improve UX when editing many blocks.
- Replicate action to copy the model with content blocks and its images.
- Content block previews! You can now show a preview of what the block looks like on the actual page, styled with the correct stylesheet. See the preview block configuration.
- 🎨 Simple asset manager, see Filament Flexible Blocks Asset Manager
NOTE: 🚀 For a complete, out-of-the-box, content management solution, check out our new Filament Flexible Content Block Pages package with page management, a menu builder, tag management and many SEO features.
Versions & compatibility
| Filament Version | Package Version | Development Branch |
|---|---|---|
| v3 | statikbe/laravel-filament-flexible-content-blocks:^3.0 |
v3 |
| v4 & v5 | statikbe/laravel-filament-flexible-content-blocks:^4.0 |
main |
Upgrades
Upgrade to v2
The image conversions in the configuration file have changed due to a refactor of spatie-medialibrary v11. Check the upgrade guide for details.
Upgrade to v1
If you need to upgrade to v1.0.0 it is IMPORTANT to read the upgrade guide thoroughly, because the data model of the content blocks has changed and needs to be upgraded via a command.
Installation
You can install the package via composer:
composer require statikbe/laravel-filament-flexible-content-blocks
You will most likely need to edit the extensive configuration, so you can publish the config file with:
php artisan vendor:publish --tag="filament-flexible-content-blocks-config"
Optionally, you can publish the views (e.g. if you want to tweak the content blocks) using:
php artisan vendor:publish --tag="filament-flexible-content-blocks-views"
Since you can apply the flexible content blocks to any view, we do not provide required or default migrations. However, we provide two example migrations, one for a translatable page and one for a single-language page. You can use these migrations as an example to create your own migrations. (see ToDo's) You can publish and run the migrations with:
php artisan vendor:publish --tag="filament-flexible-content-blocks-migrations"
#first edit the migrations and then run:
php artisan migrate
Optional installation steps
When you want to use the BackgroundVideo component, you have to make sure that the javascript files, which are used by the component, are available in your project. To do this, you have to publish the compiled javascript assets by using:
php artisan vendor:publish --tag="filament-flexible-content-blocks-assets"
To automate the above, so that these assets will be re-published each time you perform a composer update, you
can add the following publish command within the scripts.post-update-cmd array of your composer.json:
{
    "scripts": {
        "post-update-cmd": [
            "@php artisan vendor:publish --tag=filament-flexible-content-blocks-assets --force"
        ]
    }
}
Dependencies
This is an opinionated package with batteries included. So we picked a set of dependencies to build upon. Here is a brief overview of the choices made:
filament/filament: obviously ;-)spatie/laravel-medialibrary&filament/spatie-laravel-media-library-plugin: all image handling is done withspatie/medialibraryspatie/laravel-sluggable: for slugsspatie/laravel-translatable: for translations as this works together with the first party filament translatable package.dereuromark/media-embed: to support video embeds of various media services.openai-php/laravel: to generate content and add other smart features ;-).
Usage
If you are looking for a CMS-like page builder that makes use of this content blocks package, check out our Filament Flexible Content Block Pages. If you want to apply it to a different context, there is an example project of all the package features, which includes:
- migrations
- data models for default & translatable pages
- Filament resources & pages
- Http controllers
- views
- a data seeder to generate test pages
You can use this as a starting point to see how the package can be used for a CMS pages. Below we briefly discuss how to setup a migration, a model and a Filament resource in four steps. In the future, we want to add question-based commands to create these, see roadmap.
1. Setup migrations
You can start from the example migrations that can be published. Then prune and pick the fields that fit
your requirements, note that some model traits need a combination of fields, e.g. the hero image needs both hero_image_copyright and
hero_image_title. The clusters are commented in the migration or have a look in the model traits to get an idea.
2. Setup the model
If you do not have a model yet, create one with php artisan make:model, then you can add the interfaces and its default
implementation via traits. Below is an overview of the provided interfaces and traits and their functionality:
HasPageAttributes:
This adds a title and publishing begin and end date variables, together with functions and scopes to help with finding published models. Implement this interface with the trait HasPageAttributesTrait or HasTranslatedPageAttributesTrait for translated content.
HasIntroAttribute:
This adds an introduction text variable. Implement this interface with the trait HasIntroAttributeTrait or HasTranslatedIntroAttributeTrait.
HasCode:
Adds a code variable to be able to select a specific content model in your source code by string instead of a varying id or slug. For instance, this is useful to look up a home page. Implement this with the trait HasCodeTrait.
HasHeroImageAttributes:
Adds a hero image as well as a title (e.g. for accessibility in alt tags) and copyright variable to the model. This can
be implemented with HasHeroImageAttributesTrait and
HasTranslatedHeroImageAttributesTrait.
HasHeroVideoUrlAttribute:
Adds a hero video URL that can be used to create a hero with a video playing in the background. This can be implemented with HasHeroVideoAttributeTrait and HasTranslatedHeroVideoUrlAttributeTrait.
HasContentBlocks:
Adds a JSON column to your model to store the data of the flexible content blocks. This is required if you want to use the flexible content blocks. Implement it with HasContentBlocksTrait or HasTranslatedContentBlocksTrait.
HasMediaAttributes:
This provides some helper functions for handling media. You do not need to add traits, since the trait will be included by other traits that handle images.
HasTranslatableMedia:
If you want to support translatable media (e.g. a different image for each locale), include this interface. The implementation is done by the trait HasTranslatedAttributesTrait.php. The traits that implement translatable images, will make use of this implementation to keep track of the media that needs translation.
HasOverviewAttributes:
Overview fields can be used to display the content models as brief snippets in lists, for instance a list of news articles. Implement this with HasOverviewAttributesTrait or HasTranslatedOverviewAttributesTrait.
HasSEOAttributes:
This adds a new title, description, image and keywords for SEO. It provides fallbacks to the regular title, intro and hero image if no SEO fields are completed. Implement the HasSEOAttributesTrait or the HasTranslatedSEOAttributesTrait for translatable content.
Linkable:
Add this interface if you want to use the model to link in call-to-actions to create dynamic URL's, or if you want to use the view action in the Filament table. The interface asks you to implement two functions one to get the url where the content can be publicly viewed and another to view the unpublished content. There is no default implementation trait, because this package is unaware of the used routes and controllers.
Slugs:
For slug support you can include the HasSlugAttributeTrait or the HasTranslatedSlugAttributeTrait for translatable slugs. If you use translatable slugs, please change the page routing the Filament Resource.
Parent-child content aka subpages:
To support hierarchical content you can include the HasParent interface and the implementation is done by HasParentTrait.
If you want to implement a nested URL structure, check this documentation.
3. Setup the Filament resource
Create a filament resource and its page with the filament command.
If your model is translatable, add the FlexibleContentBlocksTranslatable
trait, to use the locales configured by this package.
Setup the table
There are few column fields provided by the package and a filter to select published/unpublished models. Below is an overview of all available columns in a code sample:
public static function table(Table $table): Table {
    return $table->columns([
            TitleColumn::create(),
            PublishedColumn::create(),
        ])
        ->filters([
            PublishedFilter::create(),
        ])
        ->actions([
            Tables\Actions\EditAction::make(),
            PublishAction::make(),
            ReplicateAction::make(),
        ])
        ->bulkActions([
            Tables\Actions\DeleteBulkAction::make(),
        ]);
}
(optional) Adding a ViewAction to your table
If your model uses the Linkable interface, you can also use the
provided ViewAction in your table.
This action will simply open the url returned by the getViewUrl() method on your model.
use Statikbe\FilamentFlexibleContentBlocks\Filament\Table\Actions\ViewAction;

->actions([
    Tables\Actions\EditAction::make(),
    PublishAction::make(),
    ViewAction::make(), // <-- Add this
])
(optional) Adding a ReplicateAction to your table
If you want to be able to replicate the model record, you can add the ReplicateAction.
This action will copy all data attributes and also copy all media/images of the record.
use Statikbe\FilamentFlexibleContentBlocks\Filament\Table\Actions\ViewAction;

->actions([
    Tables\Actions\EditAction::make(),
    PublishAction::make(),
    ReplicateAction::make(), // <-- Add this
])
Setup the form
And then you can implement the form() function with Filament fields provided by the package. Below is an example with tabs.
Note that we sometimes make use of create() static functions, because we want to set the
names to the fixed variables used in the models. Some fields in the example are bundled in groupings
(e.g. SEOFields), you can also use the single fields if you
want make a custom layout.
public static function form(Form $form): Form {
    return $form
        ->schema([
            Tabs::make('Heading')
                ->columnSpan(2)
                ->tabs([
                    Tab::make('General')
                        ->schema([
                            TitleField::create(true),
                            SlugField::create(),
                            PublicationSection::create(),
                            AuthorField::create(),
                            HeroImageSection::create(),
                            IntroField::create(),
                            ParentField::create(),
                        ]),
                    Tab::make('Content')
                        ->schema([
                            ContentBlocksField::create(),
                        ]),
                    Tab::make('Overview')
                        ->schema([
                            OverviewFields::make(1),
                        ]),
                    Tab::make('SEO')
                        ->schema([
                            SEOFields::make(1),
                        ]),
                ]),
        ]);
}
If you have translatable content, you need to include the traits and language switch field of the filament/spatie-laravel-translatable-plugin to
the resource
and its pages.
Important: On the edit page, you need to use the EditRecord\Concerns\TranslatableWithMedia trait if you use translatable images.
And on the create page use CreateRecord\Concerns\TranslatableWithMedia.
Note on translated slugs
If you are using translated slugs on your model, it is possible that you create a new model instance without a translated slug.
When you then switch to the language without a translated slug, Filament uses the slug as the route binding key as
defined in the model class. This will result in an error since the slug translation does not yet exist. To solve this it is
easiest to use the ID as route binding key in Filament instead of the slug. You can do this by changing the page urls in
the Filament resource class, so that they do not try to resolve the object with /{record}/edit, but use the ID attribute
/{record:id}/edit. Then set the $recordRouteKeyName of the Filament resource to id.
protected static ?string $recordRouteKeyName = 'id';

public static function getPages(): array
{
    //note: replace the page classes!
    return [
        'index' => Pages\ListArticles::route('/'),
        'create' => Pages\CreateArticle::route('/create'),
        'edit' => Pages\EditArticle::route('/{record:id}/edit'),
    ];
}
4. Setup the controller and Blade view
Now you need to create a controller and GET route that returns a Blade view to display your content. See the example code for controller examples.
We provide Blade components for all fields (except SEO fields). Below is an example of a simple Blade template,
where the model is passed to this view as $page variable. The <x-flexible-hero> component renders a default hero with
title and full screen image, and the <x-flexible-content-blocks> component renders all the content of each block.
Note: The x-flexible-hero component requires Alpine.js.
<x-layouts.flexible title="{{ $page->getTitle() }}" wide="true">
    <x-flexible-hero :page="$page" />
    <div>
        <x-flexible-content-blocks :page="$page">
        </x-flexible-content-blocks>
    </div>
</x-layouts.flexible>
If you want to customise these component views, you can publish the views.
You can use the SEO library of your preference to render the SEO tags on the page, e.g. with artesaos/seotools.
5. Configure tailwind
Do the step below to ensure that tailwind will pick up the css classes used by the flexible content blocks components.
- In the tailwind CSS file (probably in
resources/css/filament/admin/theme.css) of your filament back-end, add the following line:
@source '../../../../resources/views/filament';
- Likewise, in the CSS of your front-end, add the following lines:
@source "../../vendor/statikbe/laravel-filament-flexible-content-blocks/**/*.blade.php";
@source "../../config/filament-flexible-content-blocks.php";
AI features
We are dreaming up some exciting new AI-based features to ease content creation and translation. The first has arrived:
SEO fields generation
There is a form action SEOAIAction that generates an SEO title, description and tags based on the model's content.
To enable this, you should complete the configuration of the OpenAI library. Do not forget to run the install command:
php artisan openai:install
Create an OpenAI API key and set this up in the .env file of your project:
OPENAI_API_KEY=sk-...
OPENAI_ORGANIZATION=org-...
You will find the SEO AI action already set up in the SEOFields group.
Blocks
To build your content, the package provides the default blocks listed below.
Text with image block
Additionally to the text block, you can add an image with its title and copyright. The image can be positioned left or right of the text and an image conversion and background colour of the block can be set. One can also add a call-to-action button with configured button styles. You can link to URL's, but also dynamically to other models or routes.
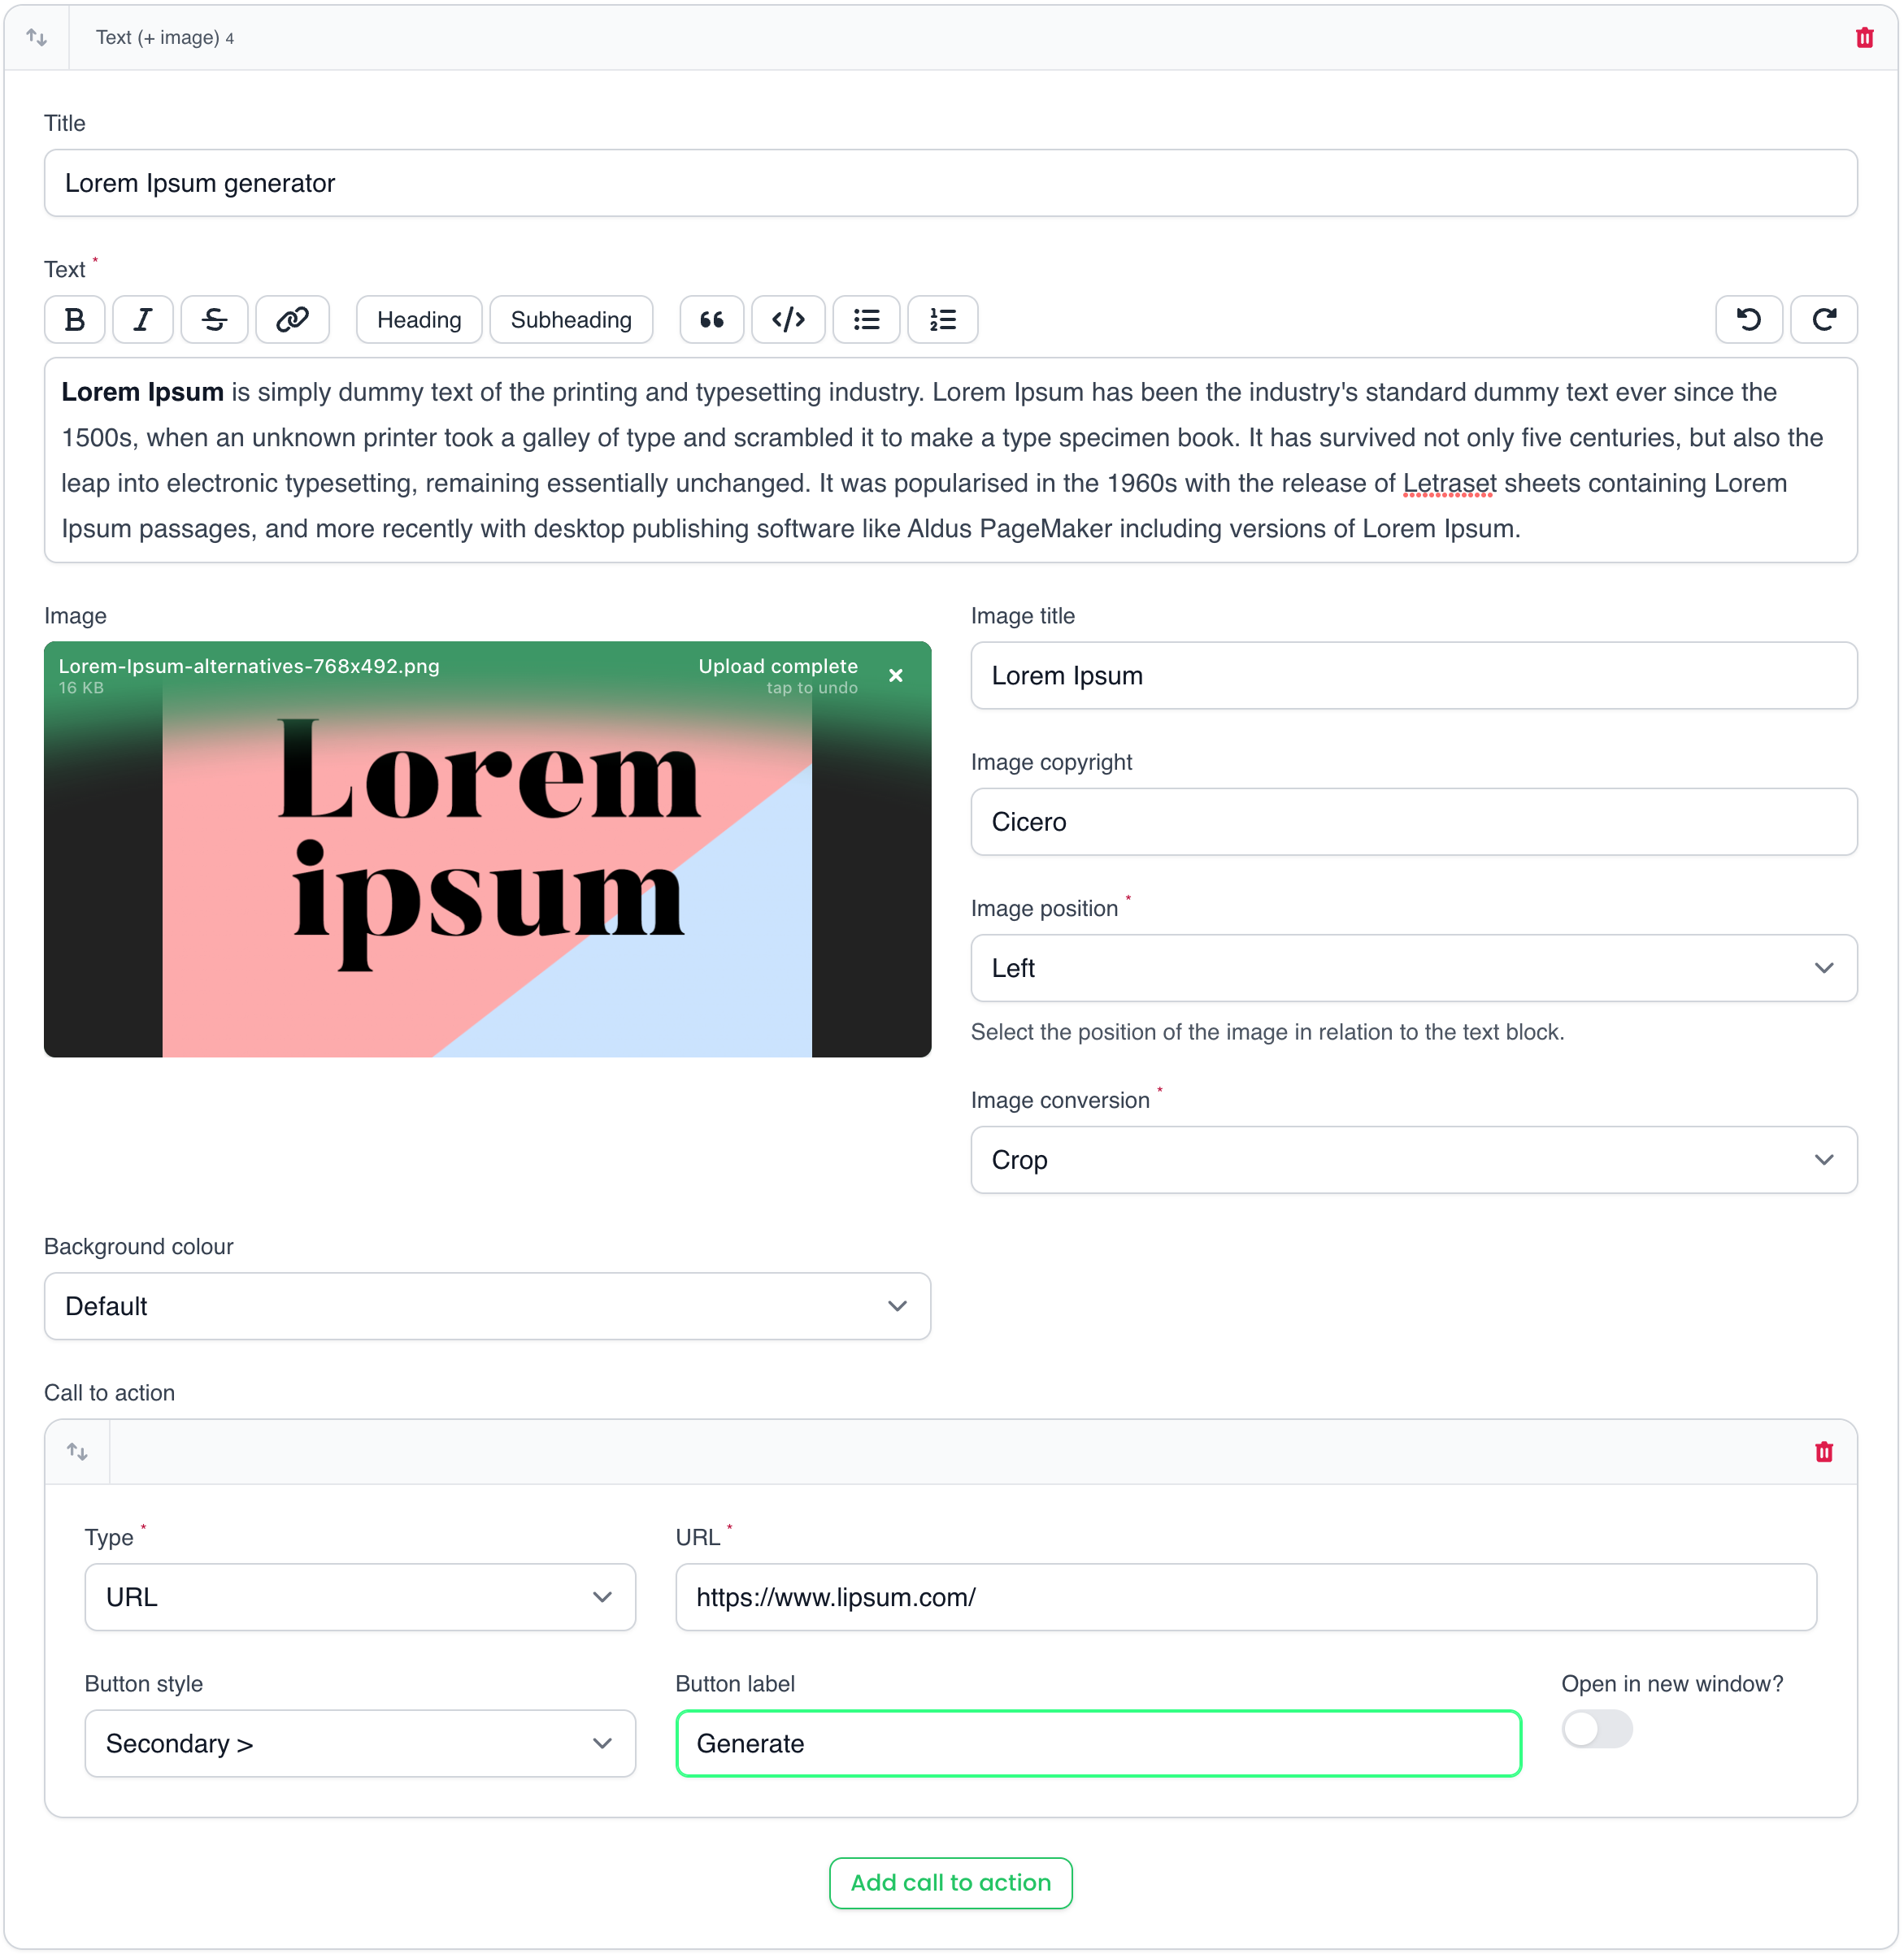
Image block
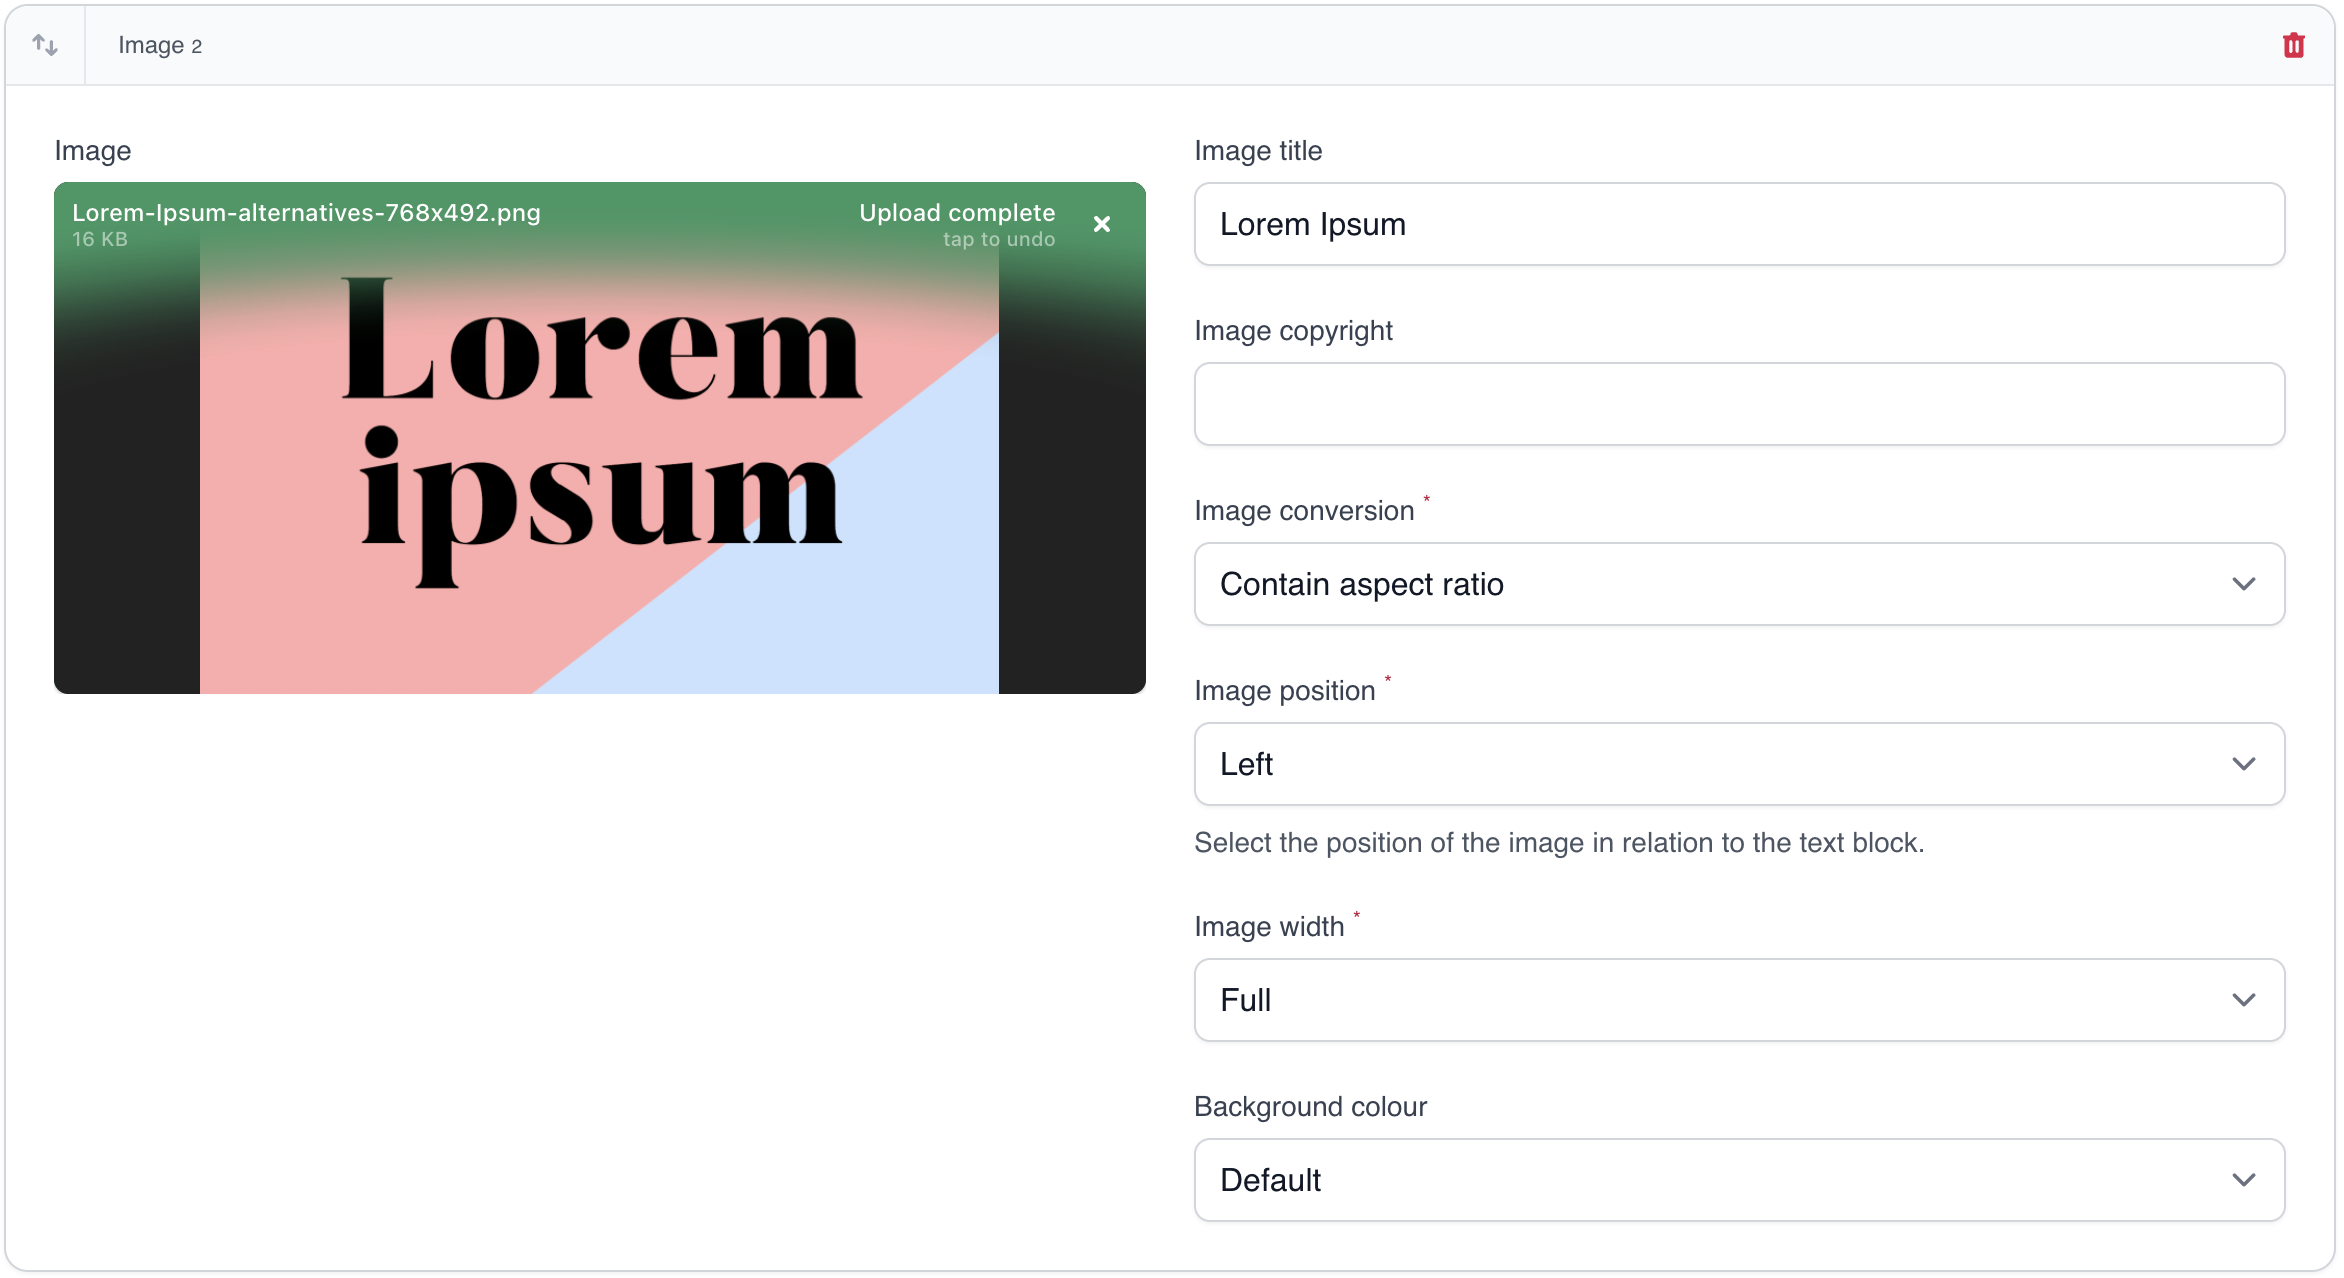
This displays an image with copyright message and you can set image conversions, the position and the width the image should use on the page.
Video block
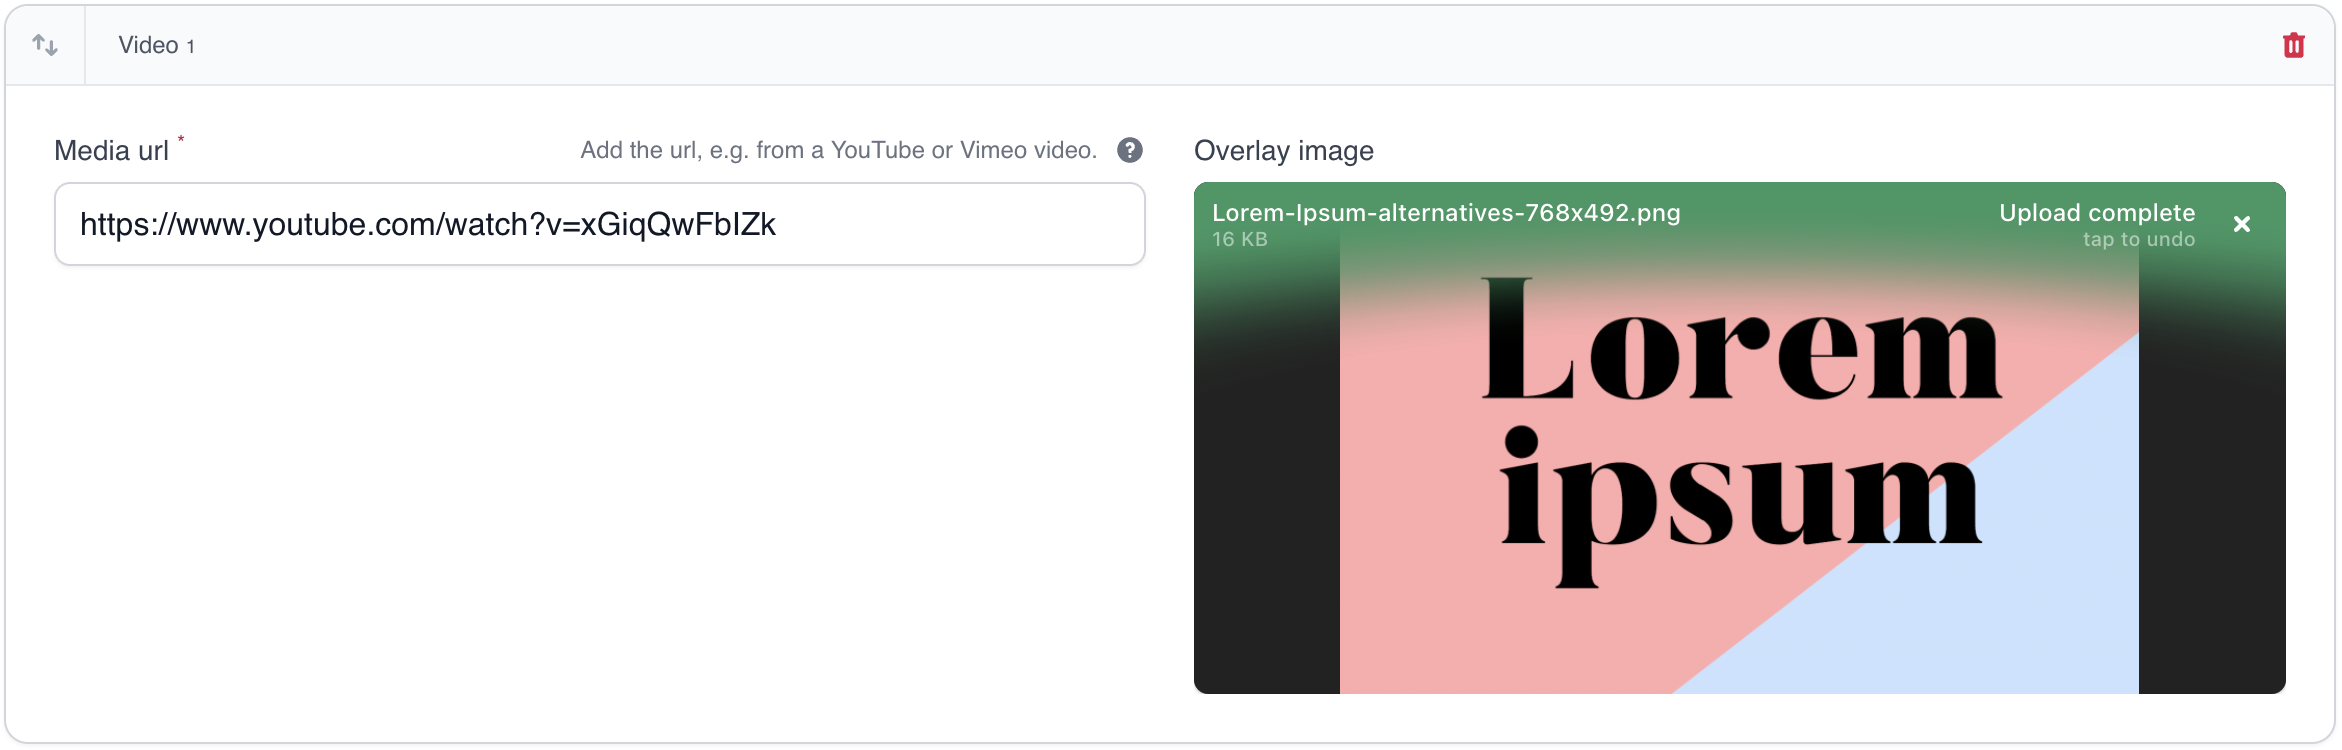
You can embed videos from numerous media services and set an overlay image that will cause the video embed to be lazy loaded after clicking the image.
Quote block
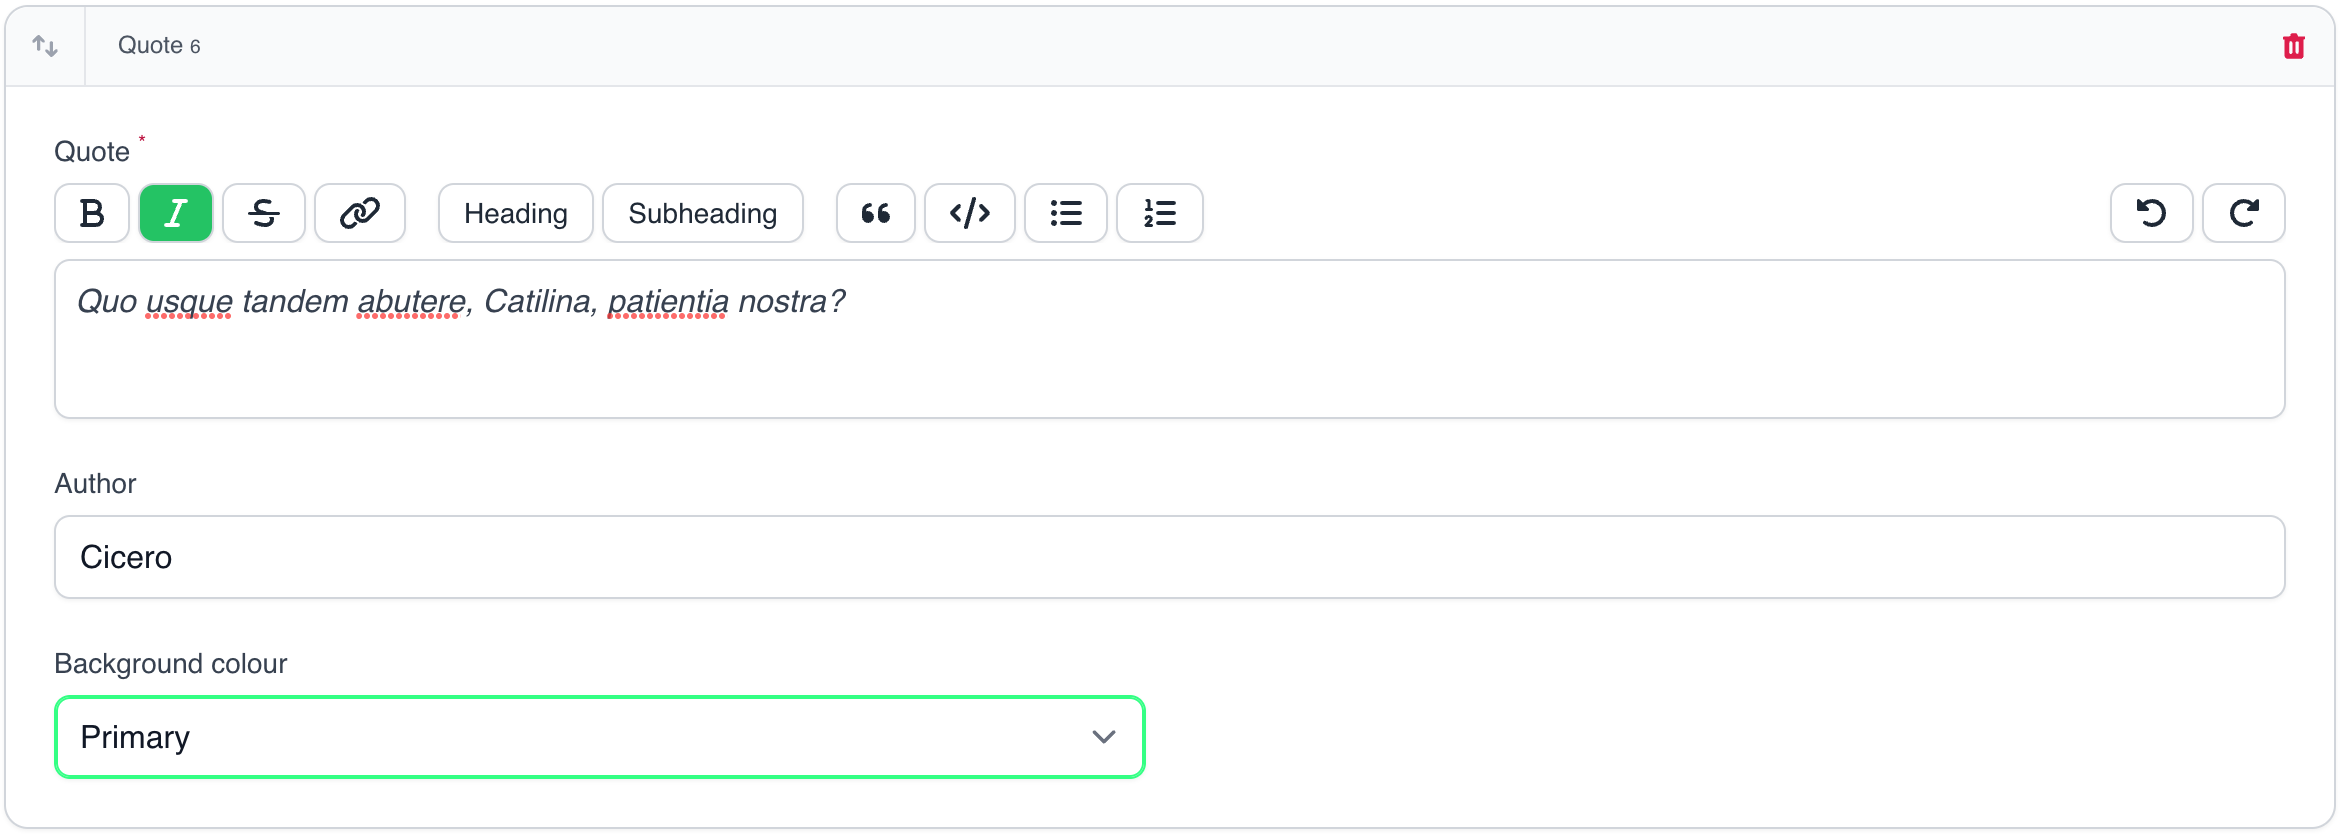
A block to show a quote and it's author.
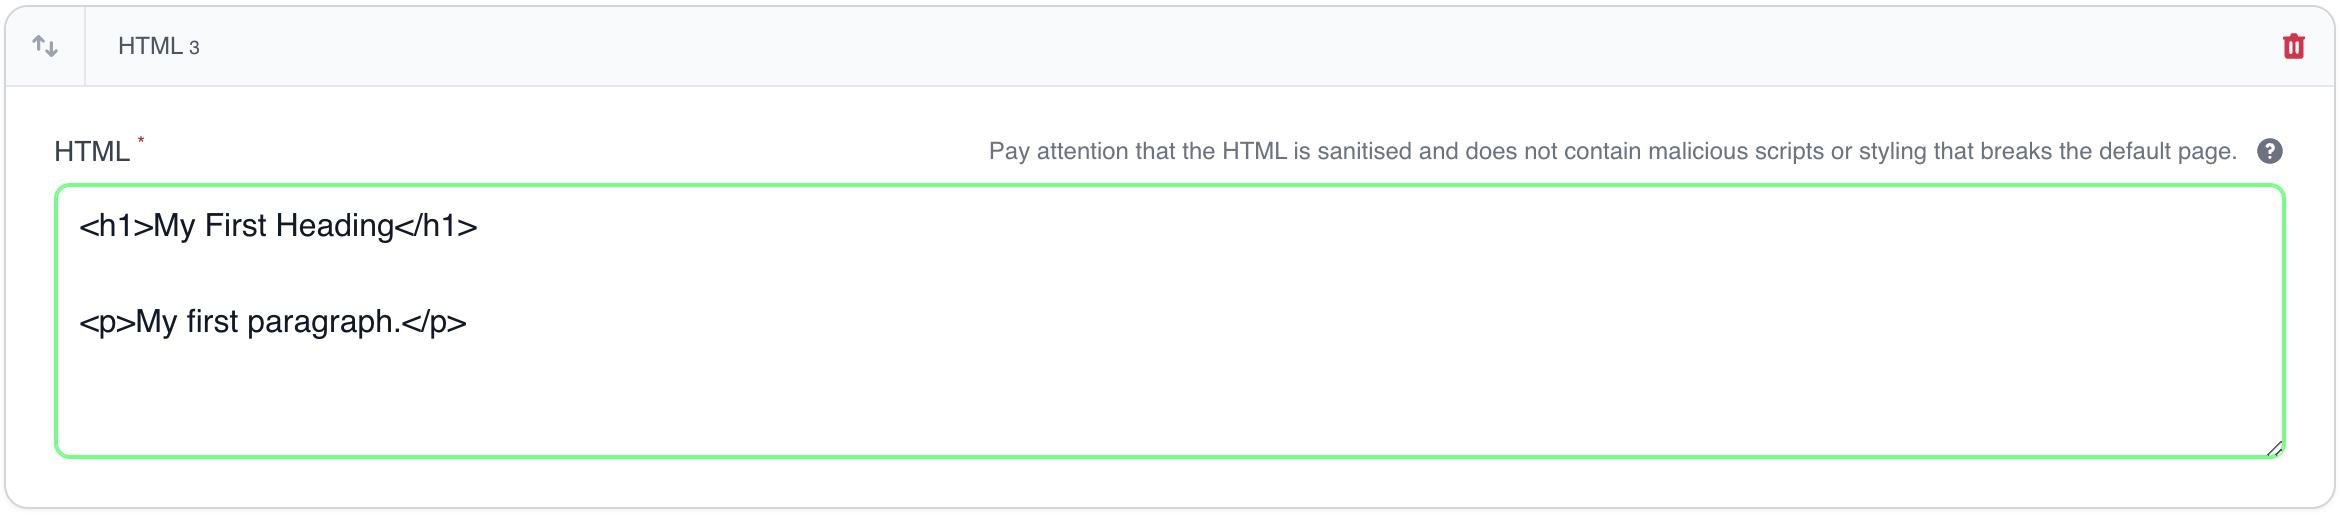
HTML block
A block to insert custom HTML.
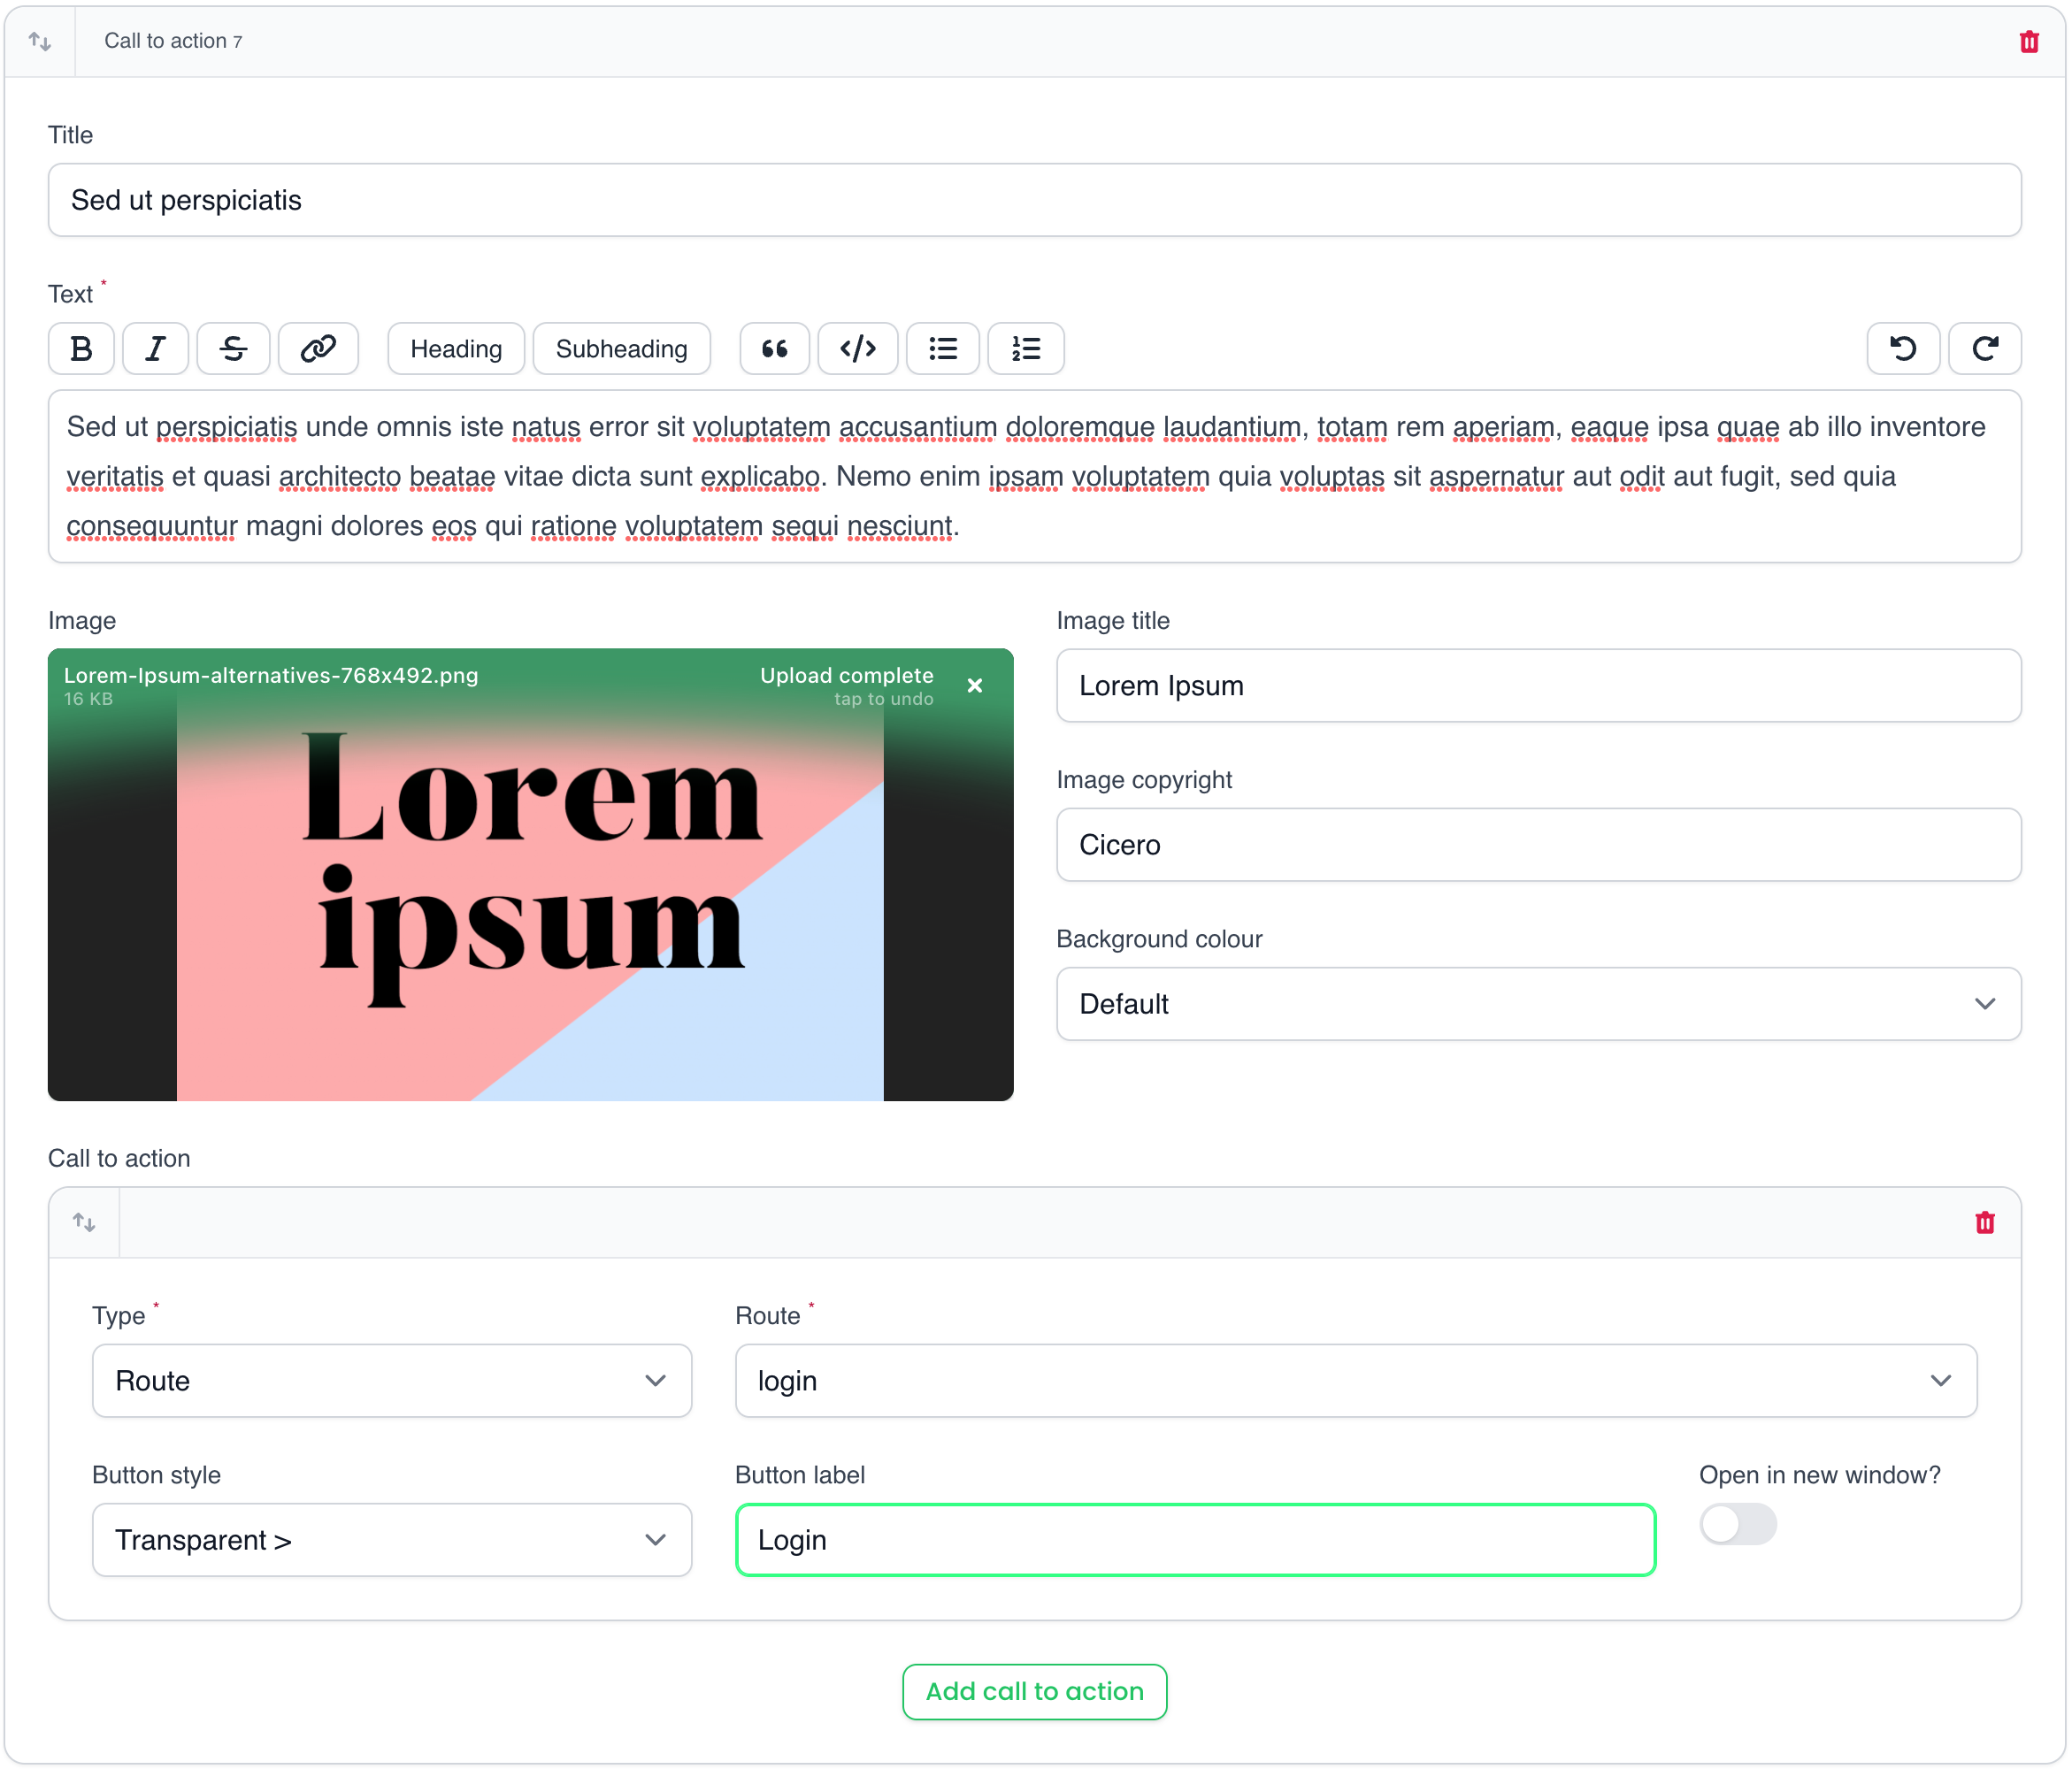
Call-to-action block
This block focuses on adding call-to-actions with image and text.
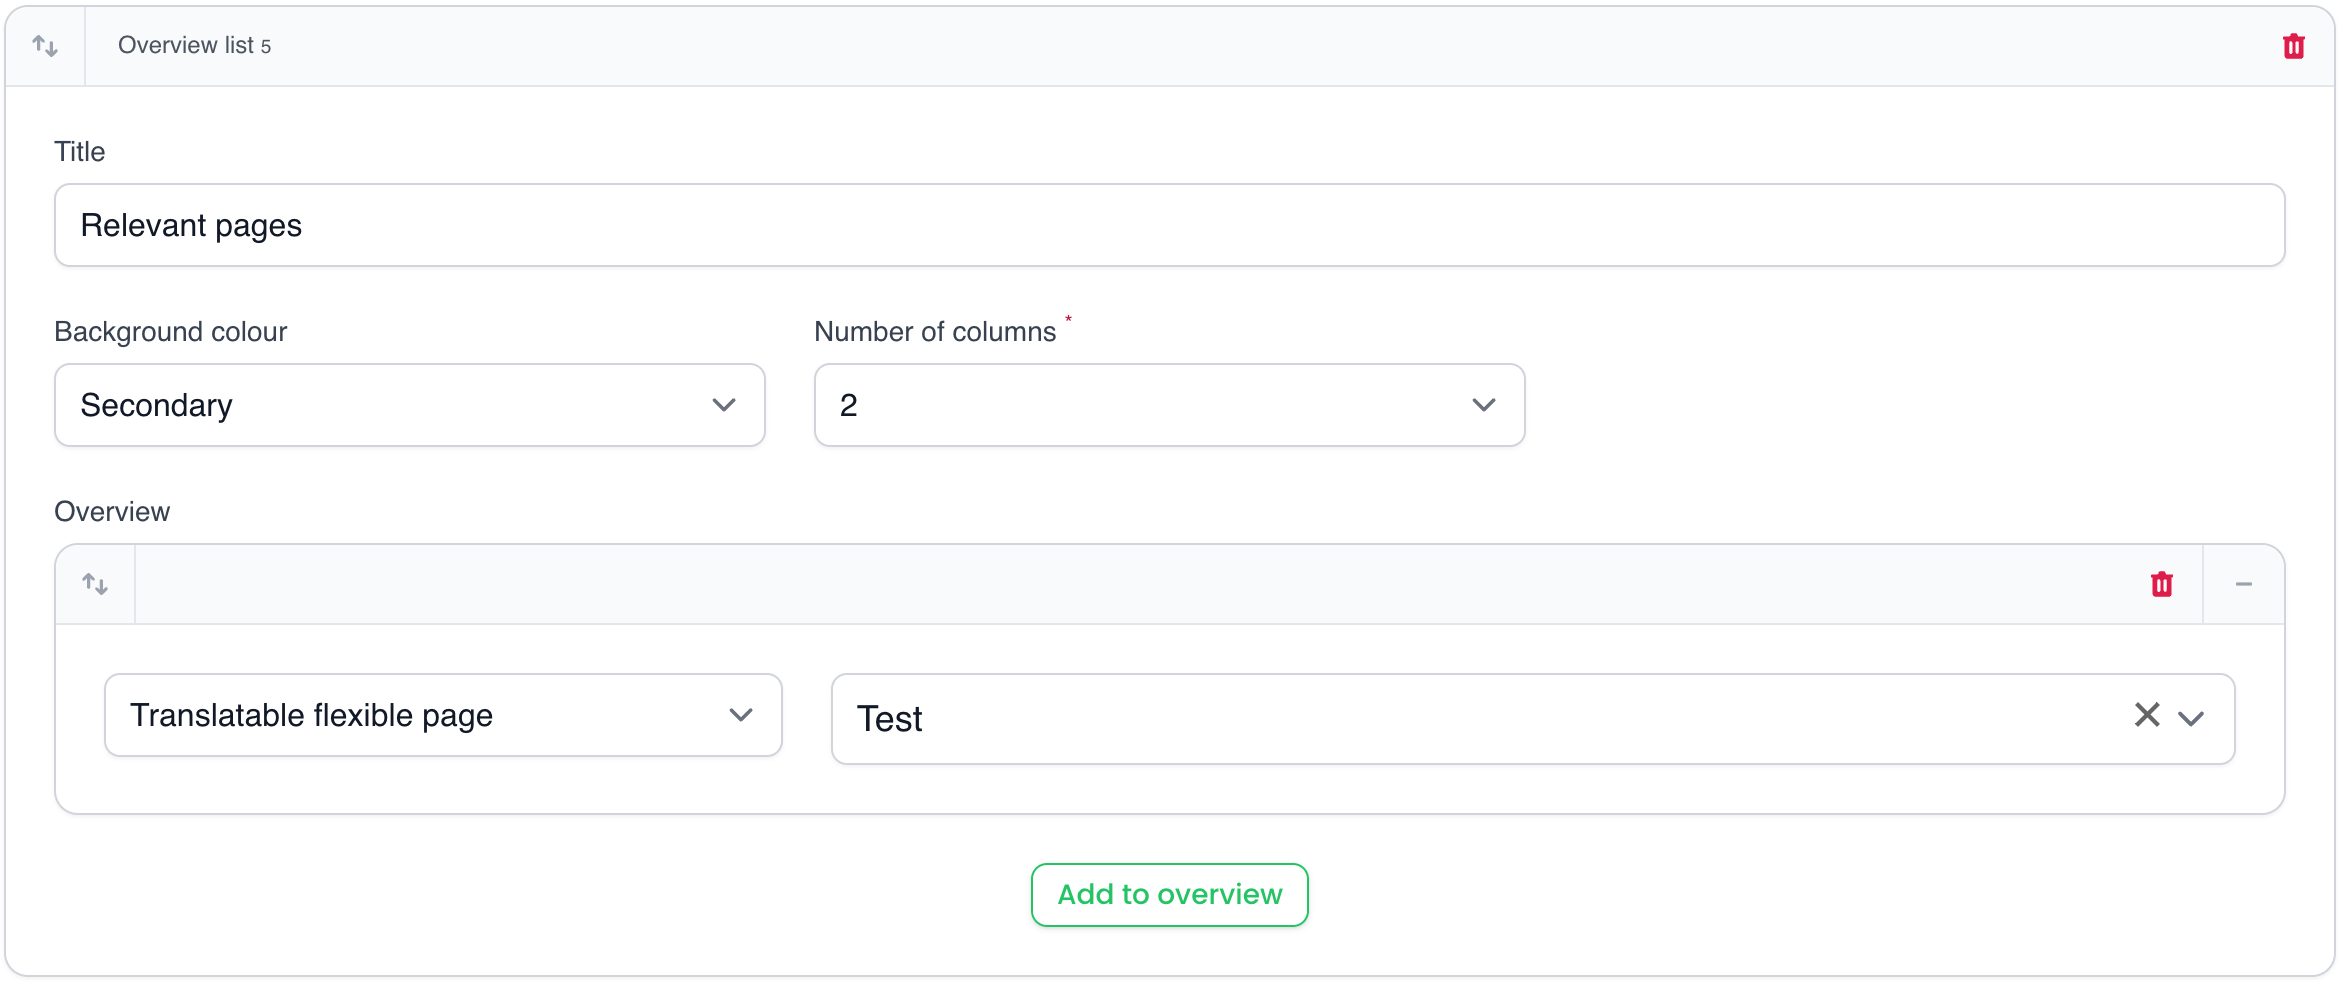
Overview block
This block can be used to display the overview fields and image of other model records, e.g. for displaying related blog posts. One can configure the grid columns and background colour.
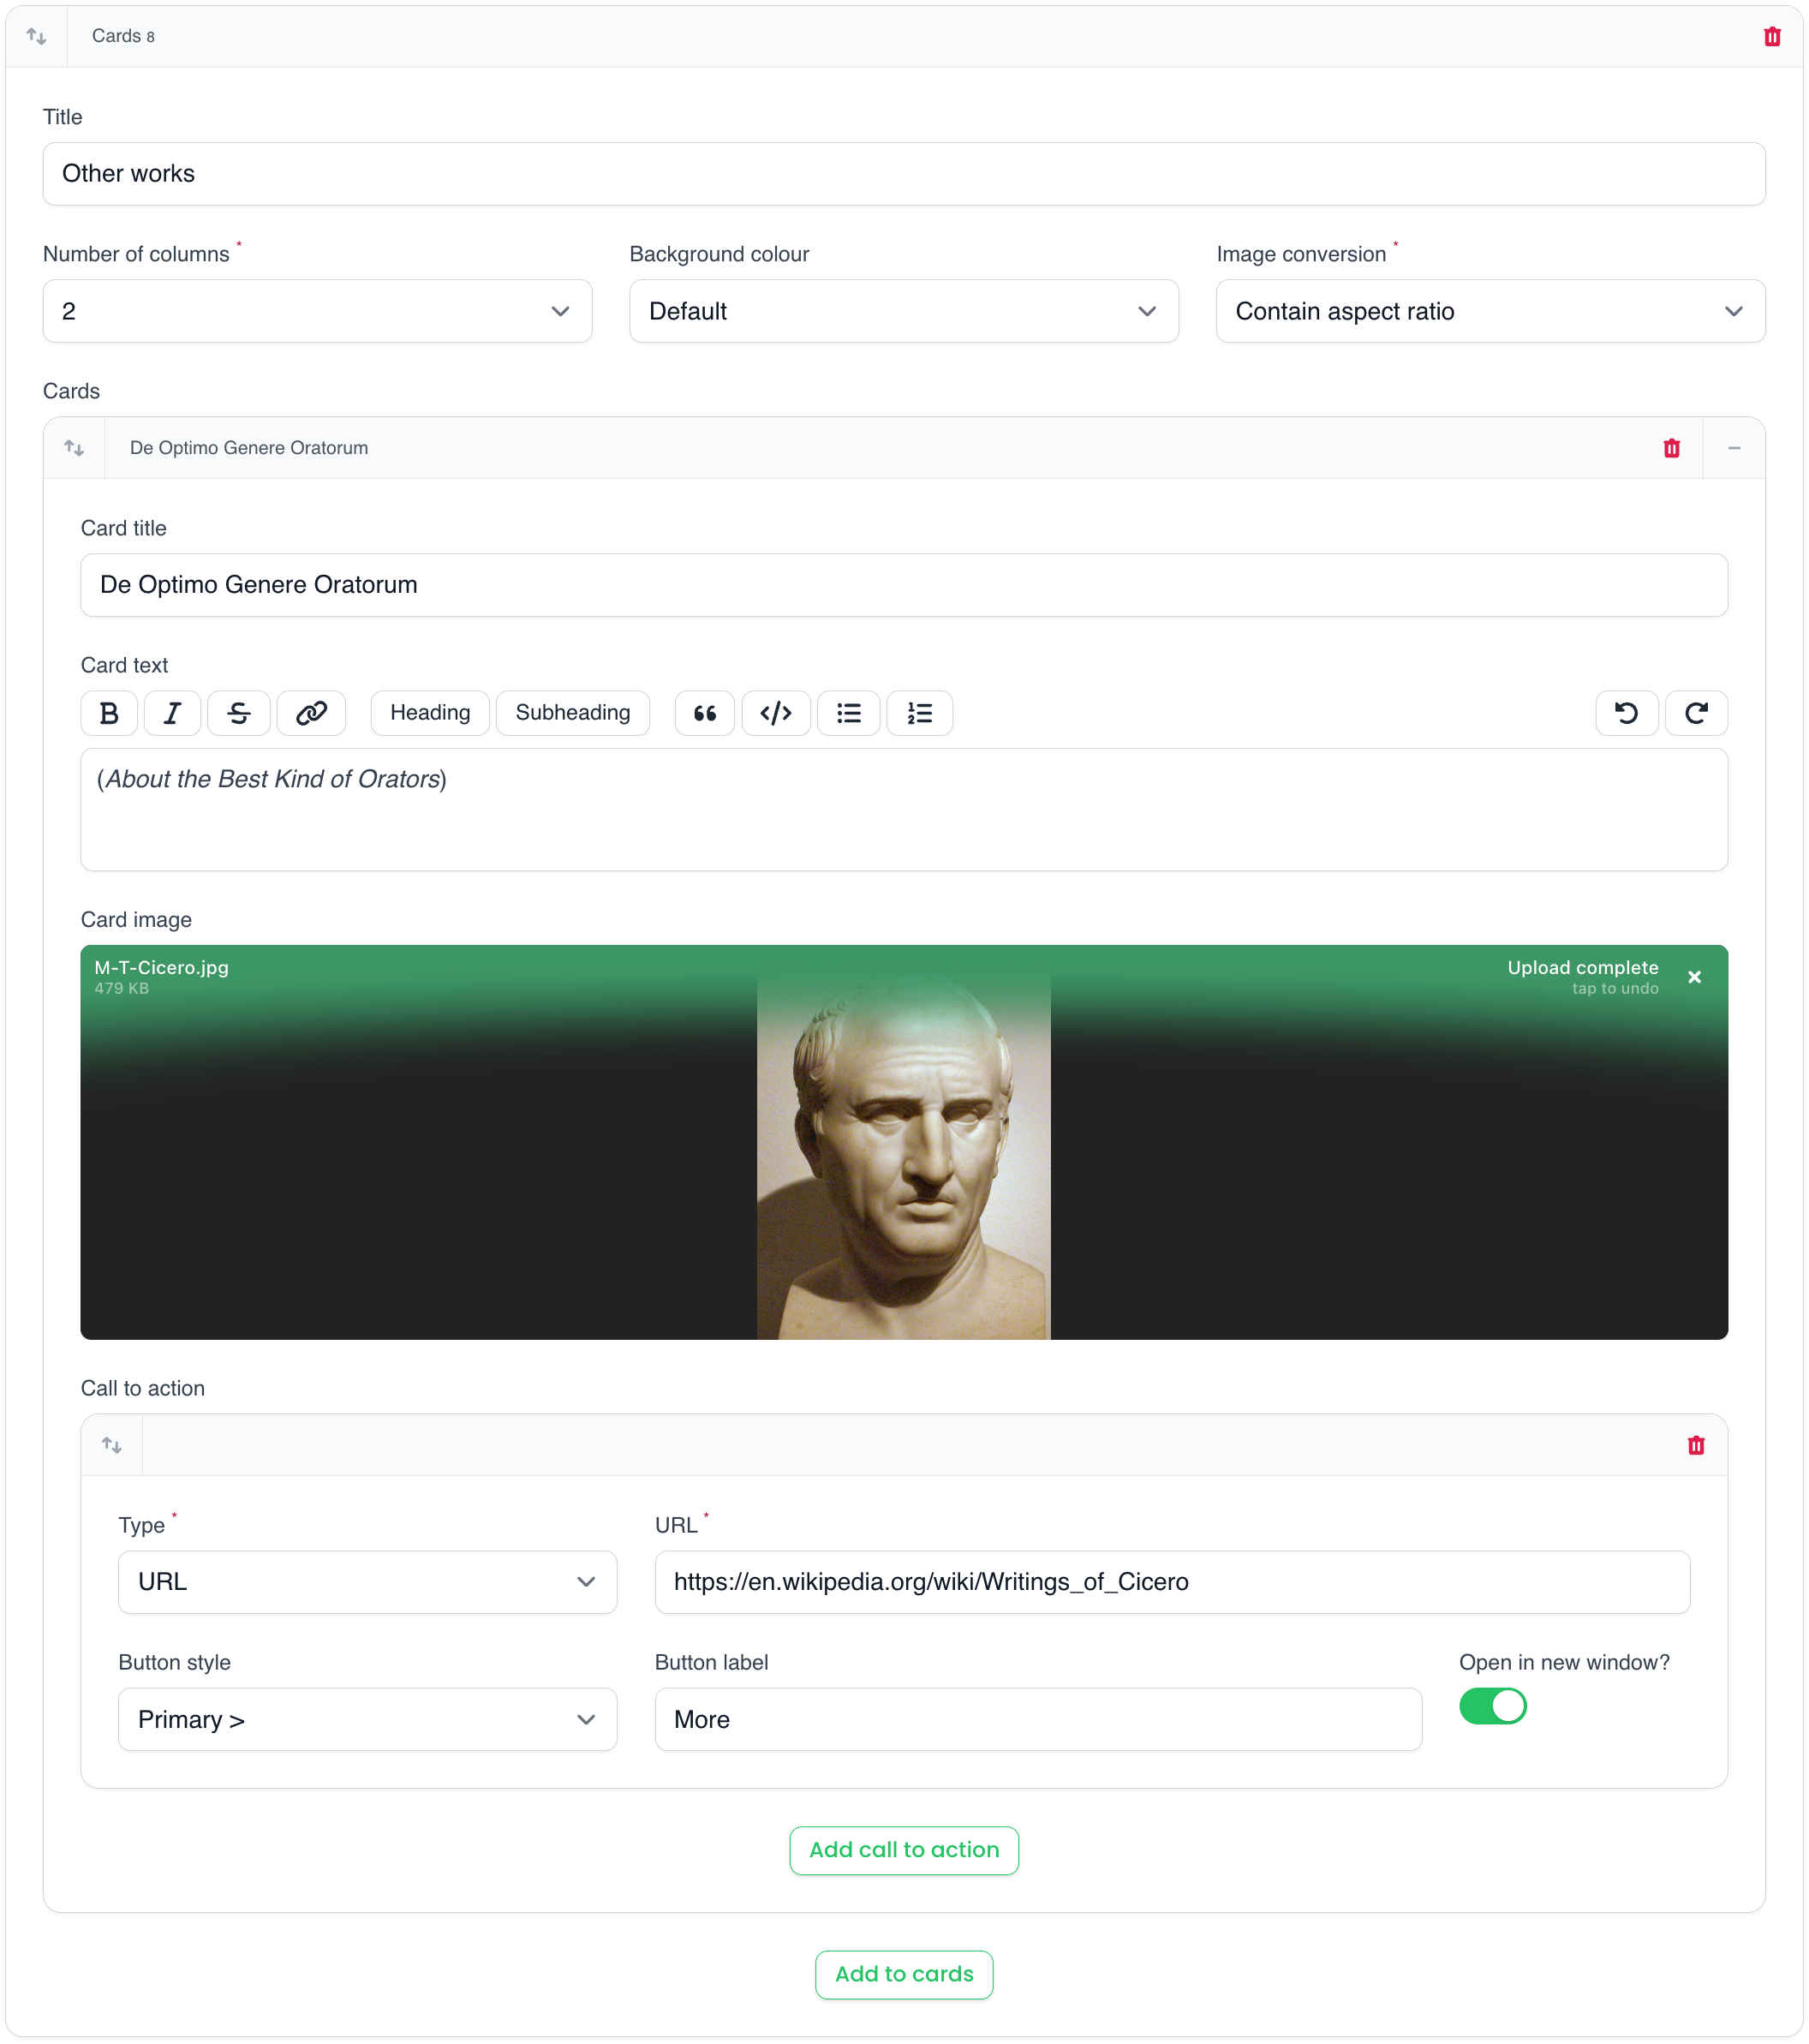
Cards block
This block is comparable to the overview block, however you can add the title, description, image and CTA for each card. The image conversion, background colour and grid columns can be configured.
Template block
You can select Blade templates that you want to include. This can be handy to add small forms or interactive components, e.g. a newsletter signup form or a map.

Create your own custom block
You can easily create your own content block by extending AbstractContentBlock.
Note: Do NOT use AbstractFilamentFlexibleContentBlock.php to extend from, because this super class contains logic to add the package's own namespace to the custom block.
Configuration
A lot of the customisation of content blocks and their behaviour can be done through the configuration file. Please, consult the configuration documentation.
Package development
See DEV.md
Roadmap
Below is a list of ideas and missing features. PR's are welcome!
Command to generate migrations, use the new Filament Flexible Content Block PagesCommand to generate models, use the new Filament Flexible Content Block PagesCommand to generate Filament resource and pages, use Filament Flexible Content Block PagesIntegrate image asset manager, see Filament Flexible Blocks Asset Manager- Store links to models in rich editor
Redirects, see- Reusable blocks. Name: global block?
- Focal point for image resizing
- Widget to show which records do not have a translated version
Changelog
Please see CHANGELOG for more information on what has changed recently.
Contributing
Please, submit bugs or feature requests via the Github issues. Pull requests are welcomed! Thanks!
Security Vulnerabilities
Please review our security policy on how to report security vulnerabilities.
Credits
License
The MIT License (MIT). Please see License File for more information.