dandisy / webcore
Webcore Platform - Single platform laravel site ready to be built as per your needs
Maintainers
Requires
- php: >=7.0.0
- arrilot/laravel-widgets: ^3.7
- dandisy/adminlte-templates: ^1.0.0
- dandisy/filemanager: ^1.0.0
- dandisy/laravel-generator: ^1.0.0
- dandisy/swagger-generator: ^1.0.0
- doctrine/dbal: ~2.3
- fideloper/proxy: ~3.3
- itsgoingd/clockwork: ^3.1
- jlapp/swaggervel: dev-master
- laravel/framework: 5.5.*
- laravel/passport: ^4.0
- laravel/tinker: ~1.0
- laravelcollective/html: ^5.5.0
- league/glide-laravel: ^1.0
- santigarcor/laratrust: ^4.0
- spatie/laravel-cors: ^1.0
- yajra/laravel-datatables-buttons: 3.0
- yajra/laravel-datatables-oracle: ~8.0
Requires (Dev)
- filp/whoops: ~2.0
- fzaninotto/faker: ~1.4
- mockery/mockery: 0.9.*
- phpunit/phpunit: ~6.0
This package is auto-updated.
Last update: 2026-06-29 01:34:14 UTC
README
Single Platform can be used for Admin Panel or Web CMS (built according to your needs)
Documentation in https://dandisy.github.io
1. Webcore
Installation
Copy, paste and hit the Enter key in console line by line
-
Using Git
  git clone https://github.com/dandisy/webcore.git

  cd webcore

  composer install

  cp .env.example .env
Make sure your server, create "webcore" database, edit .env using your favorite editor, for example using nano editor, run this in console
sudo nano .env
then
php artisan key:generate
-
Using Composer
  composer create-project dandisy/webcore {your-project-name}

  cd {your-project-name}
then
php artisan migrate --seed

php artisan storage:link
now get it all on your favorite browser
http://localhost/webcore/public

and

http://localhost/webcore/public/admin
The default users are
- superadminstrator@app.com
- administrator@app.com
- user@app.com

with default password is password
--OPTIONAL--
if you want to activate oauth,
edit the uri oauth in vue files in resources/assets/js/components/passport
php artisan passport:keys

npm install

npm run dev
then you can access oauth admin panel to manage your oauth client in
http://localhost/webcore/public/oauth-admin
Usage
- As an Admin Panel (with no public site in frontend)
run these artisan commands in your console
if you have schema model file, change YourModel to the name of model to be generate
php artisan generate:api_scaffold YourModel --fieldsFile=YourModel.json --datatables=true
or if you want to specify field interactively in console
php artisan generate:api_scaffold YourModel --datatables=true
- As Web CMS :
Concept
Admin Page - UI Component - Front Page
-
Backend Page (Admin)
Scope of Admin Page :
provide content management, presentation management, asset management and configuration -
UI Component (just a part of page)
Scope of UI Component (widget) :
provide reusable part of UI (widget) to be used in template of page (with layout positions), (*and provide tracking of user interaction for personalization)Scope of Page :
layouting and styling UI Component globaly as a Page by incorporating a template -
Frontend Page
Scope of Front Page :
provide User Experience with content personalization
run these artisan commands in your console
php artisan generate:api_scaffold Page --fieldsFile=Page.json --datatables=true --prefix=admin --logs

php artisan generate:api_scaffold Post --fieldsFile=Post.json --datatables=true --prefix=admin --logs
then run
composer require dandisy/webcore-page:dev-master

php artisan vendor:publish --provider="Webcore\Page\PageServiceProvider" --tag=config
if you want Webcore Front Page System themes & components sample code
download it in https://github.com/dandisy/themes (please don't clone!)
then extract to your project root directory
see https://github.com/dandisy/webcore-page for more info
then
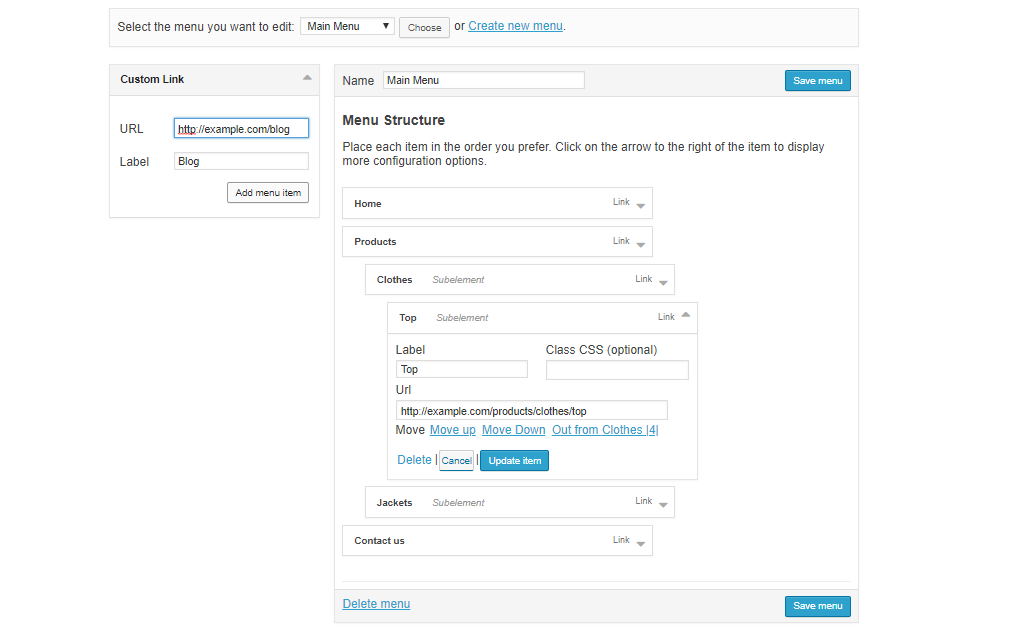
composer require dandisy/webcore-menu:dev-master

php artisan vendor:publish --provider="Harimayco\Menu\MenuServiceProvider"

php artisan vendor:publish --provider="Webcore\Menu\MenuServiceProvider" --tag=models

php artisan migrate
see https://github.com/dandisy/webcore-menu for more info
for tidiness, you can arrange Admin Page side menu in resources/views/layouts/menu.blade.php
Ready to Use
If you still confused with above usage instruction you can explore your self and try to install ready to use webcore sample as website cms
download it in https://github.com/dandisy/webcore-sample
or for better user experience CMS structure, with https://github.com/dandisy/elogui or https://github.com/dandisy/webcore-presentation
download it in https://github.com/dandisy/webcore-cms
Features
-
Admin Template
-
File Manager

-
Menu Manager

-
Image Manipulation
to manipulate the image use
http://localhost/webcore/public/img/{path}?{param=value}default {path} is configured relative to public_path, see .env for FILESYSTEM_DRIVER and config/filesystems.php
refer to the Glide documentation in http://glide.thephpleague.com for manual guide
-
Laravel Generator based on http://labs.infyom.com/laravelgenerator with Additional features
- Date Time Picker (htmltype = date-picker, time-picker or datetime-picker)
- Select2 (all select input will be select2, for multiple use htmltype = multi-select)
- Two side Multiple Select (htmltype = two-side-select)
- HTML Text Editor (htmltype = text-editor)
- File Manager (htmltype = file-manager or files-manager)
- Nullable field in migration (console option = n, or in json schema file using dbNullable = true)
- Log fields : created_by and updated_by (artisan command option = --logs)
- Related Dropdown (in console, use --relations option) : add view model in controller, and relational input form in view (htmltype = select,relation:{view-model}={field-to-show}={field-as-value})
- Related Form (in console, use --relations option) : add view model in controller, and relational input form in view (dbtype = table and htmltype = related-form,related-field1,related-field2,related-field3,...)
- Component and theme directory reader generator (htmltype = select,component or select,theme)
- Model directory reader generator (htmltype = select,model)
refer to the sample model schema files in resources/model_schemas
-
Front Page System (support themes, template position and view components)
Sample code can be download in https://github.com/dandisy/themes
-
Reusable Component
-
Using Webcore Component Presentation System for Font Page Component
Code Sample can be download in https://github.com/dandisy/themes
-
Using Widget (Widget Class & Widget View) using arrilot/laravel-widgets for UI Component
as much as possible the widget should have a loose coupled, bring data on the fly, avoid directly include / use in widget class
webcore include a widget, with this you able to use shortcode on Page description field to get datasource from models, use syntax : [source=ModelName,where=some_field_name:value,position:some_theme_position,widget=some_widget_view]
-
Using Laravel Package
webcore include dandisy/elorest package at package/webcore folder which can be used as an example
-
-
Pre Configured Oauth using Laravel Passport
with Elorest as a Laravel eloquent RESTAPI package, refer to https://github.com/dandisy/elorest
-
to login (password grant) use http://localhost/webcore/public/oauth/token
with params : - client_id - client_secret - grant_type - username - password - scope -
to get resources example http://localhost/webcore/public/api/product
with header Authorization = Bearer {your-token}
-
-
EloREST
REST API using the Laravel's Eloquest Syntax (methods & params)
Example API queries :
 https://your-domain-name/api/elorest/Models/Post?leftJoin=comments,posts.id,comments.post_id&whereIn=category_id,[2,4,5]&select=*&get=
 https://your-domain-name/api/elorest/Models/Post?join[]=authors,posts.id,authors.author_id&join[]=comments,posts.id,comments.post_id&whereIn=category_id,[2,4,5]&select=posts.*,authors.name as author_name,comments.title as comment_title&get=
 https://your-domain-name/api/elorest/Models/Post?&with=author,comment&get=*
 https://your-domain-name/api/elorest/Models/Post?&with=author(where=name,like,%dandisy%),comment&get=*

 multi first nested closure deep
 https://your-domain-name/api/elorest/Models/Post?&with=author(where=name,like,%dandisy%)(where=nick,like,%dandisy%),comment&get=*

 second nested closure deep
 https://your-domain-name/api/elorest/Models/Post?&with=author(with=city(where=name,like,%jakarta%)),comment&get=*

 https://your-domain-name/api/elorest/Models/Post?&with[]=author(where=name,like,%dandisy%)&with[]=comment(where=title,like,%test%)&get=*
 https://your-domain-name/api/elorest/Models/Post?paginate=10&page=1
Dependency
* dandisy/adminlte-templates based on infyomlabs/adminlte-templates
* dandisy/laravel-generator based on infyomlabs/laravel-generator
* dandisy/swagger-generator based on infyomlabs/swagger-generator
* dandisy/filemanager based on infinety-es/filemanager

* dandisy/webcore-page
* dandisy/webcore-menu

* arrilot/laravel-widgets
* barryvdh/laravel-debugbar
* league/glide-laravel
* santigarcor/laratrust
* harimayco/laravel-menu
* atayahmet/laravel-nestable

* ixudra/curl or guzzlehttp/guzzle

If you use laravel passport :
* spatie/laravel-cors

* barryvdh/laravel-dompdf or seguce92/laravel-dompdf
* phpoffice/phpspreadsheet or maatwebsite/excel

* pragmarx/tracker or jeremykenedy/laravel-logger
* spatie/laravel-activitylog

* fireguard/report or jimmyjs/laravel-report-generator

* khill/lavacharts or consoletvs/charts
//--------------------------------------------#
More Screenshots
Webcore CMS using https://github.com/dandisy/elogui or https://github.com/dandisy/webcore-presentation
Download Webcore CMS in https://github.com/dandisy/webcore-cms
- Sample front page

- Login page

- Admin page


//---------------------------------------------#
2. Laravel Generator
Webcore use infyomlabs/laravel-generator, by changing the artisan command to be more generic :
php artisan generate[.command]:{command} {Model_name} [option]
Refer to the infyomlabs/laravel-generator documentation here http://labs.infyom.com/laravelgenerator
Perspective :
HUMAN
Interface       -   Tools (Worker)                      -   Executor
Commands\*      -   Common\*, Utils\* and helper        -   Generators\*

COMPUTER
Interface       -   Tools (Worker)                      -   Executor
Generators\*    -   Common\*, Utils\* and helper        -   Commands\*
Guidance
-
To add additional HTML type definition, add and edit these :
-
add stub file in adminlte-templates\templates\scaffold\fields
-
add stub file in adminlte-templates\templates\vuejs\fields
-
edit Utils\HTMLFieldGenerator
-
edit Generators\ViewGenerator
-
edit Generators\VueJs\ViewGenerator
-
-
To add additional command, command option, or fields option
- edit or add Common\*
- edit or add Commands\* (BaseCommand, etc)
Note
-
Commands\* :
use Common\CommandData, use Utils\FileUtil, use Generator\*
base Commands\BaseCommand
- parsing console command
- initializing commandData
- execute Generators\* to generating files and migrating database table
-
Utils\GeneratorFieldsInputUtil :
use Common\GeneratorField
- get fields specification from console command
- return field specification by utilizing Common\GeneratorField
-
Utils\HTMLFieldGenerator :
use Common\GeneratorField
- return fieldTemplate will be used
-
Common\GeneratorField :
- parsing parts of fields specification (db type, html input, option)
- preparing migration
-
Common\GeneratorConfig :
- load, init and set config
- get console command option
-
Common\CommandData :
use Utils\GeneratorFieldsInputUtil, use Utils\TableFieldsGenerator
- get and set commandData from config, file, and console
-
Generators\* :
use Utils\FileUtil, use Common\CommandData, use Utils\HTMLFieldGenerator in Generators\Scaffold\ViewGenerator
base Generators\BaseGenerator
- define generator functionality with data and template parameters to be used
- define rollback
//--------------------------------------------#
3. Roadmap
Versions
1.0.0 Single Platform
1.1.0 Easy Platform
1.2.0 In Context Platform
1.3.0 Experience Platform
1.4.0 Enterprise Platform
1.5.0 Digital Solution