rawilk / filament-inner-nav
Add inner navigation to filament panel pages.
Fund package maintenance!
rawilk
Installs: 415
Dependents: 0
Suggesters: 0
Security: 0
Stars: 5
Watchers: 2
Forks: 3
Open Issues: 0
Language:Blade
pkg:composer/rawilk/filament-inner-nav
Requires
- php: ^8.1|^8.2|^8.3
- filament/support: ^3.0
- illuminate/contracts: ^10.0
- spatie/laravel-package-tools: ^1.14
Requires (Dev)
- filament/filament: ^3.0
- laravel/pint: ^1.0
- nunomaduro/collision: ^7.9
- nunomaduro/larastan: ^2.0.1
- orchestra/testbench: ^8.0
- pestphp/pest: ^2.10
- pestphp/pest-plugin-laravel: ^2.2
- spatie/laravel-ray: ^1.31
This package is auto-updated.
Last update: 2025-03-18 18:45:27 UTC
README
Note: This package is being abandoned because I originally thought I was going to use it, but then I found out I didn't really need it for filament. If anything, this package was a learning experience for me.
filament-inner-nav
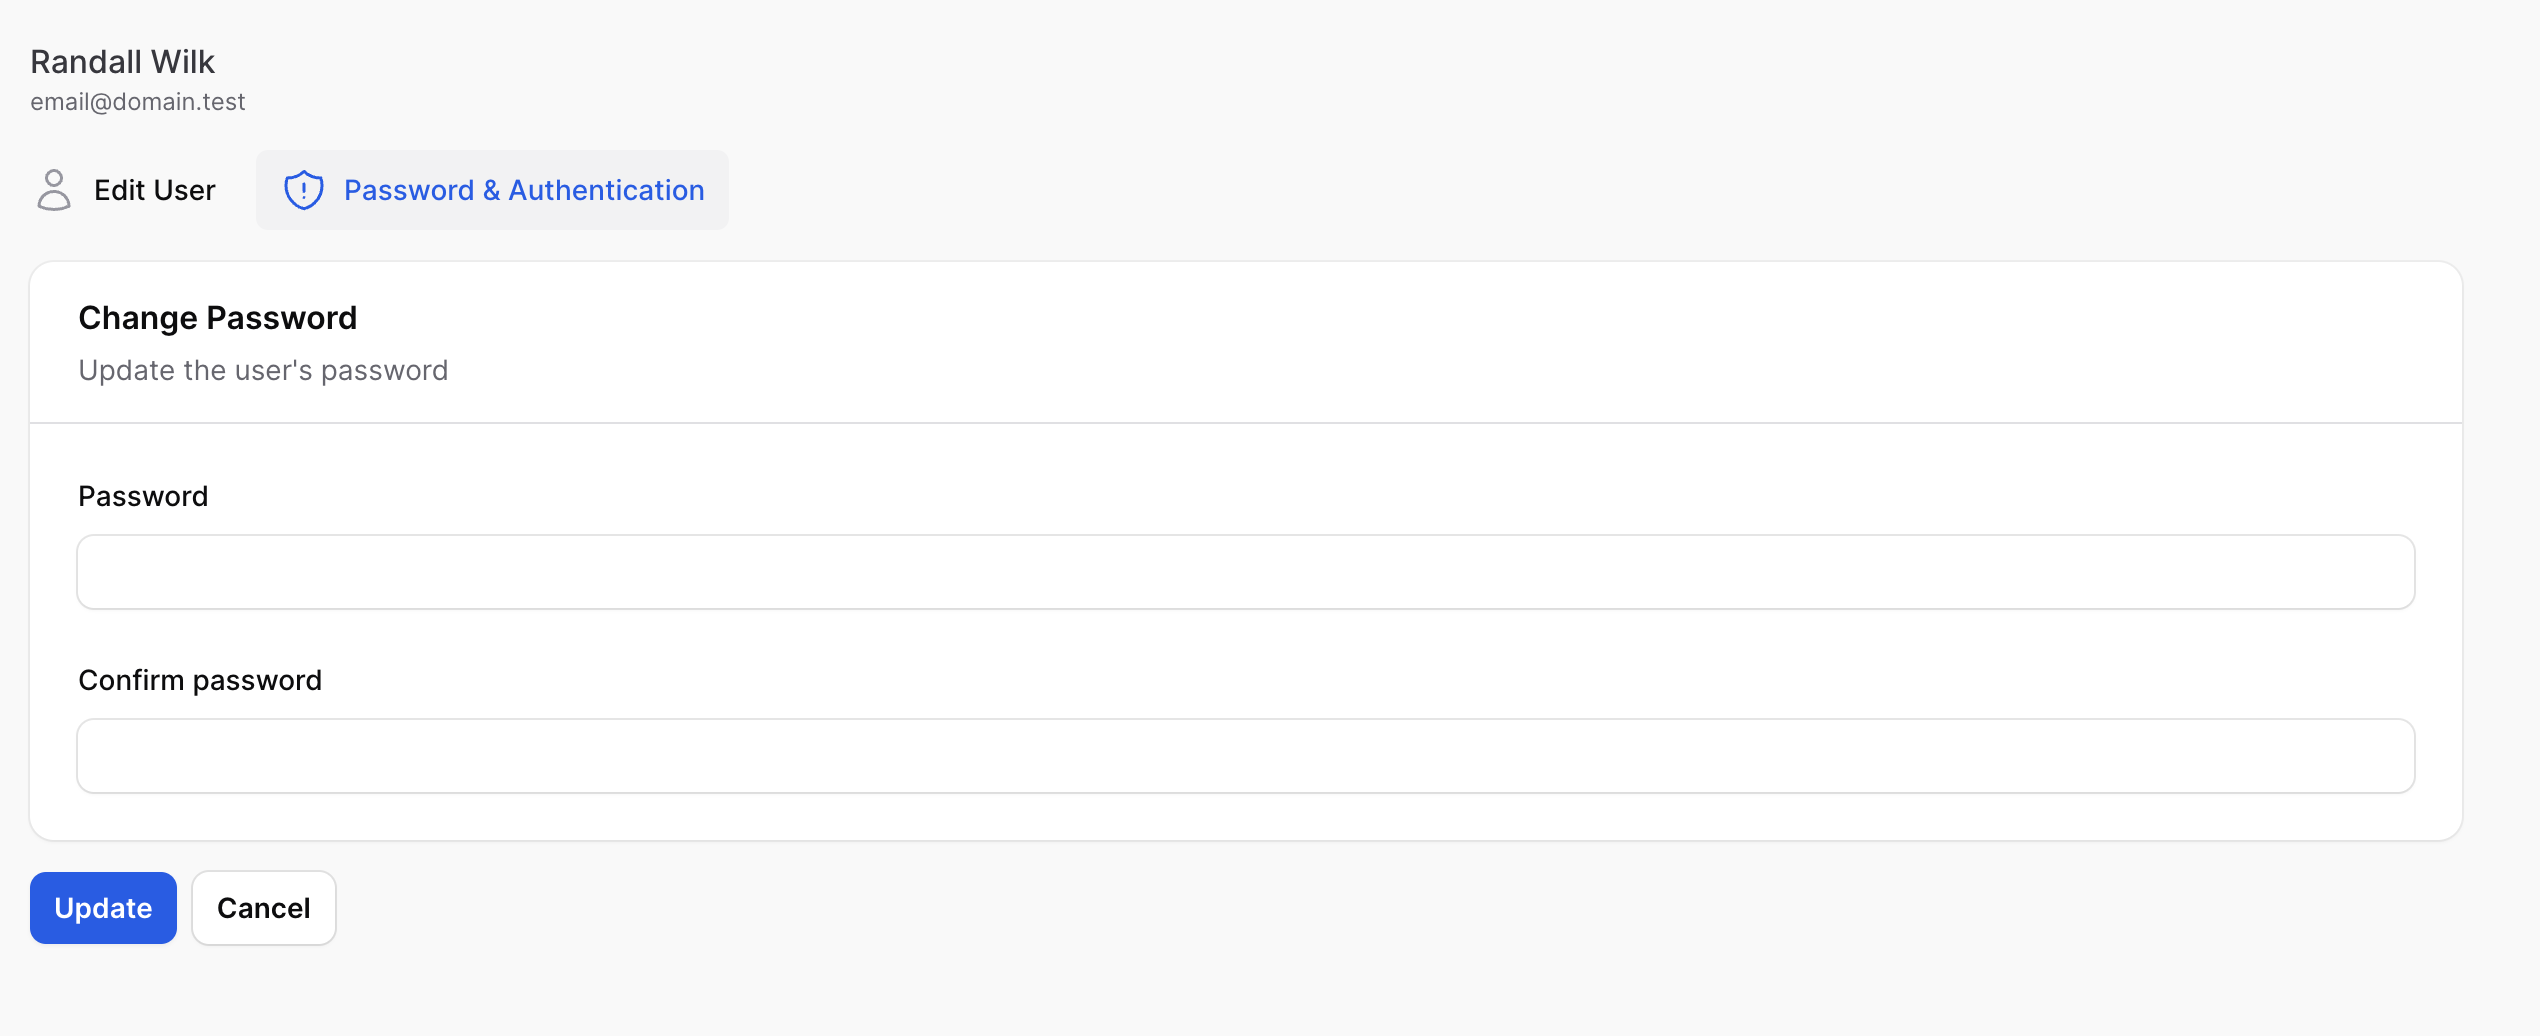
The filament-inner-nav package allows you to organize resource pages in your Filament panels into a group of "inner navigation" pages. This is useful for when you have a
resource page that has many sub-pages, such as when viewing/editing a user record.
Installation
You can install the package via composer:
composer require rawilk/filament-inner-nav
You can publish the config file with:
php artisan vendor:publish --tag="filament-inner-nav-config"
You can view the default configuration here: https://github.com/rawilk/filament-inner-nav/blob/main/config/filament-inner-nav.php
The views can be published with:
php artisan vendor:publish --tag="filament-inner-nav-views"
Usage
-
First, you need to generate a filament resource page and then add your custom resource pages to the array from
getPages. For example, aUserResource:use App\Filament\Resources\UserResource\Pages; use Filament\Resources\Resource; class UserResource extends Resource { // ... public static function getPages(): array { 'index' => Pages\ListUsers::route('/'), 'create' => Pages\CreateUser::route('/create'), 'edit' => Pages\EditUser::route('/{record}/edit'), // custom pages... 'authentication' => Pages\UserAuthentication::route('/{record}/authentication'), 'contact' => Pages\Contact::route('/{record}/contact'), 'activity' => Pages\Activity::route('/{record}/activity'), } // ... }
-
Define a
$recordproperty on each of your custom resource pages:public ModelName $record; // public User $record;
Be sure to change
ModelNameto the class name of your model. -
Define an
innerNavstatic method on your resource:use App\Models\User; use Filament\Resources\Resource; use Rawilk\FilamentInnerNav\InnerNav; use Rawilk\FilamentInnerNav\InnerNavItem; class UserResource extends Resource { // ... public static function innerNav(User $record): InnerNav { return InnerNav::make() ->setNavigationItems([ InnerNavItem::make('Edit User') ->url(fn (): string => static::getUrl('edit', ['record' => $record])), InnerNavItem::make('Password & Authentication') ->url(fn (): string => static::getUrl('authentication', ['record' => $record])), InnerNavItem::make('Contact Information') ->url(fn (): string => static::getUrl('contact', ['record' => $record])), InnerNavItem::make('Activity') ->url(fn (): string => static::getUrl('activity', ['record' => $record])), ]); } }
-
In each of your custom pages, wrap the content inside of the
<x-filament-inner-nav::page>blade component:<!-- file: filament.resources.user-resource.pages.authentication --> <x-filament-panels::page> <x-filament-inner-nav::page> <!-- page content here --> </x-filament-inner-nav::page> </x-filament-panels::page>
If the navigation isn't styled correctly, you may need to run
filament:upgradeto ensure the latest assets are published.
Advanced Usage
Enable wire:navigate
Allow the usage of livewire's wire:navigate by using the wireNavigate() method on the InnerNav object:
public static function innerNav(User $record): InnerNav
{
    return InnerNav::make()
        ->wireNavigate()
        ->setNavigationItems([
            // ...
        ]);
}
This option can be globally configured in a service provider. See Global Configuration.
Title & Description
You can set a title and/or description for the navigation via the setTitle() and setDescription() methods on the InnerNav object.
These will show up directly above the navigation items.
public static function innerNav(User $record): InnerNav
{
    return InnerNav::make()
        ->setTitle('Nav title')
        ->setDescription('Nav description')
        ->setNavigationItems([
            // ...
        ]);
}
For more advanced customization, you may return an HtmlString object from a closure with either of these methods:
public static function innerNav(User $record): InnerNav
{
    return InnerNav::make()
        ->setTitle(fn (): HtmlString => new HtmlString('<h1>' . $record->name . '</h1>'))
        ->setDescription(fn (): HtmlString => new HtmlString('<p>Nav description</p>'))
        ->setNavigationItems([
            // ...
        ]);
}
You may also return a custom view using
view('...')from the closure on thetitle()method if needed.
Item Icons
You can set an icon for each navigation item via the icon() method on the InnerNavItem object:
public static function innerNav(User $record): InnerNav
{
    return InnerNav::make()
        ->setNavigationItems([
            InnerNavItem::make('Edit User')
                ->url(fn (): string => static::getUrl('edit', ['record' => $record]))
                ->icon('heroicon-o-pencil'),
        ]);
}
Item Active State
By default, active state is not set on any navigation item. You may call the isActiveWhen() method on the InnerNavItem object to set active state.
public static function innerNav(User $record): InnerNav
{
    return InnerNav::make()
        ->setNavigationItems([
            InnerNavItem::make('Edit User')
                ->url(fn (): string => static::getUrl('edit', ['record' => $record]))
                ->isActiveWhen(fn (): bool => request()->route()->action['as'] === 'filament.resources.users.edit')
        ]);
}
Item Visibility
Items can be hidden from the UI by calling either the visible() or hidden() methods on the InnerNav object.
public static function innerNav(User $record): InnerNav
{
    return InnerNav::make()
        ->setNavigationItems([
            InnerNavItem::make('Edit User')
                ->url(fn (): string => static::getUrl('edit', ['record' => $record]))
                ->visible(fn (): bool => auth()->user()->can('edit', $record)),
        ]);
}
Disabling Items
There may be cases where you still want to show the navigation link, but disable the user from actually visiting it. You may use the isDisabledWhen() method on the InnerNavItem object for this.
public static function innerNav(User $record): InnerNav
{
    return InnerNav::make()
        ->setNavigationItems([
            InnerNavItem::make('Edit User')
                ->url(fn (): string => static::getUrl('edit', ['record' => $record]))
                ->isDisabledWhen(fn (): bool => ! auth()->user()->can('edit', $record)),
        ]);
}
Item Badges
You may add a badge to any navigation item by calling the badge() method on the InnerNavItem object.
public static function innerNav(User $record): InnerNav
{
    return InnerNav::make()
        ->setNavigationItems([
            InnerNavItem::make('Edit User')
                ->url(fn (): string => static::getUrl('edit', ['record' => $record]))
                ->badge('New'),
        ]);
}
Groups
Items can be grouped in the navigation by using the InnerNavGroup object. A group can either be collapsible
or static. Collapsible groups can be nested inside a static group. Below will be an example of each group.
Collapsible Group
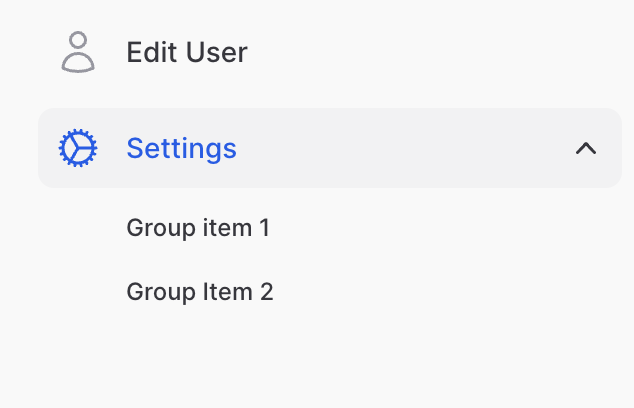
Collapsible groups allow you to nest a group of navigation items underneath a button that can toggle the visibility of the items. The UI for this is inspired by how GitHub handles their sub navigation on your account settings pages.
public static function innerNav(User $record): InnerNav
{
    return InnerNav::make()
        ->setNavigationItems([
            InnerNavItem::make('Edit User')
                ->url(fn (): string => static::getUrl('edit', ['record' => $record])),
            InnerNavGroup::make('Settings')
                ->icon('heroicon-o-cog')
                ->items([
                    InnerNavItem::make('Group item 1')
                        ->url('#'),
                    InnerNavItem::make('Group Item 2')
                        ->url('#'),
                ])
        ]);
}
Note: The icon method is optional on the InnerNavGroup object.
InnerNavItemobjects underneath anInnerNavGroupare not allowed to have an icon.
By default, collapsible groups are collapsed. You can change this by calling the
expandByDefault()method on theInnerNavGroupobject. The group will also be expanded if any of the items inside it are set to active.
Static Groups
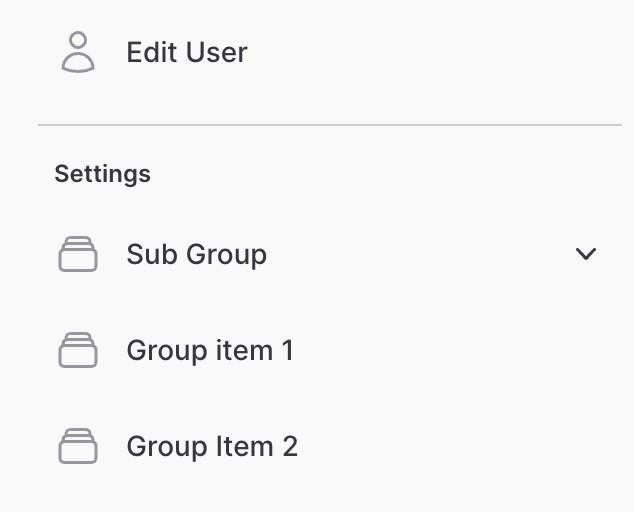
Also inspired by the GitHub UI, static groups allow you to render navigation links underneath a heading. All you need to do is provide
a falsy value to the collapsible() method on the InnerNavGroup object.
public static function innerNav(User $record): InnerNav
{
    return InnerNav::make()
            ->setNavigationItems([
                InnerNavItem::make('Edit User')
                    ->url(fn () => self::getUrl('edit', ['record' => $record]))
                    ->icon('heroicon-o-user'),
                InnerNavGroup::make('Settings')
                    ->collapsible(false)
                    ->items([
                        InnerNavGroup::make('Sub Group')
                            ->icon('heroicon-o-rectangle-stack')
                            ->items([
                                InnerNavItem::make('Sub group item 1')
                                    ->url('#'),
                            ]),
                        InnerNavItem::make('Group item 1')
                            ->icon('heroicon-o-rectangle-stack')
                            ->url('#'),
                        InnerNavItem::make('Group Item 2')
                            ->icon('heroicon-o-rectangle-stack')
                            ->url('#'),
                    ]),
}
Unlike with a collapsible group, the direct
InnerNavItemchildren are allowed to have icons.
Top Layout
If you want to render the links on top of your content, instead of on the side, you may use the setLayout() method on the InnerNav object:
use Rawilk\FilamentInnerNav\Enums\InnerNavLayout;
use Rawilk\FilamentInnerNav\InnerNav;

public static function innerNav(User $record): InnerNav
{
    return InnerNav::make()
        ->setLayout(InnerNavLayout::Top)
        ->setNavigationItems([
            // ...
        ]);
}
Any
InnerNavGroupobjects added with this layout will be rendered as a dropdown menu.
Global Configuration
Many options on the InnerNav, InnerNavItem, and InnerNavGroup objects can be configured globally, typically in a service
provider somewhere.
use Illuminate\Support\ServiceProvider;
use Rawilk\FilamentInnerNav\Enums\InnerNavLayout;
use Rawilk\FilamentInnerNav\InnerNav;
use Rawilk\FilamentInnerNav\InnerNavGroup;

class AppServiceProvider extends ServiceProvider
{
    public function boot(): void
    {
        InnerNav::configureUsing(function (InnerNav $nav) {
            $nav
                ->wireNavigate()
                ->setLayout(InnerNavLayout::Side);
        });

        InnerNavGroup::configureUsing(function (InnerNavGroup $group) {
            // Expand collapsible groups by default.
            $group->expandByDefault();
        });
    }
}
Styling
Many parts of the UI provided by this package are prefixed with a custom CSS class you can hook into with your own styles to override the styling.
All class names will start with fi-inner-nav-, for example the navigation items all have a class of fi-inner-nav-item.
It is not practical to list and maintain all the class names used here, so if there's an element you want to style differently, you can either inspect the element in your browser or view the source code of the blade components in this repository.
If there's an element that you need to style that doesn't have a custom class, you may submit a PR to add one, however I cannot guarantee that I will merge it.
Scripts
Setup
For convenience, you can run the setup bin script for easy installation for local development.
./bin/setup.sh
Formatting
Although formatting is done automatically via workflow, you can format php code locally before committing with a composer script:
composer format
Testing
composer test
Changelog
Please see CHANGELOG for more information on what has changed recently.
Contributing
Please see CONTRIBUTING for details.
Security
Please review my security policy on how to report security vulnerabilities.
Credits
Alternatives
Some alternatives to this package include:
If you have a similar package to this that you would like to add, please submit a PR with an updated README.
License
The MIT License (MIT). Please see License File for more information.


