nosto / nosto-integration
Nosto Integration
Installs: 1 763
Dependents: 0
Suggesters: 0
Security: 0
Stars: 3
Watchers: 4
Forks: 1
Open Issues: 12
Type:shopware-platform-plugin
pkg:composer/nosto/nosto-integration
Requires
- php: ^8.2
- nosto/php-sdk: 7.7.1
- nosto/shopware6-job-scheduler: 4.0.4
Requires (Dev)
- dev-develop
- 6.1.5
- 6.1.4
- 6.1.3
- 6.1.2
- 6.1.1
- 6.1.0
- 6.0.15
- 6.0.14
- 6.0.13
- 6.0.12
- 6.0.11
- 6.0.10
- 6.0.9
- 6.0.8
- 6.0.7
- 6.0.6
- 6.0.5
- 6.0.3
- 6.0.2
- 6.0.1
- 6.0.0
- v5.x-dev
- 5.2.5
- 5.2.4
- 5.2.3
- 5.2.2
- 5.2.1
- 5.2.0
- 5.1.20
- 5.1.19
- 5.1.18
- 5.1.17
- 5.1.16
- 5.1.15
- 5.1.14
- 5.1.13
- 5.1.12
- 5.1.11
- 5.1.10
- 5.1.8
- 5.1.7
- 5.1.6
- 5.1.5
- 5.1.4
- 5.1.3
- 5.1.2
- 5.1.1
- 5.1.0
- 5.0.2
- 5.0.1
- 5.0.0
- 4.2.9
- 4.2.8
- 4.2.7
- 4.2.6
- 4.2.5
- 4.2.4
- 4.2.3
- 4.2.2
- 4.2.1
- 4.2.0
- 4.1.0
- 4.0.0
- v3.x-dev
- 3.6.6
- 3.6.5
- 3.6.4
- 3.6.3
- 3.6.2
- 3.6.1
- 3.6.0
- 3.5.20
- 3.5.19
- 3.5.18
- 3.5.17
- 3.5.16
- 3.5.15
- 3.5.14
- 3.5.13
- 3.5.12
- 3.5.11
- 3.5.10
- 3.5.8
- 3.5.7
- 3.5.6
- 3.5.5
- 3.5.4
- 3.5.3
- 3.5.2
- 3.5.1
- 3.5.0
- 3.4.2
- 3.4.1
- 3.4.0
- 3.3.9
- 3.3.8
- 3.3.7
- 3.3.6
- 3.3.5
- 3.3.4
- 3.3.3
- 3.3.2
- 3.3.1
- 3.3.0
- 3.2.0
- 3.1.2
- 3.1.1
- 3.1.0
- 3.0.0
- dev-release_3.6.6
- dev-release_6.1.5
- dev-release_5.2.5
- dev-NS-13447-post-filters-v5
- dev-NS-13447-post-filters-v3
- dev-NS-13447-post-filters
- dev-ADS-5310-v5
- dev-NS-13552_set_tag_limit
- dev-fix/mysql_github_action_develop
- dev-fix/mysql_github_action_v5
- dev-fix/mysql_github_action
- dev-fix/github_actions
- dev-fix/use_extensionDispatcher
- dev-NS-13289-new-v5
- dev-NS-13288
- dev-SSP-435_v5
- dev-SSP_17_v5-new
- dev-SSP-17_v5
- dev-SSP-377_v6
- dev-SSP-377_v3
- dev-SSP-377_v5
- dev-SSP-369_v6
- dev-SSP-369_v3
- dev-SSP-369_v5
- dev-SSP-316
- dev-test_lisa
- dev-radomir_test
- dev-SSP-359_v3_category_name
- dev-SSP-277_product_images_v3
- dev-SSP-277_product_images_v5
- dev-SSP-284_v5
- dev-SSP-284_v3
- dev-SSP-283_v3
- dev-SSP-283_v5
- dev-handling_variant_v3
- dev-handling_variant_v4
- dev-SSP-246_v3
- dev-SSP-246_v4
- dev-debug_handler
- dev-reportAddToCart-fixes
- dev-SSP-201_v3
- dev-ssp-160-sw65
- dev-SSP-160_search_analytics_for_nosto
- dev-SSP-195_v4
- dev-ADS-4338_unit_testing
- dev-main
- dev-release/2.4.2
This package is auto-updated.
Last update: 2026-02-19 10:06:19 UTC
README
- Personalization for Shopware
- Installation
- Configuration
- Uninstallation
- Nosto Plugin Job Scheduling
- Dependencies
- Development
Personalization for Shopware
Increase your conversion rate and average order value by delivering your customers personalized product recommendations throughout their shopping journey.
Nosto allows you to deliver every customer a personalized shopping experience through recommendations based on their unique user behavior - increasing conversion, average order value and customer retention as a result.
Getting started
How it works
The plugin adds new block category called Nosto Components and a block called Nosto in Shopping Experiences. This element requires element id which can be found in Placements of Campaigns section of your Nosto Admin. The element can be put in any CMS-page of you shop and the plugin automatically adds product recommendation elements to the corresponding location when it's configured and active for the sales channel. Basically, cms-element is an empty "div" placeholder element and this "div" are automatically populated with product recommendations from your shop.
This is possible by mining data from the shop when the user visits the pages. For example, when the user is browsing a product page, the product information is asynchronously sent to Nosto, that in turn delivers product recommendations based on that product to the shop and displays them to the user.
The more users that are visiting the site, and the more page views they create, the better and more accurate the recommendations become.
In addition to the recommendation elements and the real time data gathering, the plugin also includes some behind the scenes features for keeping the product information up to date and keeping track of orders in the shop.
Every time a product is updated in the shop, e.g. the price is changed, the information is sent to Nosto over an API. This will sync the data across all the users visiting the shop that will see up-to-date recommendations.
All orders that are placed in the shop are also sent to Nosto. This is done to keep track of the orders that were a direct result of the product recommendations, i.e. when a user clicks a product in the recommendation, adds it to the shopping cart and places the order.
Nosto also keeps track of the order statuses, i.e. when an order is changed to "payed" or "canceled" the order is updated over an API and newsletter subscribers.
All you need to take Nosto into use in your shop, is to create a Nosto account for your shop, install and configure the plugin in you shop. This is as easy as clicking a button, so read on.
Installation
Plugin can be installed in such ways:
- Community store (preferred)
- Zip archive
The commands that need to be executed after installing the plugin from the root of the Shopware installation are:
./bin/build-administration.sh
./bin/build-storefront.sh
Also, the plugin has the embedded dependency of Nosto Job Scheduler. It's delivered with plugin sources.
Community (preferred)
The plugin can be automatically downloaded and installed from within Shopware admin My Extensions section, if you have connected your Shopware account to the installation. The plugin is found under the Customer account + Personalization section in My Extensions, or by searching for "nosto". If you can't find it, you can also manually download it from the Community store. Once you've found the plugin, simply click Download now button on the plugin page and follow the instructions to activate the plugin.
Zip archive
The plugin can also be installed by uploading zip archive in Shopware admin My Extensions section. The plugin archive
can be downloaded in the Community store.
If the plugin is set up for local development, the archive can also be generated with shopware-cli extension zip . --disable-git.
After this, the plugin can be activated in Shopware admin My Extensions section.
Configuration
The Nosto plugin has a separate settings page. You can configure values for each sales channel and it's configured languages.
Settings → Extensions → Nosto
Account Settings Overview
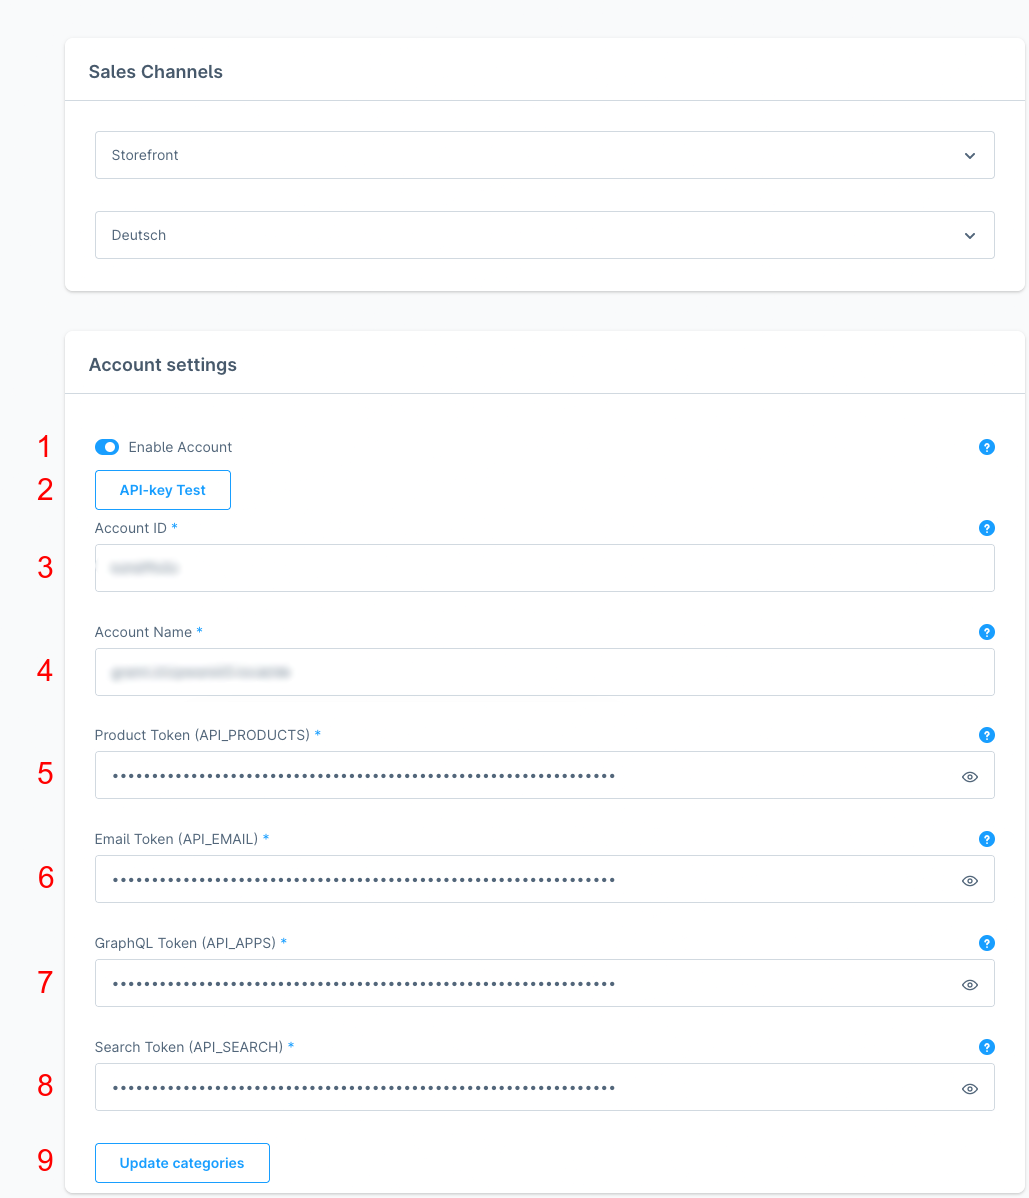
There are basic configuration fields and control buttons are located in plugin configuration page marked with digits:
Note
The account settings are only available for a specific sales channel and language. There are no global account settings.
- Field which indicates is configured account is enabled for merchandising/product sync.
- Api validation button, which will validate the tokens mentioned below and the result will be shown in the notification windows.
- Required Field with account id. It can be retrieved in Nosto account (in account settings), additional guides can be found here.
- Required Field with account name. It can be retrieved in Nosto account (in account settings), additional guides can be found here.
- Required Field with Product Token API key (API_PRODUCTS). Is used to synchronize products between Shopware and Nosto . The key must be requested from Nosto Technical Support, after which it will appear in authentication tokens section in the admin, additional guides can be found here.
- Required Field with Email Token API key, (API_EMAIL). Is used to synchronize emails between Shopware and Nosto . The key must be requested from Nosto Technical Support, after which it will appear in authentication tokens section in the admin, additional guides can be found here.
- Required Field with GraphQL Token API key, (API_APPS). Is used to synchronize orders, recommendations, segments, category merchandising products between Shopware and Nosto . The key must be requested from Nosto Technical Support, after which it will appear in authentication tokens section in the admin, additional guides can be found here.
- Required Field with Search Token API key, (API_SEARCH). Is used for all the search requests, when using the plug-and-play solution. The key must be requested from Nosto Technical Support, after which it will appear in authentication tokens section in the admin, additional guides can be found here.
- Category update button, which will synchronize all the categories for the Category Merchandising.
General Settings Overview
Some configurations are only available globally or for a specific channel.
- By enabling this setting, Nosto tracking JS scripts will be initialized and loaded directly after guest’s very first interaction with storefront page. It can be used for prevent storefront performance issues during page loading.
- Channel specific The selected domain will be used for the product URLs during the product sync.
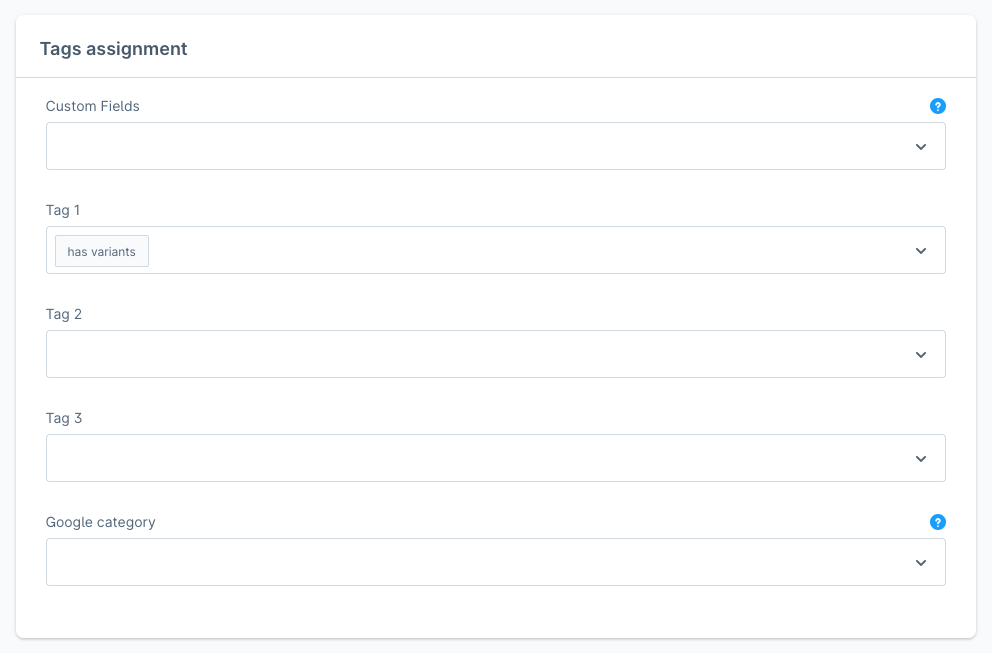
Tags Assignment Overview
All fields displayed in the “Tags assignment“ card are used to transfer product’s custom fields values to the associated
Nosto product entity.
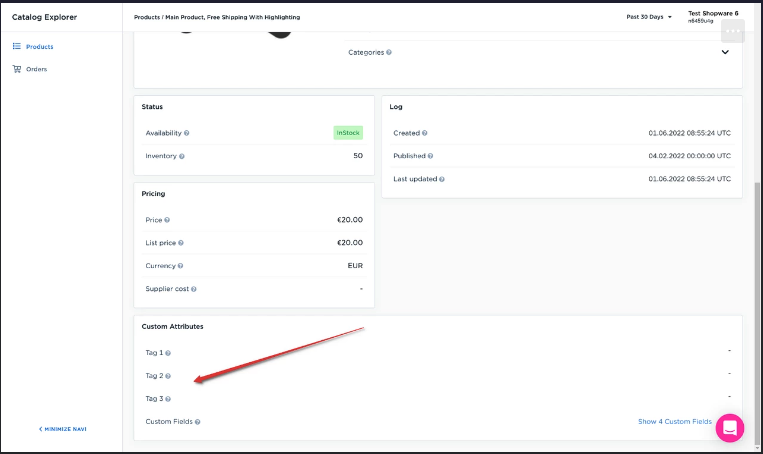
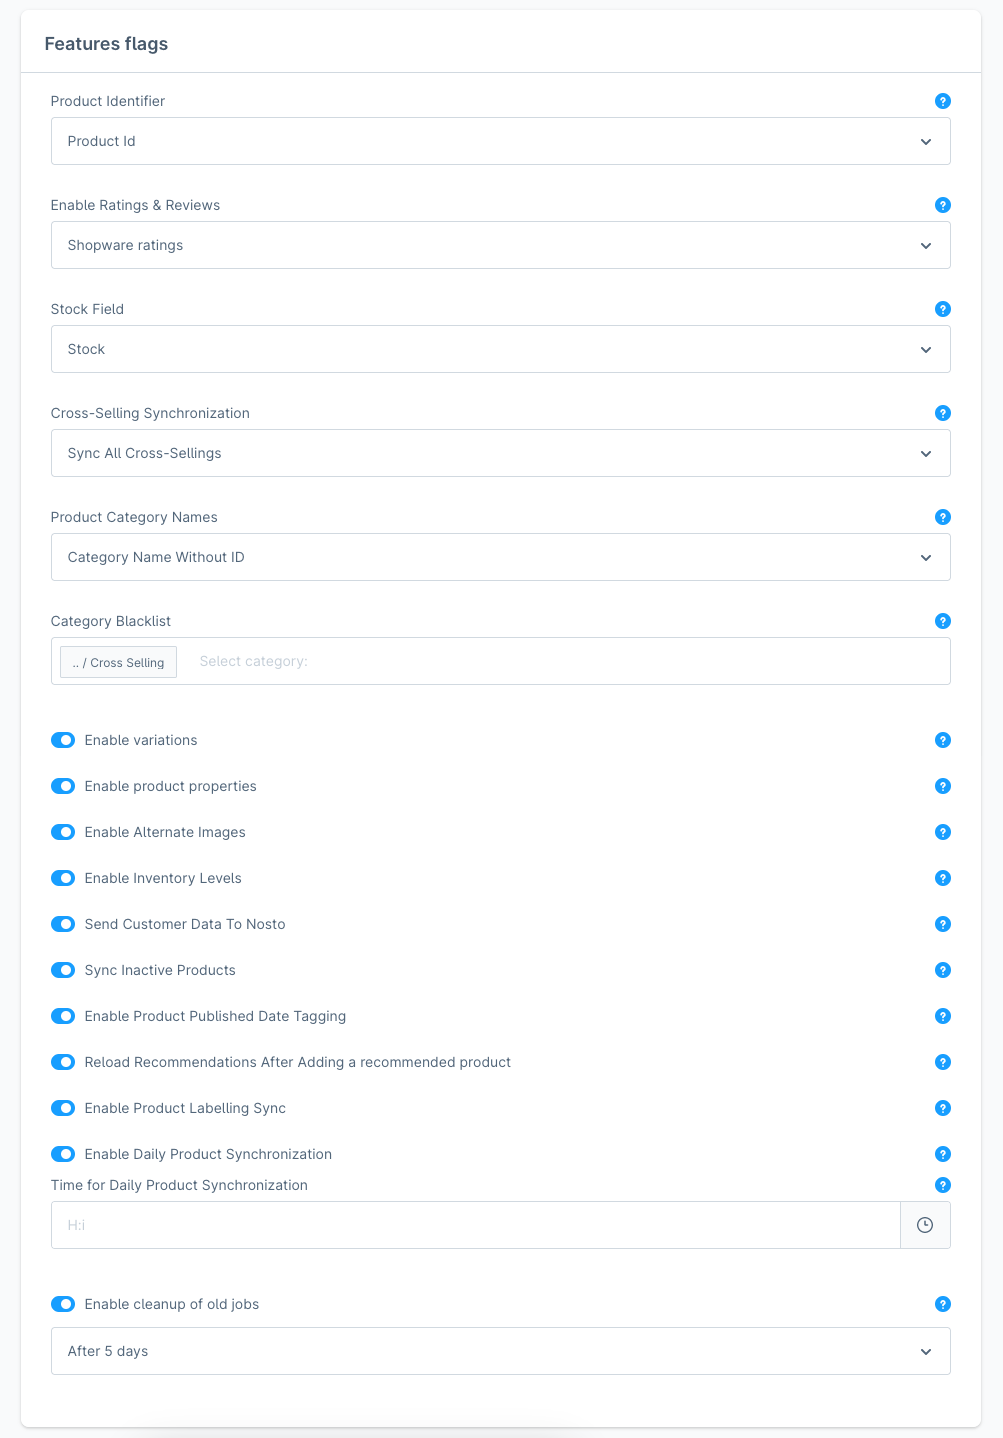
Features Flags Overview
This configuration card contains multiple feature toggles which enable/disable what information to send to Nosto with product data. Also, there is possibility to enabling/disable ratings and reviews. Nosto supports tagging the rating and review metadata. The rating value and review count metadata can be used for creating advanced recommendation rules to promote products that are well reviewed.
Uninstallation
The plugin can be uninstalled from within Shopware admin My Extensions section, with standard shopware flow. More information can be found here
Nosto Plugin Job Scheduling
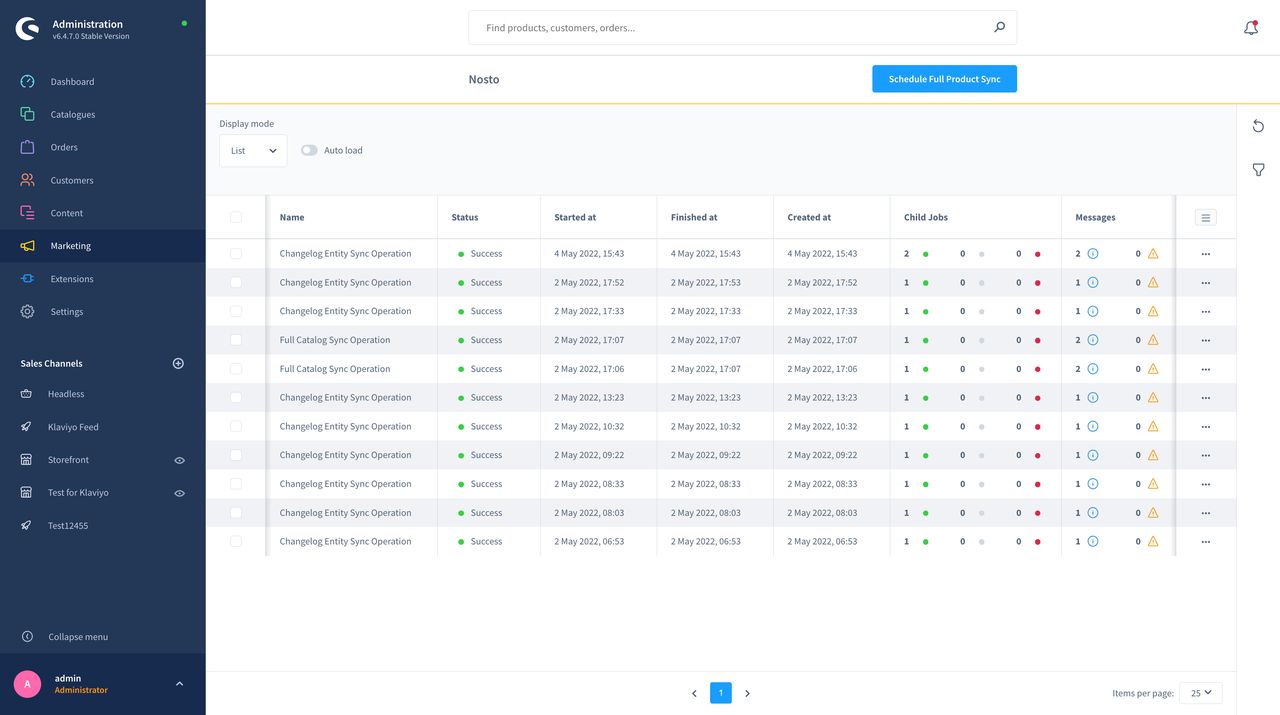
Once the plugin is installed and activated, in Shopware 6 administration you should be able to see the menu item under
the Marketing tab which will take us to the Nosto plugin dashboard. Marketing → Nosto Jobs Listing
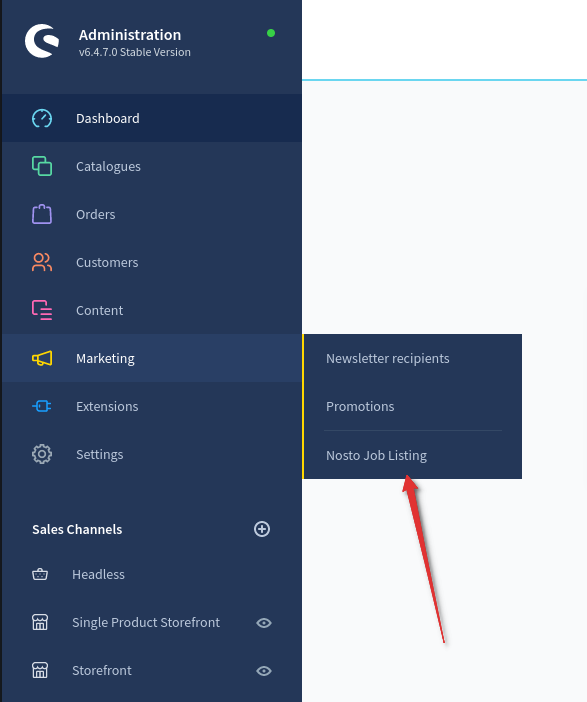
Features of Job Scheduling Dashboard
Once you are on the Nosto job listing page, you should be able to see the scheduled jobs list.
On the job listing page we are able to reach out to the complete job information. After plugin installation all products can be synced with Nosto via scheduling associated jobs by clicking over the control button “Schedule Full Product Sync”.
There are 7 columns here with the proper information about the current job.
Views of Job Scheduling Dashboard
There are 3 different type of dashboard view in Nosto plugin. View modes can be switched from the dashboard action bar on top of the job listing.
Listing View
List view is the default view of the dashboard with filtering support.
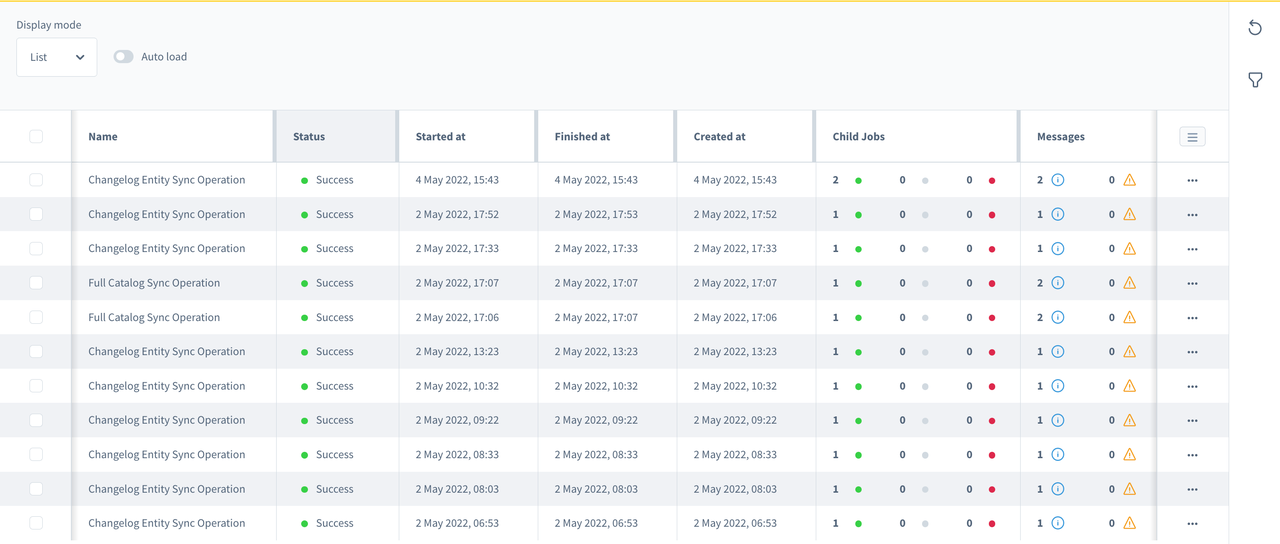
Grouped view
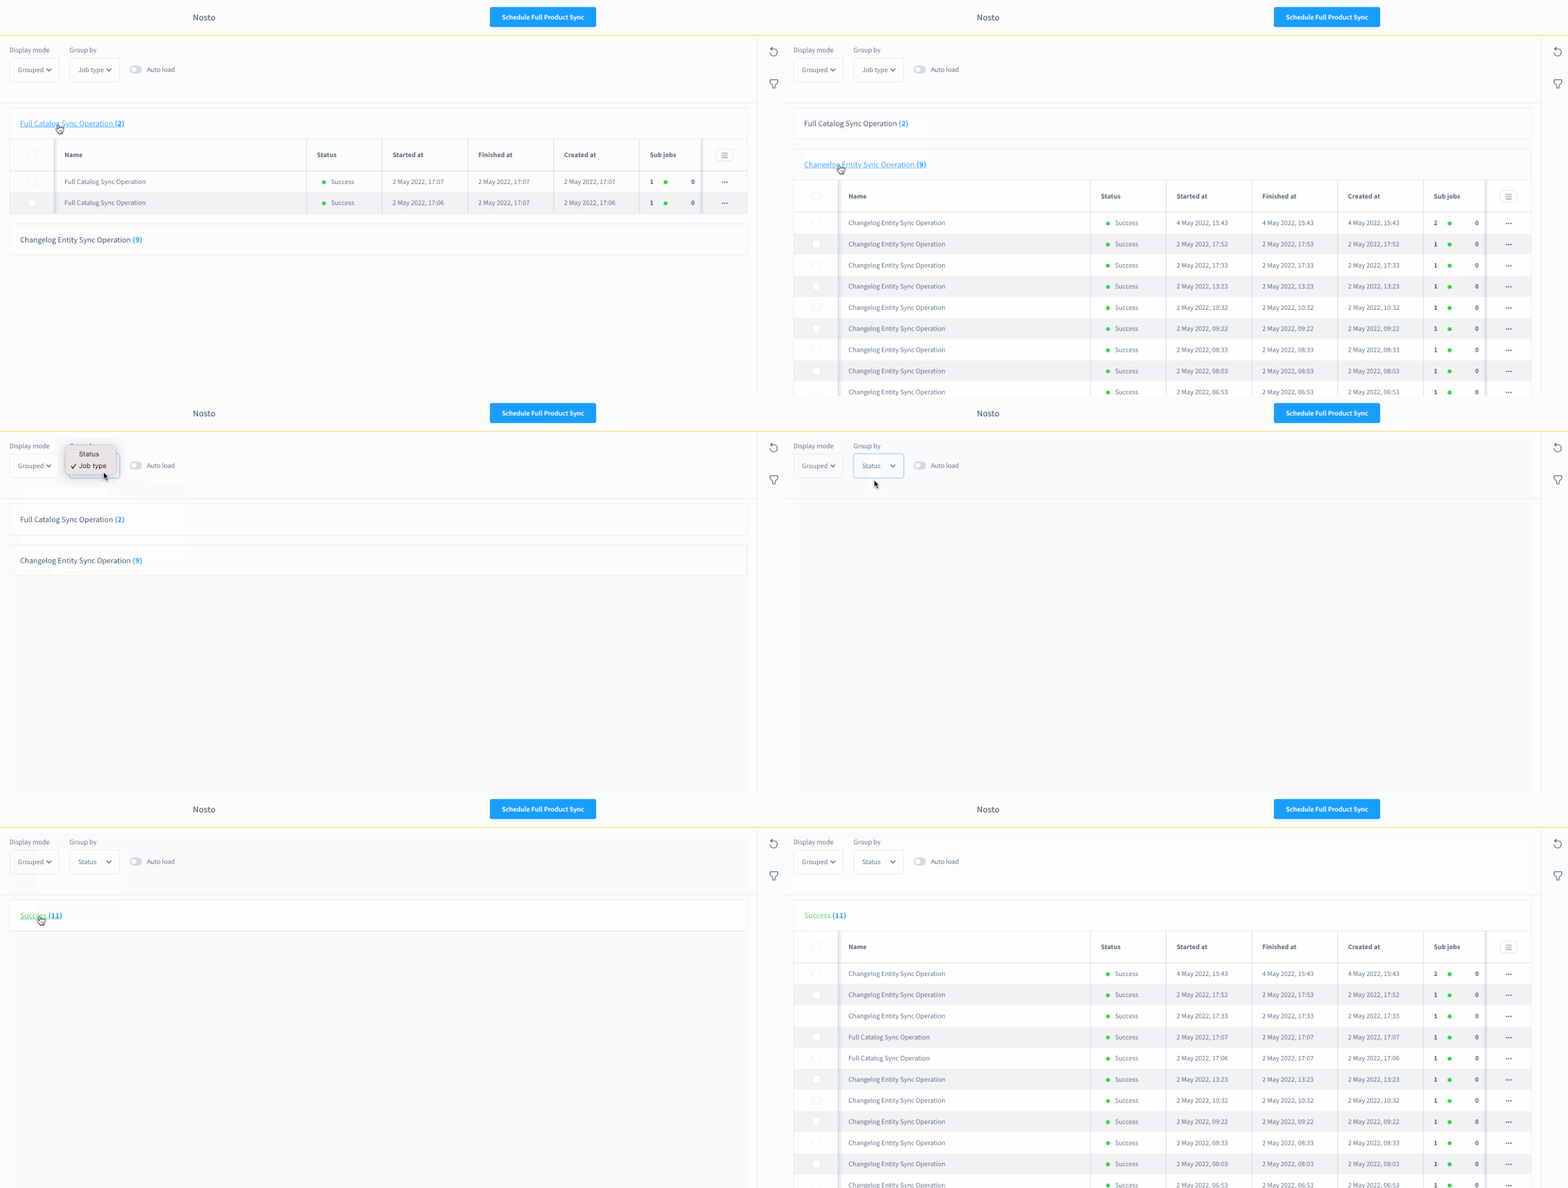 The grouped view has 2 types of grouping itself.
- Group by status
- Group by Job type.
Grouping types can be switched from the action bar at the top.
Chart view
Charts view allows us to group the jobs by type or by status and show them divided by dates.
At the top of the charts bar we have the dropdown selection where we can select the date range:
30 Days.
14 Days.
7 Days.
Last 24 hours.
Yesterday.
By clicking on the colored dot badge we can hide/show the chart line and info corresponding to the badge color and the
type/status in front of it.
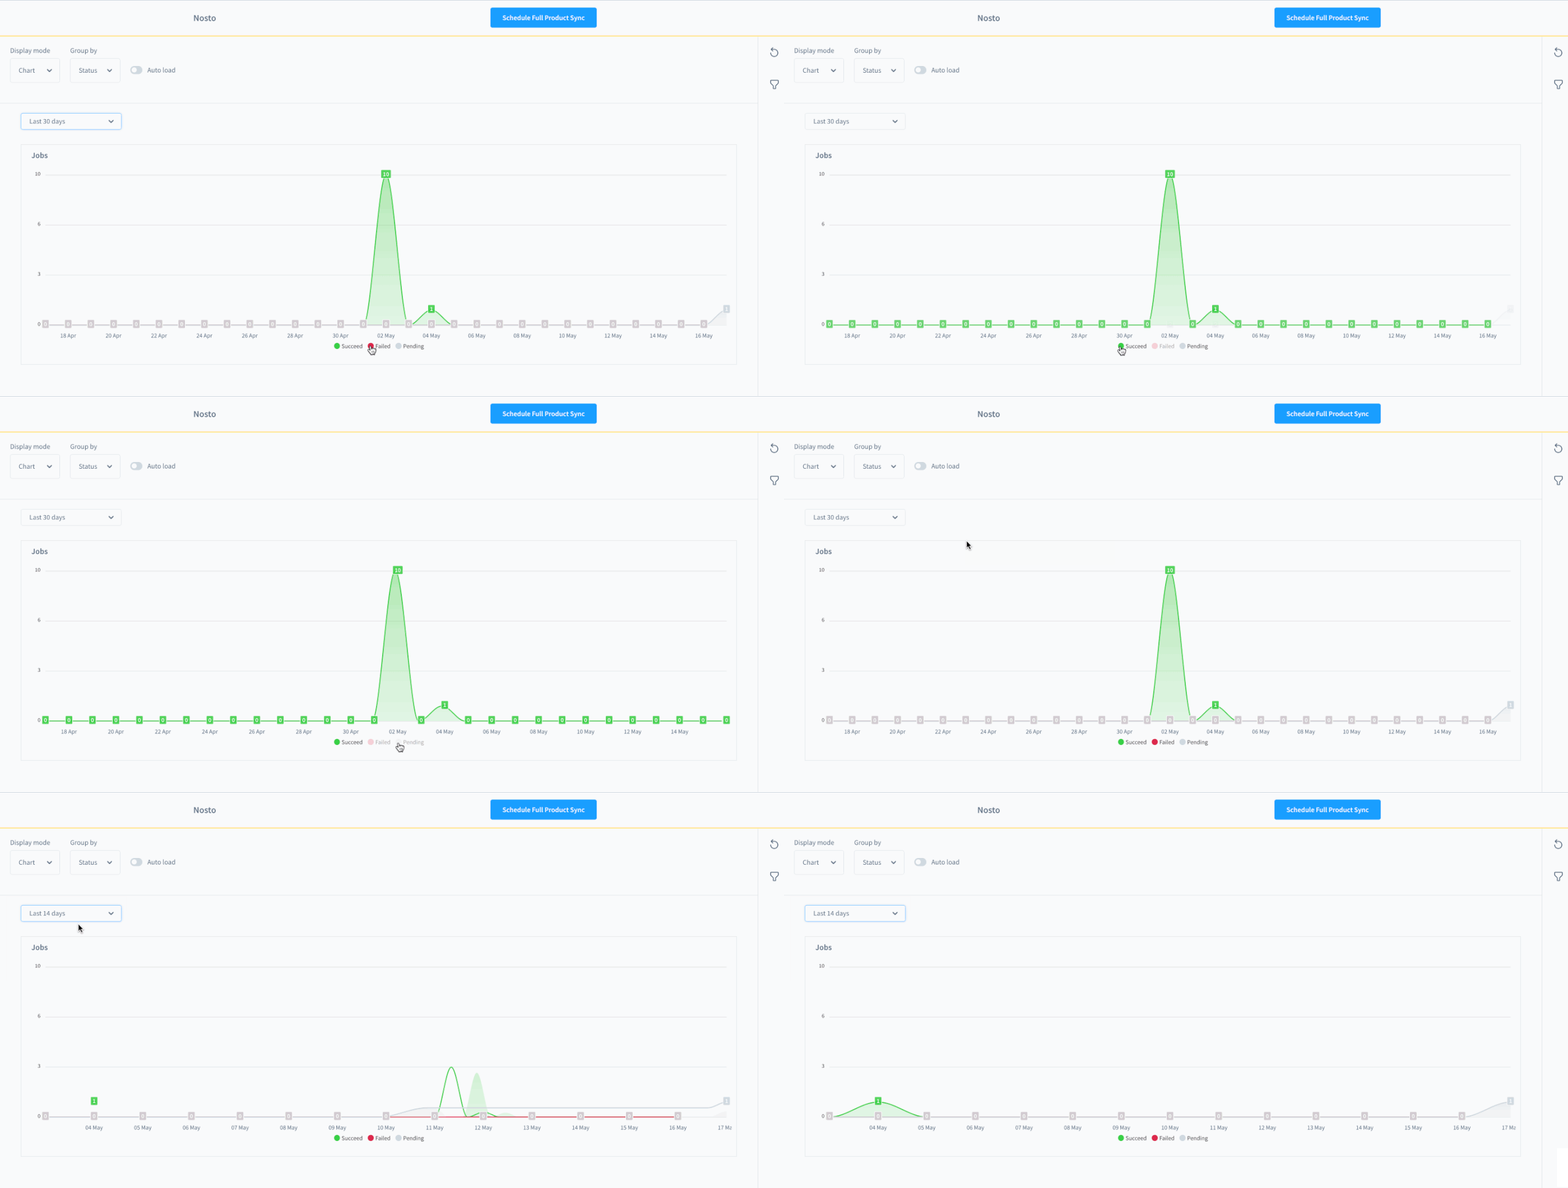
At the bottom of the charts there are colored dot badges with the chart line name (corresponding to the chart grouping mode status/type).
Auto Load
In the Actions at the top of the Nosto dashboard there is a switch field named Auto Load.
Job Listing page has auto-reload feature so you don't even need to reload whole page to check job’s execution statuses. Listing data refreshes automatically every 1 minute.
Listing page contains all Nosto plugin jobs:
- Changelog Entity Sync Operation - parent backlog events processing operation over the child's - Marketing Permission Sync Operation (newsletter), Order Sync Operation (New Order, Updated Order events), and Product Sync Operation.
- Full Catalog Sync Operation - synchronize products - parent of the Product Sync Operation.
Dependencies
- Nosto Job Scheduler which is included in the plugin sources
Development
Local setup
This setup requires the installation of the Shopware CLI.
- Install the shop with
shopware-cli project create <folder> <version>- Follow the instructions from the terminal to set up the store
- Clone or mount the plugin repository into
custom/plugins. (Symlinking is not supported) - Install all plugin dependencies
composer installnpm install
- In the store root, run the following command
bin/console plugin:refreshbin/console plugin:install NostoIntegration --activate --clearCache
Test setup
- Follow the local setup above
- Shop folder:
composer require symfony/test-pack --dev - Plugin folder:
composer test- The tests will fail for this first run
- This will create the test database and run the migrations
- The database name will be the configured DB name suffixed with
_test
- Shop folder: Change your database name in the env file to
<databaseName>_test - Shop folder: Run the following command
bin/console plugin:refreshbin/console plugin:install NostoIntegration --activate --clearCache
Now you can go back to point 3 and it will run successfully

