dennis-koster / laravel-maileon
Maileon mail driver for Laravel
Installs: 2 461
Dependents: 0
Suggesters: 0
Security: 0
Stars: 2
Watchers: 1
Forks: 0
Open Issues: 0
pkg:composer/dennis-koster/laravel-maileon
Requires
- php: ^8.2
- ext-json: *
- bensampo/laravel-enum: ^6.1.0
- laravel/framework: ^v10.0.0
- php-http/discovery: ^1.14
- psr/http-client: ^1.0
- psr/http-message: ^1.0
- psr/log: ^3.0.0
Requires (Dev)
- guzzlehttp/psr7: ^2.0
- mockery/mockery: ^1.3.3
- orchestra/testbench: ^v8.24.0
- phpstan/phpstan-mockery: ^0.12.13
- phpstan/phpstan-phpunit: ^0.12.18
- phpunit/phpunit: ^9.5
This package is auto-updated.
Last update: 2026-02-22 12:25:40 UTC
README
This package adds a custom mail driver for Maileon to Laravel.
Some configuration in the Maileon user interface is required.
Requirements
- laravel/laravel:^8.0 || ^.0
- bensampo/laravel-enum:^6.1.0
- guzzlehttp/psr7:^1.8
- php-http/discovery:^1.14
- psr/http-client:^1.0
- psr/http-message:^1.0
Installation
Install the package:
composer require dennis-koster/laravel-maileon
Publish the configuration file:
php artisan vendor:publish --provider="DennisKoster\\LaravelMaileon\\Providers\\LaravelMaileonServiceProvider"
Add the missing environment variables to your .env file:
MAILEON_API_URL=
MAILEON_API_KEY=
MAILEON_TRANSACTIONAL_CONTACT_EVENT=
Configure Maileon
Maileon does not support sending transactional emails out of the box. We need to take a couple of steps in the Maileon interface to set everything up.
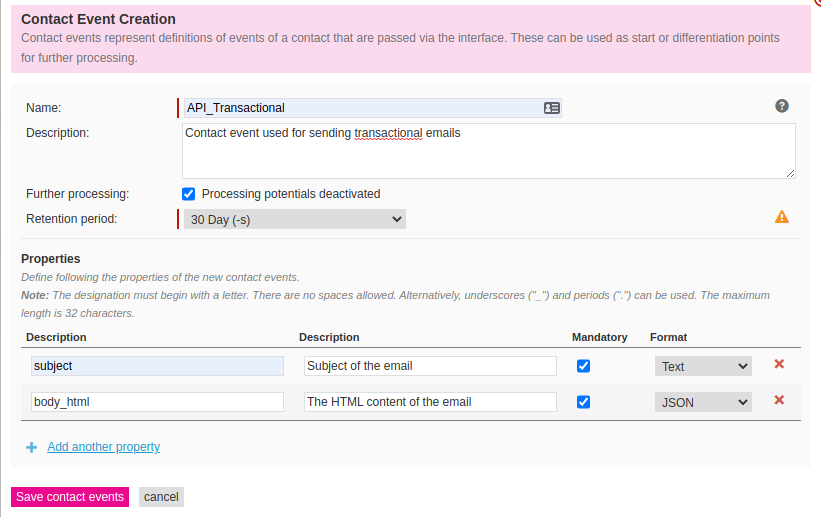
1. Creating the contact event
After logging in, go to "Lists & Contacts" in the top menu. Then click "Contact events" in the left menu, and then click the button "Create a new contact event".
Use the following settings:
Name: API_Transactional
Description: Contact event used for sending transactional emails
Further processing: Enabled
Retention period: 30 Days
Then create these two fields:
Name: subject
Description: Subject of the email
Mandatory: Yes
Format: Text
Name: body_html
Description: The HTML content of the email
Mandatory: Yes
Format: JSON (!! Very important and counter-intuitive)
2. Setting up the trigger
Click Mailings in the top menu, and then navigate to "Trigger drafts" in the left menu.
Then click the [new trigger draft] button.
Choose the "New content editor" option when prompted.
Enter a name that's easily recognizable like "Transactional mail"
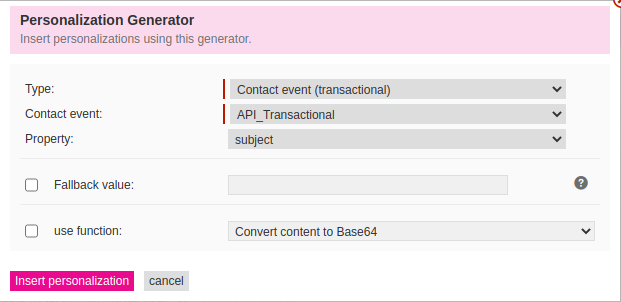
For the subject, click the blue [.] icon to the right side of the input field.
Select the type Contact event (transactional).
Then select the Contact event we just created (API_Transactional) and select the property subject.
Finally, press the [Insert personalization] button.
Enter your sender details and then click the blue Continue button in the right bottom corner.
Choose the "From scratch option".
When presented with the drag and drop editor, click the [Drag & drop editor] button on the bottom left of the screen, and select Code editor.
Remove all contents in the code editor and replace it with the following:
[[TRANSACTION|"body_html[0]"]]
Then click the [Save] button in the top right corner, followed by the X Close button.
Click the blue Contine button again in the bottom right corner of the screen, to go to the Dispatch logic & Approval screen.
For the Mailing logic type, select Single dispatch for an event and then for incident, select the trigger we created (API_Transactional).
Enable Permission neutral sendout.
Finally, click the [activate Trigger-mailing] button in the bottom right corner.


