yidas / mtr-database
MTR Batch processing storing in database with dashboard
Maintainers
Requires
- php: >=5.4.0
README
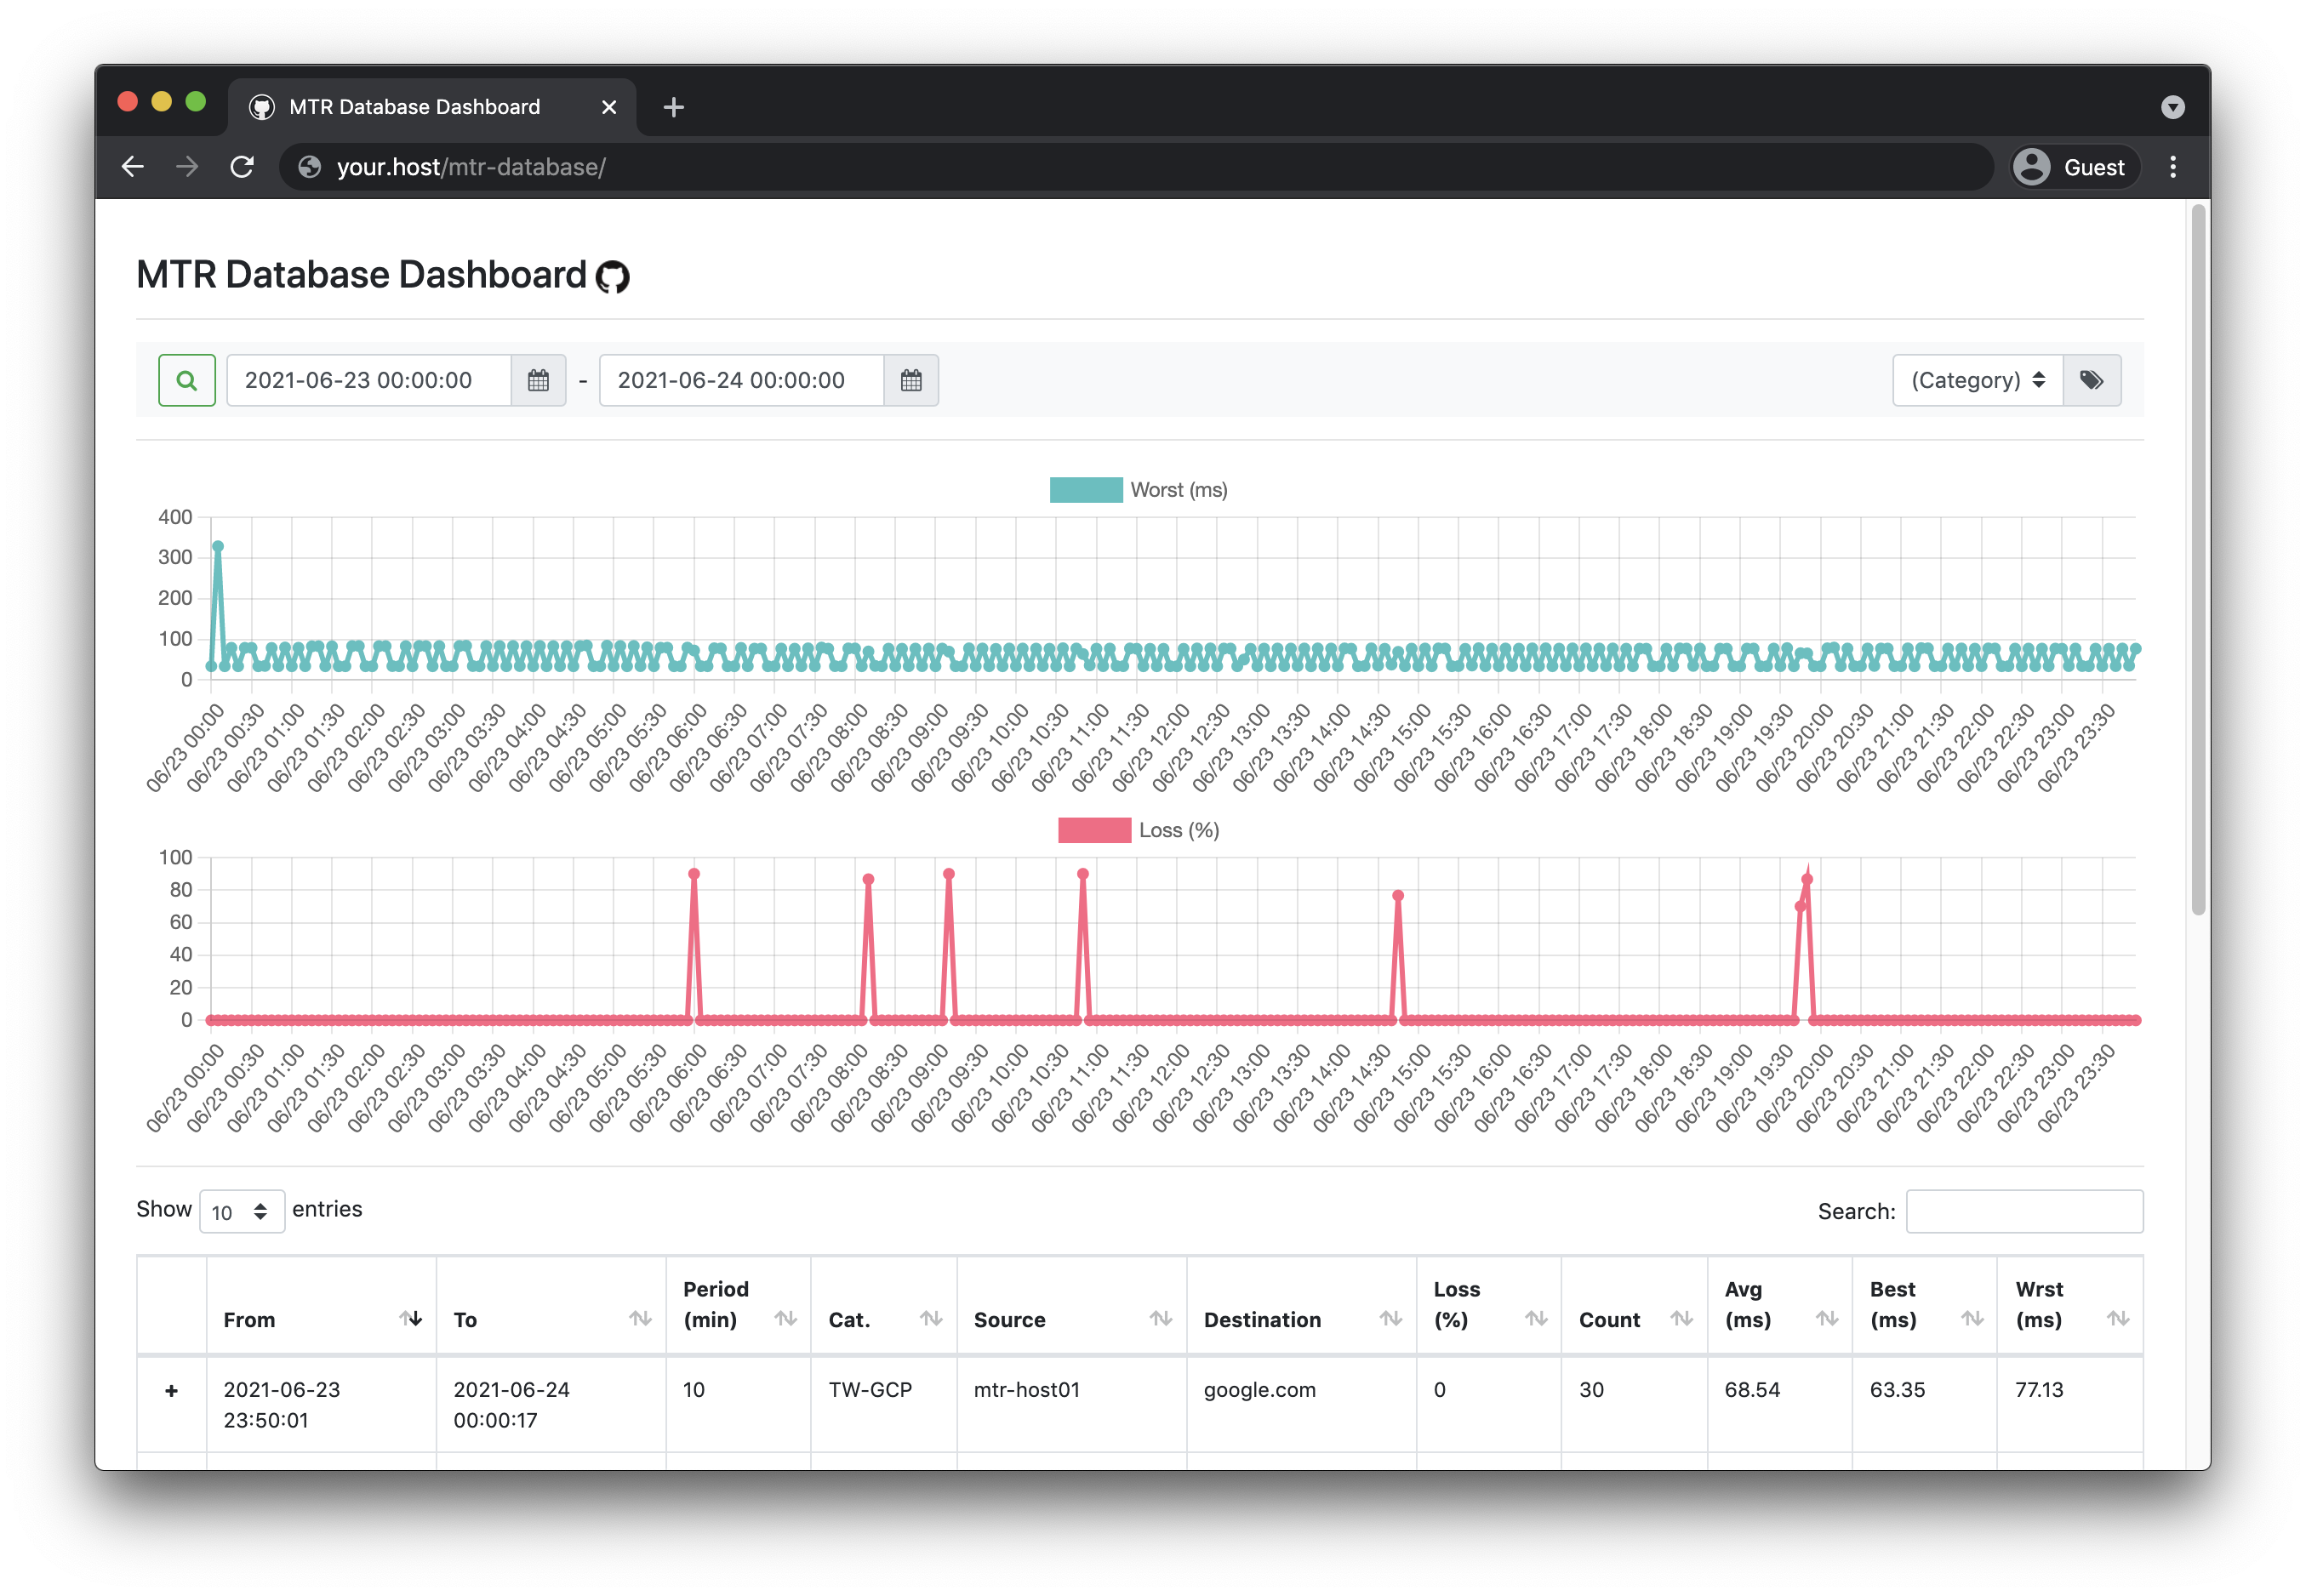
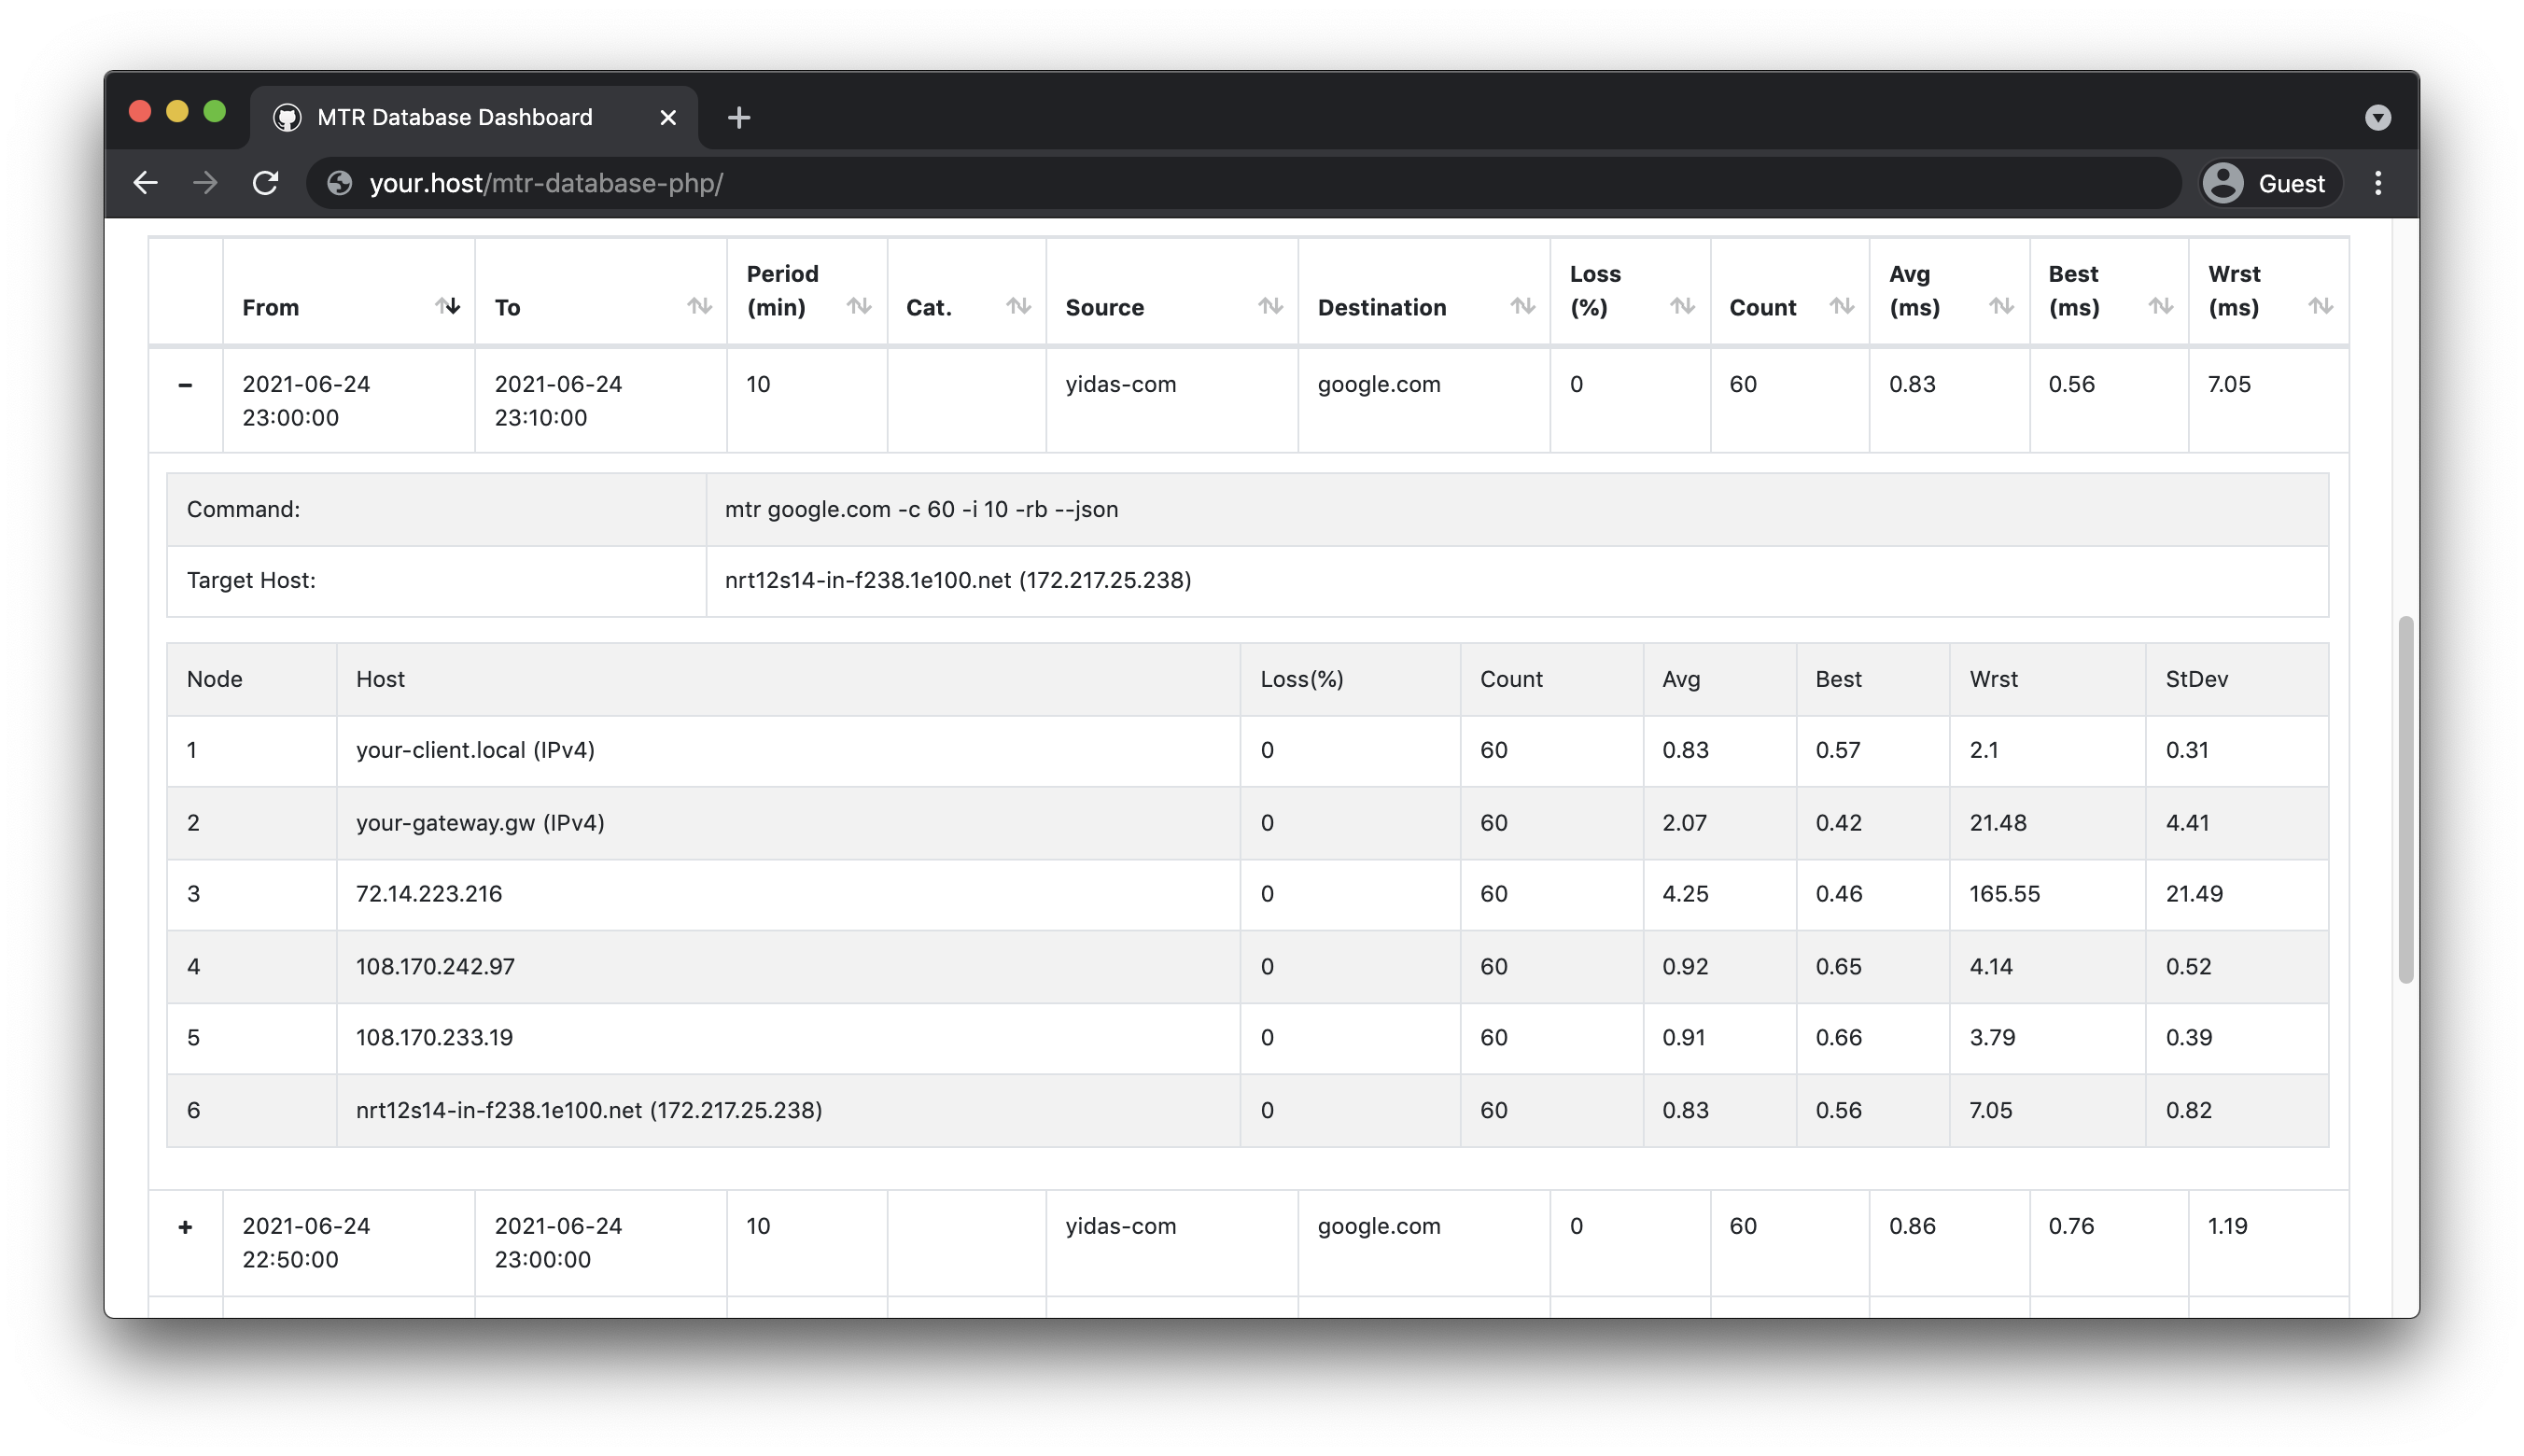
MTR (My traceroute) centralized monitoring dashboard with agent deployment
OUTLINE
DEMONSTRATION
INTRODUCTION
Easy to deploy agents and collect MTR data into a database for monitoring via a web dashboard with charts.
REQUIREMENTS
This library requires the following:
- MTR library (CLI) 0.9+
- PHP 5.4.0+|7.0+
INSTALLATION
Download
Composer Installation
Using Composer to install is the easiest way with auto-installer:
composer create-project --prefer-dist yidas/mtr-database
Wget Installation
You could see Release for picking up the package with version, for example:
$ wget https://github.com/yidas/mtr-database-php/archive/master.tar.gz -O mtr-database-phpi.tar.gz
After download, uncompress the package:
$ tar -zxvf mtr-database-php.tar.gz
SETUP
Database Setup
After the download, you could start to set up the config.inc.php with your database connection:
...
    'database' => [
        'host' => '',
        'driver'    => 'mysql',
        'database'  => 'mtr_database',
        'username'  => '',
        'password'  => '',
        'table' => 'records',
        'charset'   => 'utf8',
        'collation' => 'utf8_unicode_ci',
    ],
...
Then run install.php which will help you to install the database & table:
$ php install.php
Installation completed
Agent Setup & Launch
The default setting of the agent can be configurated in config.inc.php:
...
    'general' => [
        'mtrCmd' => 'mtr',
        'timezone' => 'Asia/Taipei',
        'category' => 'agent-01',   // Category mark for distinguishing
    ],
    'mtr' => [
        'host' => 'your.host',
        'period' => 10,     // Minute
        'count' => 60,      // Report-cycles
        'tcp' => false,     // TCP mode
        'port' => 443,      // Port number for TCP mode
    ],
    'api' => [
        'key' => '',            // API key must be the same bewteen agent and collector
        'agent' => [
            'enabled' => false, // To send MTR data to collector via API Agent (deafult is database)
            'reportUrl' => '',  // Collector's API URL
        ],
        'collector' => [
            'enabled' => false, // To receive MTR data from agent via API
        ],
    ],
...
After the setting, enjoy to run or set launch.php with your prefered arguments in crontab:
$php launch.php
Process success
Set crontab into /etc/cron.d/mtr-database:
# Launch and record MTR every 10 miniutes by default ('period' => 10)
*/10 * * * * root php /var/www/html/mtr-database/launch.php >/dev/null 2>&1

# Purge data before 90 days by default (Optional)
00 00 * * * root php /var/www/html/mtr-database/purge.php >/dev/null 2>&1
The default batch period is configured to be 10 minutes, so we can set the batch to be executed every 10 minutes.
API for collector & agents
Regarding the introduction structure diagram, it's better to collect agents' MTR data via API (Default is database).
The endpoint path of collector (reportUrl) is /collect.php, you could place the project in the web path such as /var/www/html/mtr-database/index.php.
Configuration for collector, the database setting is required:
    'api' => [
        'key' => 'your-own-api-key',            // API key must be the same bewteen agent and collector
        'agent' => [
            'enabled' => false, // To send MTR data to collector via API Agent (deafult is database)
            'reportUrl' => '',  // Collector's API URL
        ],
        'collector' => [
            'enabled' => true,  // To receive MTR data from agent via API
        ],
    ],
    'database' => [
Configuration for agents:
    'api' => [
        'key' => 'your-own-api-key',            // API key must be the same bewteen agent and collector
        'agent' => [
            'enabled' => true, // To send MTR data to collector via API Agent (deafult is database)
            'reportUrl' => 'https://your.host/mtr-database/collect.php',  // Collector's API URL
        ],
        'collector' => [
            'enabled' => false, // To receive MTR data from agent via API
        ],
    ],
Dashboard
The endpoint path of MTR Dashboard is /index.php and it's disable by default, you could place the project in the web path such as /var/www/html/mtr-database/index.php.
Turn the enabled on and set the username and password for the authentication in config.ini.php, the database setting is required:
...
    'dashboard' => [
        'enabled' => true,
        'username' => '',
        'password' => '',
        'categories' => [''],   // Category list for selection
    ],
    'database' => [
...
categorieswill enable you to query specific data by category settings or query all data with default blank values.
ADVANCED USAGE
Agent Configuration
The configuration file config.inc.php allows you to set the default settings for MTR launching. However, you can also specify parameters immediately in the command to be run.
Host
Host parameter allows you to specify the target host to be tracked with -h --host parameter:
php launch.php --host="yourhost.local"
Period
Period argument allocate the number of minutes between crontab intervals with -p --period parameter:
# Launch and record MTR every 5 miniutes
*/5 * * * * root php /var/www/html/mtr-database/launch.php --period=5 >/dev/null 2>&1
In addition, Count argument will distribute the sending count between the interval according to the Period setting with -c --report-cycles parameter:
# Launch and record MTR every 1 miniutes, and each report will send 10 count (send every 6 seconds)
*/1 * * * * root php /var/www/html/mtr-database/launch.php --period=1 --report-cycles=10 >/dev/null 2>&1
TCP
TCP argument allows you to use MTR TCP mode with specified port, -T --tcp for enabling TCP mode and -P --port for setting port:
php launch.php --tcp -port=443
Category
Category allows to categorize each monitor command and supports filtering from the dashboard, which also can be achieved by using the --category parameter:
php launch.php --category="Monitor-A1"
Purge
Running purge.php will delete old records older than the given number of days. You can use the -d --days parameter to set with (default is 90 days):
00 00 * * * root php /var/www/html/mtr-database/purge.php --days=30 >/dev/null 2>&1