ycs77 / laravel-line-bot
LINE Messaging API SDK for Laravel.
Installs: 45
Dependents: 0
Suggesters: 0
Security: 0
Stars: 4
Watchers: 1
Forks: 0
Open Issues: 3
pkg:composer/ycs77/laravel-line-bot
Requires
- php: ^7.1
- facade/ignition-contracts: ^1.0
- illuminate/console: ~5.7|~5.8|^6.0
- illuminate/contracts: ~5.7|~5.8|^6.0
- illuminate/database: ~5.7|~5.8|^6.0
- illuminate/http: ~5.7|~5.8|^6.0
- illuminate/support: ~5.7|~5.8|^6.0
- linecorp/line-bot-sdk: ^4.1
Requires (Dev)
- mockery/mockery: ^1.0
- orchestra/testbench: ~3.7|~3.8|^4.0
- phpunit/phpunit: ^7.0|^8.0
This package is auto-updated.
Last update: 2020-08-16 08:17:03 UTC
README
開發中
在 Laravel 中快速開發 Line Bot
安裝前準備
- 建立一個 Laravel (或 Lumen) 專案
- 在 Line Developers 設定新的 Messaging API
- 準備一個 HTTPS 的網址,開發時建議使用 ngrok 來建立臨時網址。
安裝
使用 Composer 安裝:
composer require ycs77/laravel-line-bot
發布設定檔案 (選用):
php artisan vendor:publish --provider=Ycs77\\LaravelLineBot\\LineBotServiceProvider
設定 Line Bot 金鑰到 .env 檔裡 (在剛才新增的 Messaging API 裡產生):
LINE_BOT_CHANNEL_ACCESS_TOKEN=xxx...
LINE_BOT_CHANNEL_SECRET=123...
執行安裝指令,產生 Laravel LineBot 所需的檔案:
php artisan linebot:install
增加 webhook 路徑到 Laravel 的 VerifyCsrfToken Middleware 中的 except 陣列,以禁用 CSRF 檢查:
app/Http/Middleware/VerifyCsrfToken.php
class VerifyCsrfToken extends Middleware
{
    protected $except = [
        'webhook',
    ];
}
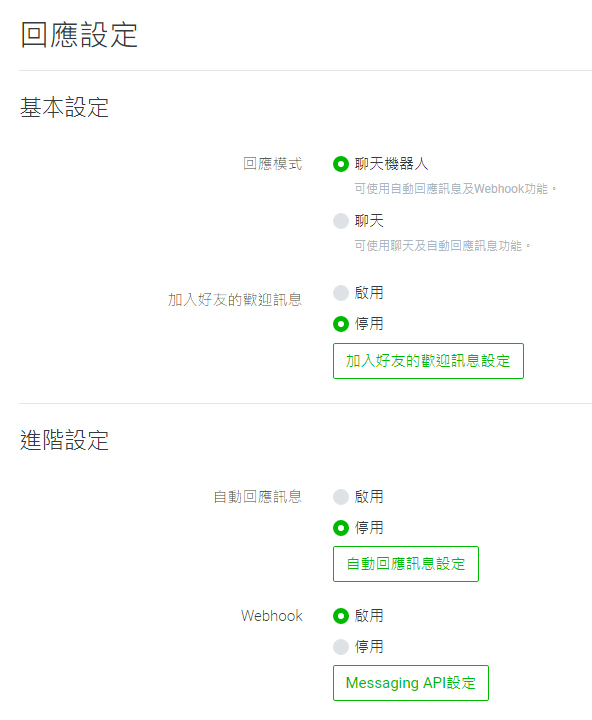
最後,開啟 Line Developers,關閉「歡迎訊息」和「自動回應訊息」,並開啟和設定 Webhook 網址:
Lumen
如果使用 Lumen,就需要別的方式來註冊。使用 Composer 安裝完套件後,首先先把 config 檔案複製到 config/linebot.php (若 config 資料夾不存在請自行創建),然後開啟 bootstrap/app.php,新增下方程式碼來註冊。
bootstrap/app.php
$app->configure('app');
$app->configure('linebot');

/*
|--------------------------------------------------------------------------
| Register Service Providers
|--------------------------------------------------------------------------
|
| ...
|
*/

$app->register(Ycs77\LaravelLineBot\LineBotLumenServiceProvider::class);
最後,執行 php artisan linebot:install 和在 Line Developers 設定 webhook 網址即可。
使用
首先先開啟 routes/linebot.php,在 Laravel LineBot 中所有的監聽訊息及回傳訊息的程式,都是在這個檔案中:
routes/linebot.php
<?php

use Ycs77\LaravelLineBot\Facades\LineBot;

LineBot::on()->text('嗨', function () {
    LineBot::text('你好')->reply();
});

LineBot::on()->fallback(function () {
    LineBot::text('我不大了解您的意思...')->reply();
});
在這個範例中,如果用戶傳送 嗨 時,會自動回應 你好。
監聽事件 (Event)
最基本的事件是監聽文字訊息事件,當然也可以使用 {name} 的替代文字來擷取用戶傳送的部分文字,並轉換成變數:
用法參考自 Botman
LineBot::on()->text('我叫{name}', function ($name) {
    LineBot::text("你好{$name}")->reply();
});
若沒有匹配成功任何訊息,將會回覆預設回應:
LineBot::on()->fallback(function () {
    LineBot::text('我不大了解您的意思...')->reply();
});
除了文字訊息事件,也可以監聽圖片訊息事件、跟隨事件等:
這些功能目前尚未完成
LineBot::on()->image(function () {
    LineBot::text('圖片')->reply();
});

LineBot::on()->follow(function () {
    LineBot::text('加為好友')->reply();
});
全部可以監聽的事件:
text(): Text Message Event (文字訊息事件)image(): (未完成) Image Message Event (圖片訊息事件)video(): (未完成) Video Message Event (影片訊息事件)audio(): (未完成) Audio Message Event (音檔訊息事件)file(): (未完成) File Message Event (檔案訊息事件)location(): (未完成) Location Message Event (位置訊息事件)sticker(): (未完成) Sticker Message Event (貼圖訊息事件)follow(): (未完成) Follow Event (加為好友事件)unfollow(): (未完成) Unfollow Event (取消好友事件)join(): (未完成) Join Event (LineBot 加入聊天室事件)leave(): (未完成) Leave Event (LineBot 退出聊天室事件)memberJoin(): (未完成) Member Join Event (其他人加入聊天室事件)memberLeave(): (未完成) Member Leave Event (其他人退出聊天室事件)postback(): (未完成) Postback Event (Postback 事件)accountLink(): (未完成) Account Link Event (用戶連結事件)fallback(): Fallback Event (預設回應)
回應 (Reply)
文字訊息:
LineBot::on()->text('嗨', function () {
    LineBot::text('你好')->reply();
});
按鈕選單:
行動按鈕使用方式請參考 行動按鈕 (Action)
use Ycs77\LaravelLineBot\ActionBuilder;
use Ycs77\LaravelLineBot\Message\TemplateBuilder;

LineBot::on()->text('選單', function () {
    LineBot::template('這是我的選單', function (TemplateBuilder $template) {
        $template->button('選單', '請選擇', 'https://example.test/image/path...', function (ActionBuilder $action) {
            $action->message('購買');
            $action->message('加到購物車');
            $action->url('瀏覽網站', 'https://developers.line.biz/zh-hant/');
        });
    })->reply();
});

LineBot::on()->text('購買', function () {
    LineBot::text('購買成功!')->reply();
});

LineBot::on()->text('加到購物車', function () {
    LineBot::text('加到購物車成功!')->reply();
});
全部可以使用的回覆訊息類型:
text(): Text (文字)sticker(): (未完成) Sticker (貼圖)image(): (未完成) Image (圖片)video(): (未完成) Video (影片)audio(): (未完成) Audio (音檔)location(): (未完成) Location (位置)imagemap(): (未完成) Imagemap (圖片映射)template(): Template (模板訊息)flex(): (未完成) Flex
全部可以使用的模板訊息類型:
buttons(): Template Buttons (按鈕選單)confirm(): Template Confirm (確認)carousel(): (未完成) Template Carousel (輪播)imageCarousel(): (未完成) Template Image carousel (圖片輪播)
快速回覆 (Quick Reply)
行動按鈕使用方式請參考 行動按鈕 (Action)
快速回覆無法使用 Url Action
use Ycs77\LaravelLineBot\QuickReplyBuilder;

LineBot::on()->text('哈囉', function () {
    LineBot::text('請問有什麼能為您服務?')
        ->quickReply(function (QuickReplyBuilder $action) {
            $action->message('商品清單');
            $action->message('聯絡資訊');
        })
        ->reply();
});

LineBot::on()->text('商品清單', function () {
    LineBot::text('商品清單...')->reply();
});

LineBot::on()->text('聯絡資訊', function () {
    LineBot::text('聯絡資訊...')->reply();
});
行動按鈕 (Action)
行動按鈕需搭配 Quick Reply 和 Template 訊息使用。以下為使用範例:
$action->message('購買');
$action->message('加到購物車');
$action->url('瀏覽網站', 'https://example.test/');
全部可以使用的行動按鈕:
message(): Message (文字訊息)url(): Url (網址)postback(): Postbacklocation(): Location (選擇位置)datetimePicker(): Datetime Picker (日期)camera(): Camera (相機)cameraRoll(): Camera Roll (圖片庫)
用戶資訊
取得 Line 用戶資料
使用 LineBot::profile() 即可取得當前用戶的資訊:
LineBot::on()->text('profile', function () {
    $profile = LineBot::profile();
    LineBot::text("你好 {$profile->name()}")->reply();
});
可以取得的用戶資訊:
id(): User IDname(): 用戶顯示名稱 (暱稱)picture(): 用戶大頭貼網址status(): 用戶狀態消息文字
整合 Eloquent
這個功能預設是關閉的,需要先把 LineBot 設置中的 user.enabled 改成 true,才可以開始使用 Eloquent:
還可以依需求調整
model(用戶模型) 及id(辨識用戶的欄位名稱)。
config/linebot.php
'user' => [
    'enabled' => true,
    'model' => App\User::class,
    'id' => 'line_user_id',
],
在 Lumen 中需要開啟
bootstrap/app.php取消$app->withEloquent();的註釋
然後將 users 資料表修改成以下欄位,和運行 php artisan migrate:
database/migrations/2014_10_12_000000_create_users_table.php
Schema::create('users', function (Blueprint $table) {
    $table->increments('id');
    $table->string('name');
    $table->string('line_user_id')->unique();
    $table->timestamps();
});
修改 User Model:
app/User.php
<?php

namespace App;

use Illuminate\Foundation\Auth\User as Authenticatable;
use Illuminate\Notifications\Notifiable;
use Ycs77\LaravelLineBot\CanStoreLineBotUser;
use Ycs77\LaravelLineBot\Contracts\User as UserContract;

class User extends Authenticatable implements UserContract
{
    use Notifiable, CanStoreLineBotUser;

    protected $fillable = [
        'name', 'line_user_id',
    ];
}
最後,就可以使用 LineBot::user() 來取得用戶模型了:
LineBot::on()->text('user', function () {
    $user = LineBot::user();
    LineBot::text("你好:{$user->name}")->reply();
});
Rich Menu
新增 Rich Menu 和上傳圖片
詳細配置請參考 Line 官方說明:Using rich menus
準備一張 Rich Menu 的圖片
在 config/linebot.php 中設定 rich_menu 的設定 (建議可以使用 LINE Bot Designer 來產生)。每個 Rich Menu 都要設定對應的 key (跟 Line 官方沒有關係,只是用來辨識 Rich Menu 而已),例如範例將 key 設定為 rich_menu_1:
routes/linebot.php
'rich_menus' => [
    'rich_menu_1' => [
        'size' => [
            'width' => 2500,
            'height' => 1686,
        ],
        'selected' => false,
        'name' => '我的 Rich Menu',
        'chatBarText' => '開啟選單',
        'areas' => [
            [
                'bounds' => [
                    'x' => 0,
                    'y' => 0,
                    'width' => 2500,
                    'height' => 1686,
                ],
                'action' => [
                    'type' => 'message',
                    'label' => 'Rich Menu',
                    'text' => 'Rich Menu',
                ],
            ],
        ],
    ],
],
執行 linebot:richmenu:create 命令新增 Rich Menu 和上傳圖片,參數需要 Rich Menu 的 key (上方 config 設定) 和圖片路徑 (範例圖片路徑為 "public/image.jpg"):
php artisan linebot:richmenu:create rich_menu_1 "public/image.jpg"
查看 Rich Menu
查看全部 Rich Menu ID:
php artisan linebot:richmenu:list
查看全部 Rich Menu 的原始資料:
php artisan linebot:richmenu:list --raw
刪除 Rich Menu
刪除指定 Rich Menu ID:
php artisan linebot:richmenu:clear richmenuid-sdg24sd56gf...
刪除全部 Rich Menu:
php artisan linebot:richmenu:clear --all
調用 LINE 官方 SDK 的 API
使用 LineBot::base() 即可調用 LINE 官方 SDK 的 API:
LineBot::on()->text('LINE SDK', function () {
    $token = LineBot::getEvent()->getReplyToken();
    LineBot::base()->replyText($token, '回傳文字...');
});
參考
測試
運行測試:
composer test
運行指令產生測試覆蓋率報告,報告產生在 build/coverage-report:
composer coverage
License
Under the MIT license.

