thepay / api-client
API client for ThePay - payment gate API
Installs: 364 122
Dependents: 1
Suggesters: 0
Security: 0
Stars: 6
Watchers: 6
Forks: 1
Open Issues: 0
pkg:composer/thepay/api-client
Requires
- php: ~7.4|~8.0
- ext-json: *
- psr/http-client: ^1.0
- psr/http-factory: ^1.0
- psr/http-message: ^1.0|^2.0
Requires (Dev)
- friendsofphp/php-cs-fixer: *
- guzzlehttp/guzzle: ^7.7
- phpstan/phpstan: ^1.9
- phpunit/phpunit: ^9.0
Suggests
- guzzlehttp/guzzle: Widly used implementation of PSR-7 (psr/http-message), PSR-17 (psr/http-factory) and PSR-18 (psr/http-client)
- v3.x-dev
- v2.x-dev
- v2.2.0
- v2.1.3
- v2.1.2
- v2.1.1
- v2.1.0
- v2.0.0
- v1.x-dev
- v1.7.1
- v1.7.0
- v1.6.0
- v1.5.1
- v1.5.0
- v1.4.3
- v1.4.2
- v1.4.1
- v1.4.0
- v1.3.4
- v1.3.3
- v1.3.2
- v1.3.1
- v1.3.0
- v1.2.9
- v1.2.8
- v1.2.7
- v1.2.6
- v1.2.5
- v1.2.4
- v1.2.3
- v1.2.2
- v1.2.1
- v1.2.0
- v1.1.5
- v1.1.4
- v1.1.3
- v1.1.2
- v1.1.1
- v1.1.0
- v1.0.4
- v1.0.3
- v1.0.2
- v1.0.1
- v1.0.0
This package is auto-updated.
Last update: 2026-02-04 11:16:07 UTC
README
This is the official highly compatible public package of The Pay SDK which interacts with The Pay's REST API. To get started see examples below.
Requirements
All necessary requirements are defined in composer.json require property.
We strongly recommend SDK installation using Composer!
Installation
composer require thepay/api-client
Installation with suggested PSR http client.
composer require thepay/api-client guzzlehttp/guzzle
This project adheres to Semantic Versioning.
Support & Contributions
If you find any bug, please submit the issue in Github directly.
Feel free to contribute via Github issues and pull requests. We will response as soon as possible. Please have on mind the backwards compatibility and do not change requirements without previous admin agreement.
Preconditions
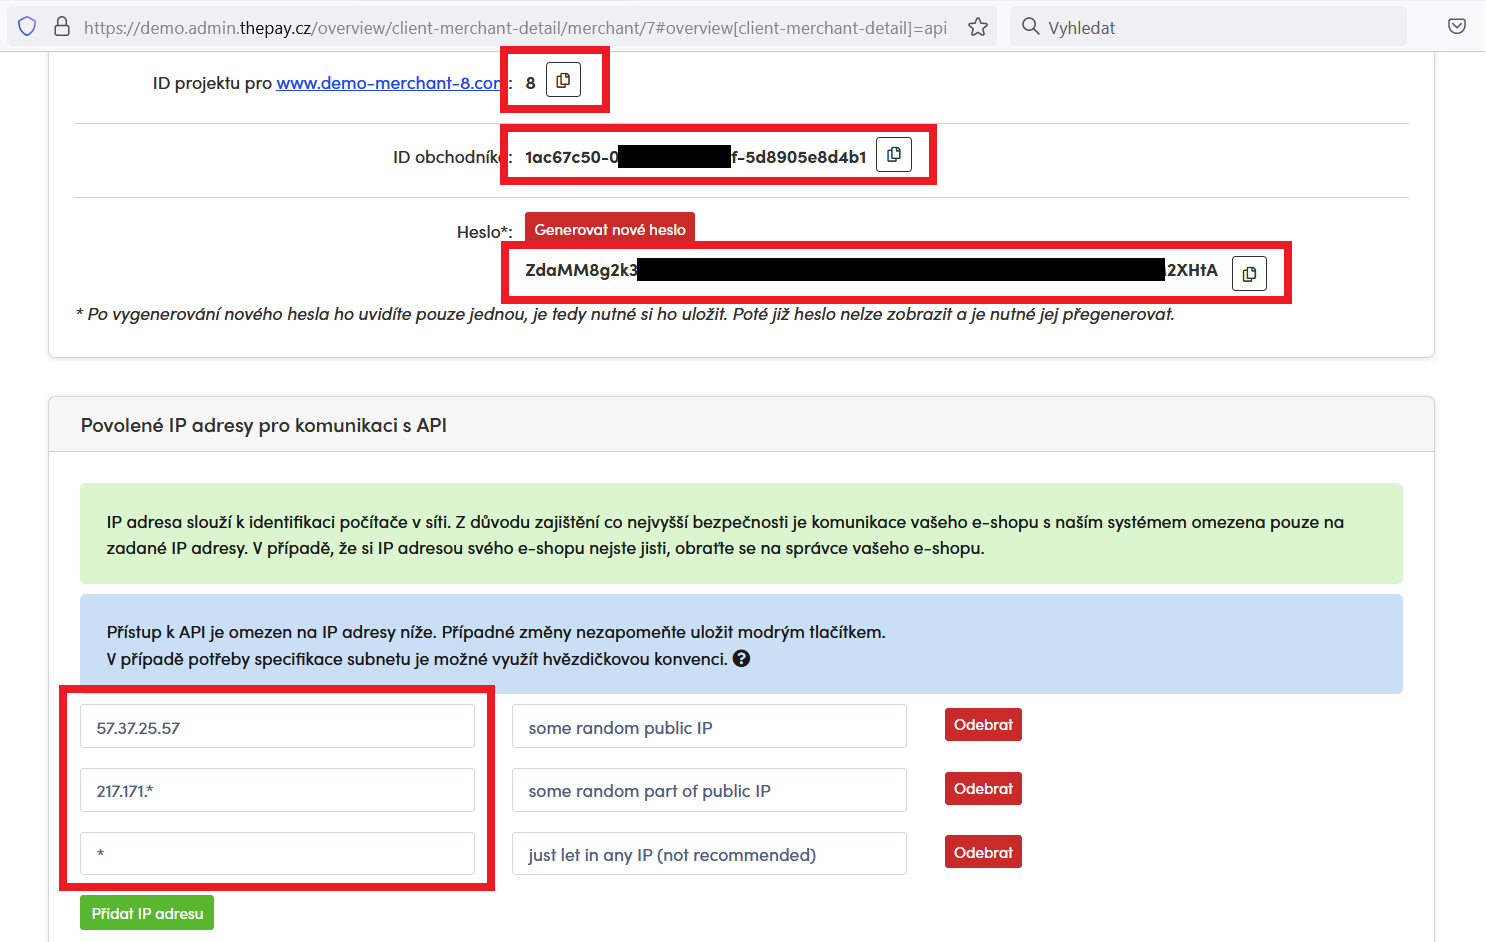
Make sure that you have all required credentials and that you've set up the API access in administration:
- merchant ID
- project ID
- password for API access
- enabled your IP address in project settings (you have to add IP address or IP address range of your server)
To test the integration you can create simplified "ready-to-go" DEMO account in our DEMO environment.
You can find all the necessary credentials in "Implementation" section under your merchant profile:
Usage
You will work with only two classes when using this SDK.
- TheConfig - for setting up the library
- TheClient - for main functionality (calling the API, rendering helpers)
Configuration
All constructor parameters are described in php doc
$merchantId = '86a3eed0-95a4-11ea-ac9f-371f3488e0fa';
$projectId = 3;
$apiPassword = 'secret';
$apiUrl = 'https://demo.api.thepay.cz/'; // production: 'https://api.thepay.cz/'
$gateUrl = 'https://demo.gate.thepay.cz/'; // production: 'https://gate.thepay.cz/'
$language = 'cs';

$theConfig = new \ThePay\ApiClient\TheConfig(
    $merchantId,
    $projectId,
    $apiPassword,
    $apiUrl,
    $gateUrl
);

$theConfig->setLanguage($language);
TheClient instance
Before making \ThePay\ApiClient\TheClient instance, some dependencies must be prepared.
If you use some DI container automation, all other dependencies than TheConfig
should be auto-injected even PSR interfaces if you have some implementations
already installed in your application.
/** @var \ThePay\ApiClient\TheConfig $theConfig */

// TheClient instance dependencies
$signatureService = new \ThePay\ApiClient\Service\SignatureService($theConfig);
/** @var \Psr\Http\Client\ClientInterface $httpClient some PSR-18 implementation */
/** @var \Psr\Http\Message\RequestFactoryInterface $requestFactory some PSR-17 implementation */
/** @var \Psr\Http\Message\StreamFactoryInterface $streamFactory some PSR-17 implementation */
// if you install suggested guzzle implementation you can use this:
// $httpClient = new \GuzzleHttp\Client();
// $requestFactory = $streamFactory = new \GuzzleHttp\Psr7\HttpFactory();
$apiService = new \ThePay\ApiClient\Service\ApiService(
    $theConfig,
    $signatureService,
    $httpClient,
    $requestFactory,
    $streamFactory
);

$thePayClient = new \ThePay\ApiClient\TheClient(
    $theConfig,
    $apiService
);
Usual workflow
There are three steps when creating a payment:
- creating a link through which the customer will realize the payment
- hadling the return of customer to your website
- handling server to server notification, which are sent by us everytime the payment state is changed
All of these steps will need to be implemented by yourself, but fear not, we have prepared examples that you can take on your journey through our SDK.
1. Payment creation
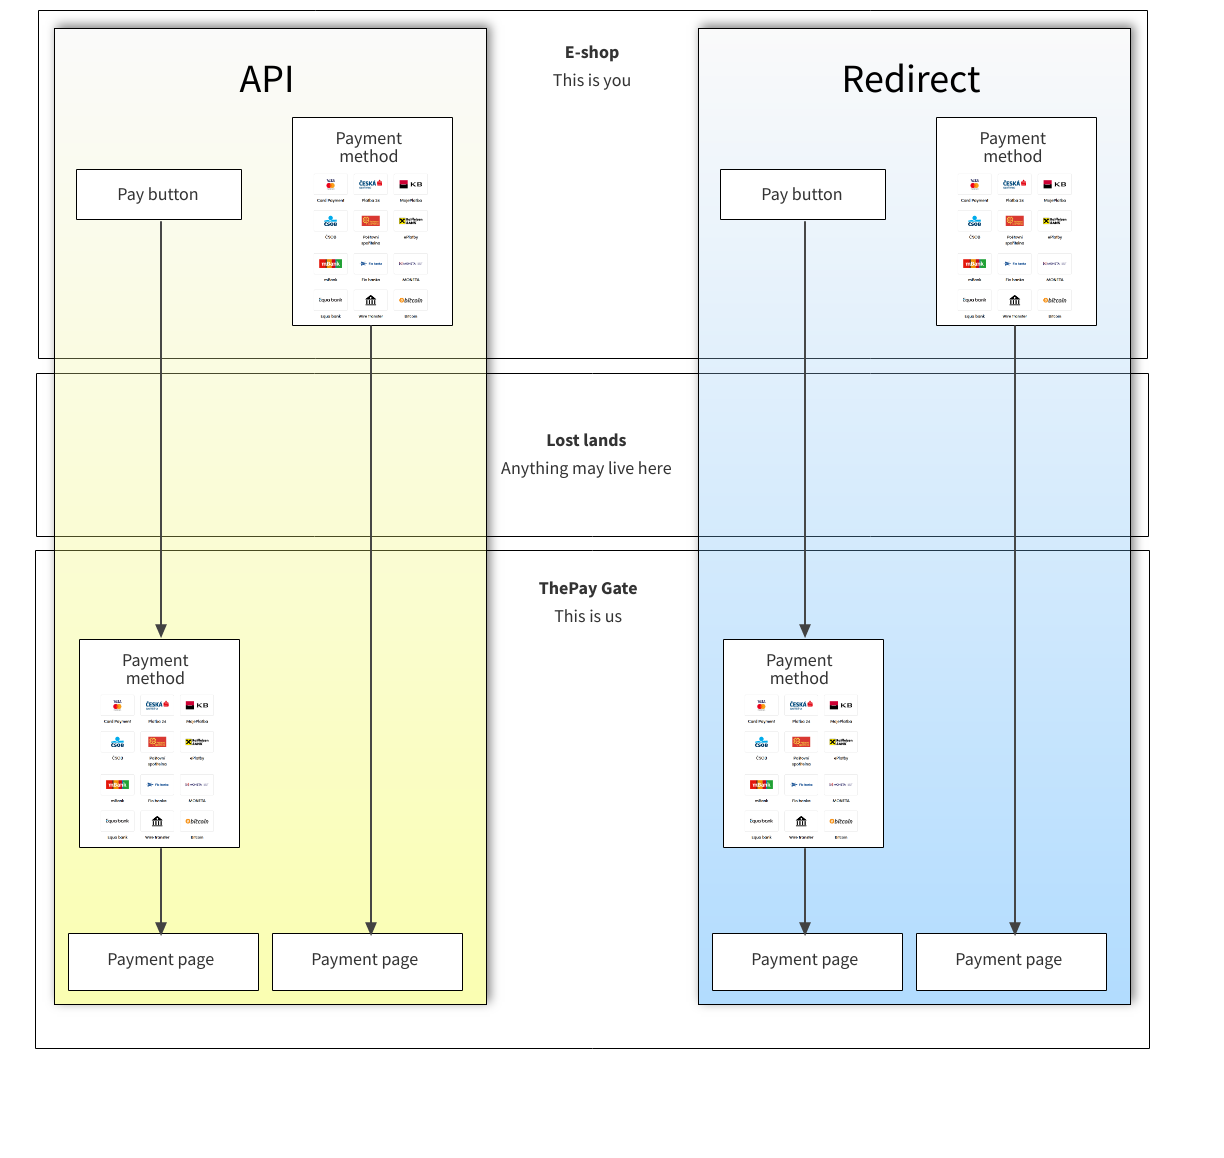
The payment (link) can be created via two methods:
- REST API
- Redirection
No matter what method you choose, you have two more options, based on preselection of payment method:
- Payment method preselected in e-shop
- Payment method NOT preselected - the customer will select payment method at ThePay gate
Even if you (or your customer) preselect the payment method, it can still be changed after redirection, unless specifically forbidden.
REST API
You can create payment (link) via REST API and redirect user to that link. The payment itself is created through an API call. This is the preferred way for custom forms and if you want to redirect user after the whole cart process is finished.
The payment method can be preselected on your side and simply added as payment parameter to the API. Otherwise, the customer will be presented with payment method selection on visiting ThePay gate through generated link.
The payment link is returned to you in a response, upon calling the API endpoint for payment creation.
Redirection of customer
The second (simpler) method is to redirect customer to payment gate with payment parameters. The payment itself will be created as soon as customer is redirected. This SDK will generate payment buttons which will do all the work.
The payment method can be preselected in your e-shop and simply added as payment parameter to the correct method. Otherwise, the customer will be presented with payment method selection on visiting ThePay gate through generated link.
The payment link is generated by the SDK, upon using the method for generating the payment button/s. The payment on our side is created at the moment the customer visits the link.
Payment amount is unchangeable
In case your order amount changes, a new payment needs to be created.
Payment flow and changes
You should always create only one payment (with its unique UID) for each order in your e-shop. You should never create new payments, except when changing the payment amount.
TL;DR - summary
These are the usual ways for payment creation:
- API - creating the payment through API call (selection of payment method either in e-shop or ThePay gate)
- Redirection with selection of payment method in ThePay gateway
- Redirection with selection of payment method in the e-shop
Always create only one payment for your order for all payment creation options, unless you need to change the payment amount. In that case, consider it a whole new payment.
For more examples see create-payment.md
/** @var \ThePay\ApiClient\TheClient $thePayClient */

// Render payment methods for payment (100,- Kč)
$paymentParams = new \ThePay\ApiClient\Model\CreatePaymentParams(10000, 'CZK', 'uid124');

// display button, user will choose payment method at the payment gate
echo $thePayClient->getPaymentButton($paymentParams);

// or buttons with available payment methods, payment method will be preselected
// echo $thePayClient->getPaymentButtons($paymentParams);

// or just get payment link and redirect customer whenever you want
// $payment = $thePayClient->createPayment($createPayment);
// $redirectLink = $payment->getPayUrl();
2. Customer return
The customer is returned from ThePay gate to the return url address.
Return url is set in administration and customer gets redirected there with two query parameters added - payment_uid and project_id (needed if you have one endpoint for multiple projects).
The state of payment must be checked at the time of customer return, since the payment may not always be in the paid state at this time. For example the customer simply returns to the e-shop without paying.
General example of handling the customer return
/** @var \ThePay\ApiClient\TheClient $thePayClient */

$payment = $thePayClient->getPayment($uid);

// check if the payment is paid
if ($payment->wasPaid()) {
    // Check if the order isn't labeled as paid yet. If not, do so.
    // ...
}
3. Server to server notification
It's basically the same as second step (customer return), it's triggered everytime the payment has changed, for example when the state of payment has been changed.
/** @var \ThePay\ApiClient\TheClient $thePayClient */

$payment = $thePayClient->getPayment($uid);

// check if the payment is paid
if ($payment->wasPaid()) {
    // Check if the order isn't labeled as paid yet. If not, do so.
    // ...
}
More and detailed usage examples
You can find more usage examples at folder /doc.
Money calculations
For safe money calculations we recommend to use moneyphp/money package. Please, do not use float to save information about prices because of its inaccuracy.
composer require moneyphp/money


