prestashop / hummingbird
Hummingbird development theme for PrestaShop
Installs: 2 602 613
Dependents: 1
Suggesters: 0
Security: 0
Stars: 112
Watchers: 37
Forks: 117
Open Issues: 14
Language:Smarty
Type:prestashop-theme
pkg:composer/prestashop/hummingbird
Requires (Dev)
- symfony/console: ~4.4 || ^5.0 || ^6.4
- symfony/yaml: ~4.4 || ^5.0 || ^6.4
This package is auto-updated.
Last update: 2026-02-20 15:59:26 UTC
README
Hummingbird is a modern, in-development theme for PrestaShop built to be compatible with versions 9.1.x and above.
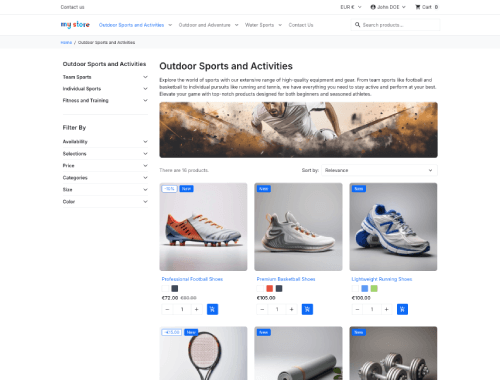
🔍 Theme Previews
 |
 |
 |
|---|---|---|
| Homepage | Category | Product |
⚠️ Requirements
To work on Hummingbird, you'll need:
- Node.js v20.x.
- npm v8.
📑 Table of Contents
- Want to help develop the theme? Start with 🔨 Develop on Hummingbird.
- Want to preview or test it? Jump to 🐳 Run Hummingbird with Docker.
- Having issues with caching during development? Jump to 🥵 Troubleshooting.
🔨 Develop on Hummingbird
🧰 Installation / Setup
👀 Watch Mode Setup
From the project root run the following commands if you want to:
- Install dependencies:
npm ci. - Run watch mode to build assets:
npm run watch. - You can now go to 🐳 Run Hummingbird with Docker section to run PrestaShop embedding Hummingbird.
🔥 Hot Module Reload (HMR) Setup
- From the project root run:
npm ci. - Navigate to the
webpack/directory. - Run
cp .env-docker-example .envorcp .env-vhost-example .env(depending on how you want to run your PrestaShop environment). - Edit
.envwith your local environment settings and ensure you use a free TCP port. - From the project root run
npm run dev. - You can now go to 🐳 Run Hummingbird with Docker section to run PrestaShop embedding Hummingbird.
🖌️ Code Quality
To ensure code quality and consistency, run the following commands from the project root:
- Lint & auto-fix SCSS files:
npm run stylelintornpm run stylelint:fix. - Format & auto-format SCSS with Prettier:
npm run prettierornpm run prettier:fix. - Lint & auto-fix JS/TS files:
npm run lintornpm run lint:fix.
🐳 Run Hummingbird with Docker
This theme includes Docker configurations for both PrestaShop and PrestaShop Flashlight development environments.
🛠️ Getting Started
Note: If you've already set up your development environment using Watch Mode or Hot Module Reload (HMR), you can skip ahead to step 3.
- From the project root run:
npm ci. - Then run:
npm run build. - Navigate to the
docker/directory:cd docker. - Copy the example environment file:
cp .env-example .env. - Edit
.envto configure the following variables:PS_TAG: PrestaShop or Flashlight version tag.PLATFORM: Platform architecture (e.g., linux/amd64, linux/arm64).ADMIN_EMAIL: Back office admin email.ADMIN_PASSWORD: Back office admin password.
📦 Available Configurations
docker-compose-prestashop.yml: for standard PrestaShop development environment.docker-compose-flashlight.yml: for PrestaShop Flashlight development environment.
▶️ Starting the Environment
From the project root, run one of the following commands:
# For PrestaShop environment
docker compose -f docker/docker-compose-prestashop.yml up -d

# For Flashlight environment
docker compose -f docker/docker-compose-flashlight.yml up -d
👀 After Starting the Environment
- PrestaShop/Flashlight will be available at http://localhost:8887 and BO at http://localhost:8887/admin-dev.
- phpMyAdmin will be available at http://localhost:8889.
⏹️ Stopping the Environment
From the project root, run one of the following commands:
# For PrestaShop environment
docker compose -f docker/docker-compose-prestashop.yml down -v

# For Flashlight environment
docker compose -f docker/docker-compose-flashlight.yml down
🥵 Troubleshooting
Warning
If you're experiencing issues with styles or assets not updating while using HMR mode, follow these steps to avoid browser and PrestaShop caching problems:
- Disable browser cache during development:
- Open your browser's DevTools.
- Go to the
Networktab. - Enable
Disable cache(⚠️ this only works while DevTools stays open).
- Disable PrestaShop caching:
- In the back office, go to:
Advanced Parameters→Performance. - Under the Smarty section:
- Set Force compilation to
Yes. - Set Cache to
No.
- Set Force compilation to
- Under the CCC (Combine, Compress and Cache) section:
- Disable all options.
- In the back office, go to:
📚 Storybook
Storybook is used to document and preview the theme's UI components during development. You can view the live documentation here. Since the theme is still in progress, contributions to improve or expand the documentation are welcome and encouraged.
▶️ Run Storybook Locally
To run Storybook on your machine:
- Make sure project dependencies are installed, if not, from the project root run:
npm ci. - Then run:
npm run storybook. - Storybook will be available at http://localhost:6006.
🤝 Contributing
Please refer to the contributing guide.
✅ Continuous Integration
The CI runs include Stylelint, Prettier, ESLint, and TypeScript type checks.
🚀 Continuous Deployment
Whenever the develop branch is merged into master, the Storybook documentation is automatically deployed to GitHub Pages and becomes publicly accessible within minutes.
📄 License
This theme is released under the Academic Free License 3.0.
