nordsoftware / yii-account
Extension that provides basic account functionality for the Yii PHP framework.
Maintainers
Package info
github.com/nordsoftware/yii-account
Type:yii-extension
pkg:composer/nordsoftware/yii-account
Requires
- crisu83/yiistrap: dev-bs3
- ircmaxell/random-lib: v1.0.0
- phpnode/yiipassword: >=1.0.3
Requires (Dev)
- codeception/codeception: *
- crisu83/yii-caviar: dev-develop#1859e55504f3a4076678c9b39843da604dfc43aa
- crisu83/yii-consoletools: *
- yiisoft/yii: >=1.1.14
This package is not auto-updated.
Last update: 2022-04-11 14:54:03 UTC
README
Extension that provides basic account functionality for the Yii PHP framework.
Why do I want this
This project was inspired by the [http://github.com/mishamx/yii-user](yii-user module) and was carefully developed with our expertise in Yii following the best practices of the framework. It is more secure because it uses passwords with salt that are encrypted using bcrypt instead of password hashes. It also comes with support for sending mail with truly random authentication tokens that expire.
We are also currently working on additional security features (listed in the requirements below).
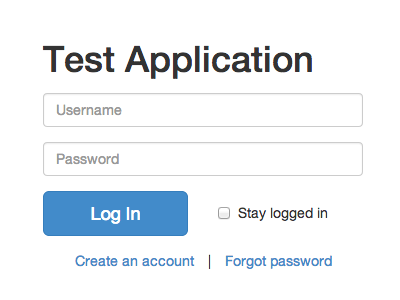
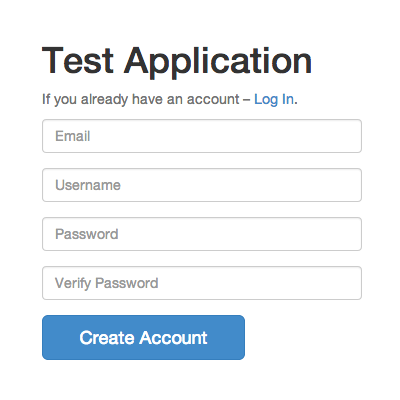
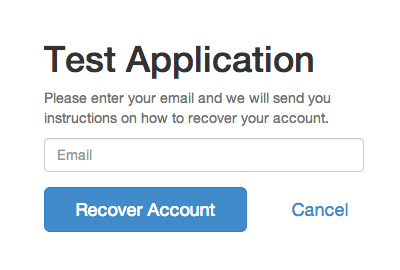
User interface

Requirements
- Secure accounts (password + salt) DONE
- Sign up DONE
- Account activation (enabled by default) DONE
- Log in / Log out DONE
- Reset password DONE
- Email sending (with token validation) DONE
- Require new password every x days (disabled by default) DONE
- Password history (encrypted) to prevent from using same password twice DONE
- Lock accounts after x failed login attempts (disabled by default) DONE
- Captcha support on sign up DONE
- Console command for creating accounts DONE
- Proper README WIP
Installation
The easiest way to install this extension is to use Composer.
Run the following command to download the extension:
php composer.phar require nordsoftware/yii-account:*
Add the following to your application configuration:
'modules' => array(
    'account' => array(
        'class' => '\nordsoftware\yii_account\Module',
    ),
),
'components' => array(
    'user' => array(
        'class' => '\nordsoftware\yii_account\components\WebUser',
    ),
),
To use the console command you need to add the following to your console application configuration:
'commandMap' => array(
    'account' => array(
        'class' => '\nordsoftware\yii_account\commands\AccountCommand',
    ),
),
Run the following command to apply database migrations (you need to have a database configured for your application):
php yiic.php migrate --migrationPath=account.migrations
Without Composer
If you are not using Composer, then you need to download the dependencies manually and add the following to your application configuration:
'aliases' => array(
    '\nordsoftware\yii_account' => __DIR__ . '/relative/path/to/yii-account/src',
    '\YiiPassword' => __DIR__ . '/relative/path/to/yiipassword/src',
    '\RandomLib' => __DIR__ . '/relative/path/to/randomlib/lib',
    '\SecureLib' => __DIR__ . '/relative/path/to/securelib/lib',
),
Dependencies
- Yiistrap http://github.com/crisu83/yiistrap
- YiiPassword https://github.com/phpnode/yiipassword
- RandomLib https://github.com/ircmaxell/RandomLib
- SecurityLib https://github.com/ircmaxell/SecurityLib
Configuration
The following configurations are available for the \nordsoftware\yii_account\Module class:
- classMap array map over classes to use within the module.
- enableActivation bool whether to enable account activation (defaults to true).
- enableCaptcha bool whether to enable captcha on sign up (defaults to false).
- numAllowedFailedLogins int number of a user can fail to login before the account is locked (defaults to 10)
- loginExpireTime int number of seconds for login cookie to expire (defaults to 30 days).
- activateExpireTime int number of seconds for account activation to expire (defaults to 30 days).
- resetPasswordExpireTime int number of seconds for password reset to expire (defaults to 1 day).
- passwordExpireTime int number of seconds for passwords to expire (defaults to disabled).
- lockoutExpireTime int number of seconds for account lockout to expire (defaults to 10 minutes).
- fromEmailAddress string from e-mail address used when sending mail.
- messageSource string message source component to use for the module.
- registerStyles bool whether to register the default styles.
- defaultLayout string path alias for the layout to use within the module.
Usage
Now you should be able to see the login page when you go to the following url:
index.php?r=account
You can run the following command to generate an account from the command line:
php yiic.php account create --username=demo --password=demo
Extending
This project was developed with a focus on re-usability, so before you start copy-pasting take a moment of your time and read through this section to learn how to extend this module properly.
Custom account model
You can use your own account model as long as you add the following fields to it:
- username varchar(255) not null account username
- password varchar(255) not null account password
- email varchar(255) not null account email
- passwordStrategy varchar(255) not null password encryption type
- requireNewPassword tinyint(1) not null default '0' whether account password must be changed
- createdAt timestamp null default current_timestamp when the account was created
- lastActiveAt timestamp null default null when the account was last active
- status int(11) default '0' account status (e.g. inactive, activated)
Changing the model used by the extension is easy, simply configure it to use your class instead by adding it to the class map for the module:
'account' => array(
    'class' => '\nordsoftware\yii_account\Module',
    'classMap' => array(
        'account' => 'MyAccount', // defaults to \nordsoftware\yii_account\models\ar\Account
    ),
),
Custom models, components or forms classes
You can use the class map to configure any classes used by the module, here is a complete list of the available classes:
- account models\ar\Account account model
- token models\ar\AccountToken account token mode
- loginHistory models\ar\AccountLoginHistory login history model
- passwordHistory models\ar\AccountPasswordHistory password history model
- userIdentity components\UserIdentity user identity
- loginForm models\form\LoginForm login form
- passwordForm models\form\PasswordForm base form that handles passwords
- signupForm models\form\SignupForm signup form (extends passwordForm)
- forgotPassword models\form\ForgotPasswordForm forgot password form
- captchaAction \CCaptchaAction action class to render the captcha image
- captchaWidget \CCaptcha widget class for rendering the captcha element in the view
Custom controllers
If you want to use your own controllers you can map them using the module's controller map:
array(
    'account' => array(
        'class' => '\nordsoftware\yii_account\Module',
        'controllerMap' => array(
            'authorize' => 'AuthorizeController', // defaults to \nordsoftware\yii_account\controllers\AuthorizeController
        ),
    ),
),
Custom views
If you want to use your own views with this module you can override the views with your own by placing them either
under your application under protected\views\account or your theme under themes\views\account.
Extending the module itself
You may also want to extend the module itself, e.g. in order to implement proper email sending. In that case you can extend the module and override the methods necessary and configure your account to use your module instead:
'account' => array(
    'class' => 'MyAccountModule',
),
Normally you would need to copy all the views under your module, but we have made it easy so that you can only override the views you need to and the module will automatically look for the default views under the parent module.
The source code is also quite well documented so the easiest way to find out how to extend properly is to dive into the code and get to know the logic behind the functionality. Also, if you have any ideas for improvements feel free to file an issue or create a pull-request.
Contribute
If you wish to contribute to this project feel free to create a pull-request to the develop branch.
Run test suite
To run the test suite you need to run the following commands:
export DB_HOST=<YOUR-DB-HOST>
export DB_NAME=<YOUR-DB-NAME>
export DB_USER=<YOUR-DB-USER>
export DB_PASS=<YOUR-DB-PASS>
export BASE_URL=<YOUR-BASE-URL>
erb tests/app/config/bootstrap.php.erb > tests/app/config/bootstrap.php
erb codeception.yml.erb > codeception.yml
erb tests/acceptance.suite.yml.erb > tests/acceptance.suite.yml
Now you can use the following command to run the test suite:
vendor/bin/codecept run
Translate
If you wish to translate this project you can find the translation templates under src/messages/templates.
When you are done with your translation create a pull-request to the develop branch.