mothership / state_machine
php implementation of state machine, completely configured by an external .yml file with the render of a graph's description
Maintainers
Requires
- php: >=5.4
- symfony/console: ~2.7
- symfony/yaml: ~2.7
Requires (Dev)
README
A PHP based state machine implementation with a graph generator.
For more informations visit the website
Design goals
There are a lot of FSM(Finite State Machines) implementation. But most implementations do not have a proper documentation or are too overengineered in a lot of terms. This library tries to be a starting point for your own implementation by reading the code. In fact you can also use this for your own projects.
Features
- Create a FSM-compatible state machine
- Define your states, transitions and conditions completely in a configuration file. Currently only supports YAML
- NO additional logic is needed to process the transitions. The state machine will automatically try to detect valid transitions
- Render a graphic image that shows the behaviour of the state machine.
Tests
You can run the unit tests with the following command:
$ cd path/to/Mothership/Component/StateMachine/ #check your path
$ composer install
$ phpunit
Installation
You can use composer to directly install in in your project. Do not use the master branch but only tagged versions.
"require": {
	"mothership/state_machine": "v1.3.*"
}
Then just run composer install
$ composer install
Requirement for rendering the graph
The StateMachine render graph functionality depends on the graphviz library. On os with apt just install it with the package managment
sudo apt-get install graphviz
Usage
The state machine needs three files to be able to run:
- A concrete state machine
- The yaml configuration file
- A workflow definition
Quickstart
In case you have everything or just want to skip the more detailed parts, take a look at this directory within this repository:
/src/Examples/Simple/SimpleStateMachine.php
$stateMachine = new \Mothership\StateMachine\Examples\Simple('workflow.yml');
$stateMachine->run();
1. The concrecte state machine
There is no concrete StateMachine implementation in this library, except the examples. However the implementation is very easy and in fact just an inheritance of the abstract class.
// set your own namespace
namespace Mothership\StateMachine\Examples\Simple;

class SimpleStateMachine extends \Mothership\StateMachine\StateMachineAbstract
{
// that's all!
}
2. The yaml configuration file
The yaml configuration file is the most important file as it describes various business cases. You will find more advanced use cases later. For the beginning take a look at the following workflow.

By the way: the graph has been rendered with graphviz. You can also easily render it by your own with this command:
$stateMachine->renderGraph('/your/path/file.png');
If you are familiar with the concepts of a state machine, you will know that a state machine contains
- a defined start
- a defined end
- a number of transitions
- a set of various states
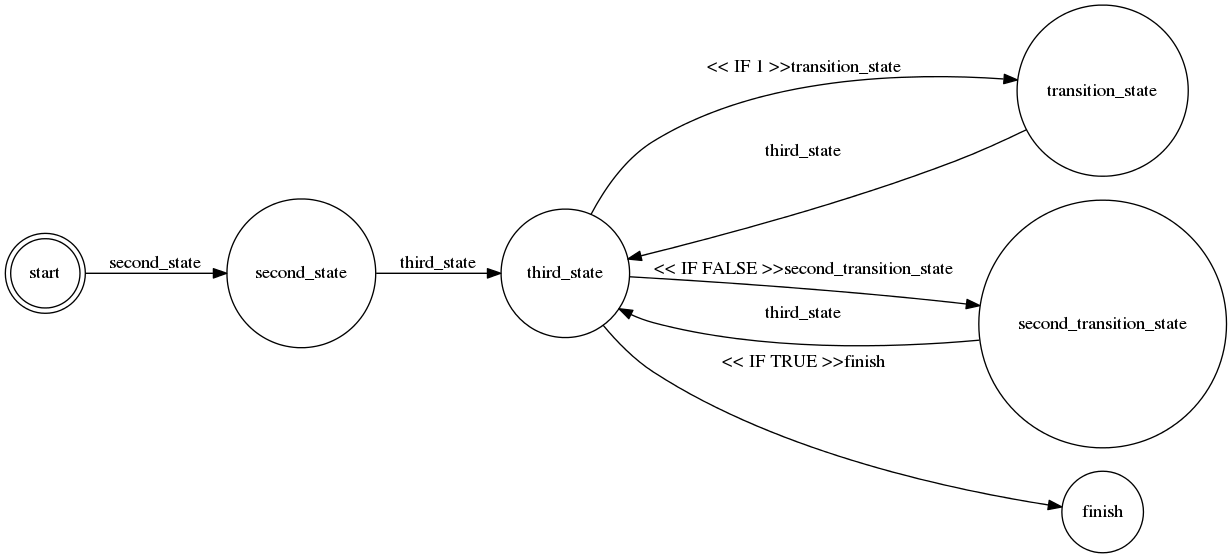
Let's see, how the configuration file could look like, by inspecting the workflow.yml:
class:
  name: Mothership\StateMachine\Examples\Simple\SimpleWorkflow
  args: []

states:
  start:
    type: initial
  second_state:
    type: normal
    transitions_from: 	[start]
    transitions_to: 	[second_state]
  third_state:
    type: normal
    transitions_from: 	[second_state]
    transitions_to: 	[third_state]
  finish:
    type: final
    transitions_from:  [third_state]
    transitions_to:    [finish]
Good to know
- Every state, except start needs to be implemented as a method. For example the state with the name second_state expects a method named
second_state()in the workflow class. - The name of the transitions is always equals to the name of the
transitions_tofield. If there is an condition, the transition name will also be changed. - You do not need to implement any programming logic for state transitions.
- The possible types of the state can be initial, normal or final.
3. The workflow class
While the configuration file defines the possible transitions of the automata, the workflow class contains the possible transitions. Let's check this code:
namespace Mothership\StateMachine\Examples\Simple;

use Mothership\StateMachine\WorkflowAbstract;

class SimpleWorkflow extends WorkflowAbstract
{

    function second_state()
    {

    }

    function third_state()
    {

    }

    function finish()
    {
    }
}
- There is no method
start()as this state will never be executed but is just a starting point - The basic methods do not return any value. More advanced methods can for example return a boolean value or any string. This important for more advanced use cases.
- The name of the class MUST match the name of the class in the configuration file
- You can use a
preDispatch()orpostDispatch()method after each state. It might be better to use a callback handler for that kind of stuff but to keep this library small, easy to understand and suitable for basic cases, this decision was made.
Render the graph
It is recommended to render your workflow as a graph, so that you will get visual support.
$state_machine = new StateMachine();
$state_machine = $state_machine->renderGraph($path, false);
$paht: path where the state machine will save the image
true/false: if you want that after the render the state machine exits (default is true)
Advanced Use Cases
Let's assume a more advanced workflow like that one: Advanced Workflow. The rendered graph will look like the following:

We will go through smaller examples to discuss the different transition types.
Conditionals
Check the transition product_has_media_gallery and create_media_gallery|get_images
| Start | Condition | Target |
|---|---|---|
| product_has_media_gallery | true | create_media_gallery |
| product_has_media_gallery | false | get_images |
As you can see, you need to have a condition AFTER the start state. This means that the state product_has_media_gallery needs to return a boolean value true OR false. To be able to do this, you need to update your yaml configuration like this:
  product_has_media_gallery:
    type: normal
    transitions_from: [download_directory_exist]
    transitions_to:   [product_has_media_gallery]

  create_media_gallery:
    type: normal
    transitions_from: [{status: product_has_media_gallery, result:  false}]
    transitions_to:   [create_media_gallery]

  get_images:
    type: normal
    transitions_from: [{status: product_has_media_gallery, result:  true}, create_media_gallery]
    transitions_to:   [get_images]
-
The conditions are AlWAYS set in the target transition
-
Even if we use BOOLEAN values here, you can actually also return a STRING! This is valid as well:
transitions_from: [{status: product_has_media_gallery, result: 'yes, okay'}] -
The state
get_imagescan be processed with two different transitions.
Loops
Loops are very useful if you need to process a large set of data. The pattern is pretty simple. Take a look at the states process_images, has_more and finish.
If there is more to process, then continue to process_images, otherwise finish. As a matrix this would be:
| Start | Condition | Target |
|---|---|---|
| has_more | true | process_images |
| has_more | false | finish |
Just do it like that:
  process_images:
    type: normal
    transitions_from: [get_images, {status: has_more, result:  true}]
    transitions_to:   [process_images]

  has_more:
    type: normal
    transitions_from: [assign_image]
    transitions_to:   [has_more]

  finish:
    type: final
    transitions_from:  [{status: has_more, result:  false}]
    transitions_to:  [finish]
Exception handling
You can use exception handling in different cases.
Define an exception state
This is not a typical FSA. But defining an external exception can help you to build more tolerant state machines. However you should be very careful with this one. Defining an exception state can lead to some bad design decisions as you leave the exception handling into the responsibility of the appropriate exception state.
Consider the usage of the exception state very carefully:
- Do i need a general exception handling. If you need a centralized exception handling this could be useful but you can also build try-catch blocks in every state
- Do i need to re-run a failed transition? You can use the exception state to re-run the state machine from a defined transition. Just set the transition in the yaml file.
Catch the run method
Wrap a try-catch around the run method and build a custom exception handler. Useful to have it in a centralized way. However it is difficult to return to a working state again.
  public function run(array $args = [])
  {
    try {
        parent::run($args);
    } catch (WorkflowException $e) {
        $this->handleException('Workflow', $e);
    } catch (StatusException $e) {
        $this->handleException('Workflow', $e);
    } catch (\Exception $e) {
        $this->handleException('General', $e);
    }
  }
Catch in the states
Catch any exception which you want to control. It is recommended to be as specific as possible.
test_state()
{
    try {
    } catch (\Highest\Exception $e) {
        echo $e->getMessage();
    }
}
More examples
Check the directory ./src/Examples to explore more advanced examples by your own. You can also add new state machines into this directory, to automatically run unit tests.
Simple

SimpleLoop

IfConditions

Boolean Conditions
Advanced Workflow

Exception Workflow
This workflow is pretty advanced and IS NOT A STANDARD automata in terms of a DFA which only has ONE defined start. It is more useful if you need to build more complex state machines where you might have exceptions in different part of the code and do not know where to handle it. It is possible to model an exception handling as a transition for every single node but the side effect would be that you will have a lot of transitions in bigger graphs.
It is not recommended to have a general exception handling like that one, especially if you don't know what your workflow is doing.

Tests
- Run test from root directory:
phpunit --coverage-text - You can add your State machine in the
./src/Examplesfolder and it will be automatically tested with the command about. Just use the same conventions name space
Notes
- Mothership StateMachine is inspired by Finite/StateMachine presents in this extension
- dev-master api