Search by 
mariojgt / witchcraft
A Laravel Package Witchcraft, a quick start for new laravel Packages
Maintainers
Package info
github.com/mariojgt/witchcraft
Language:Vue
Type:laravel
pkg:composer/mariojgt/witchcraft
v2.0.6
2025-10-01 09:04 UTC
Requires
- php: ^8.0
- intervention/image: ^2.5
README
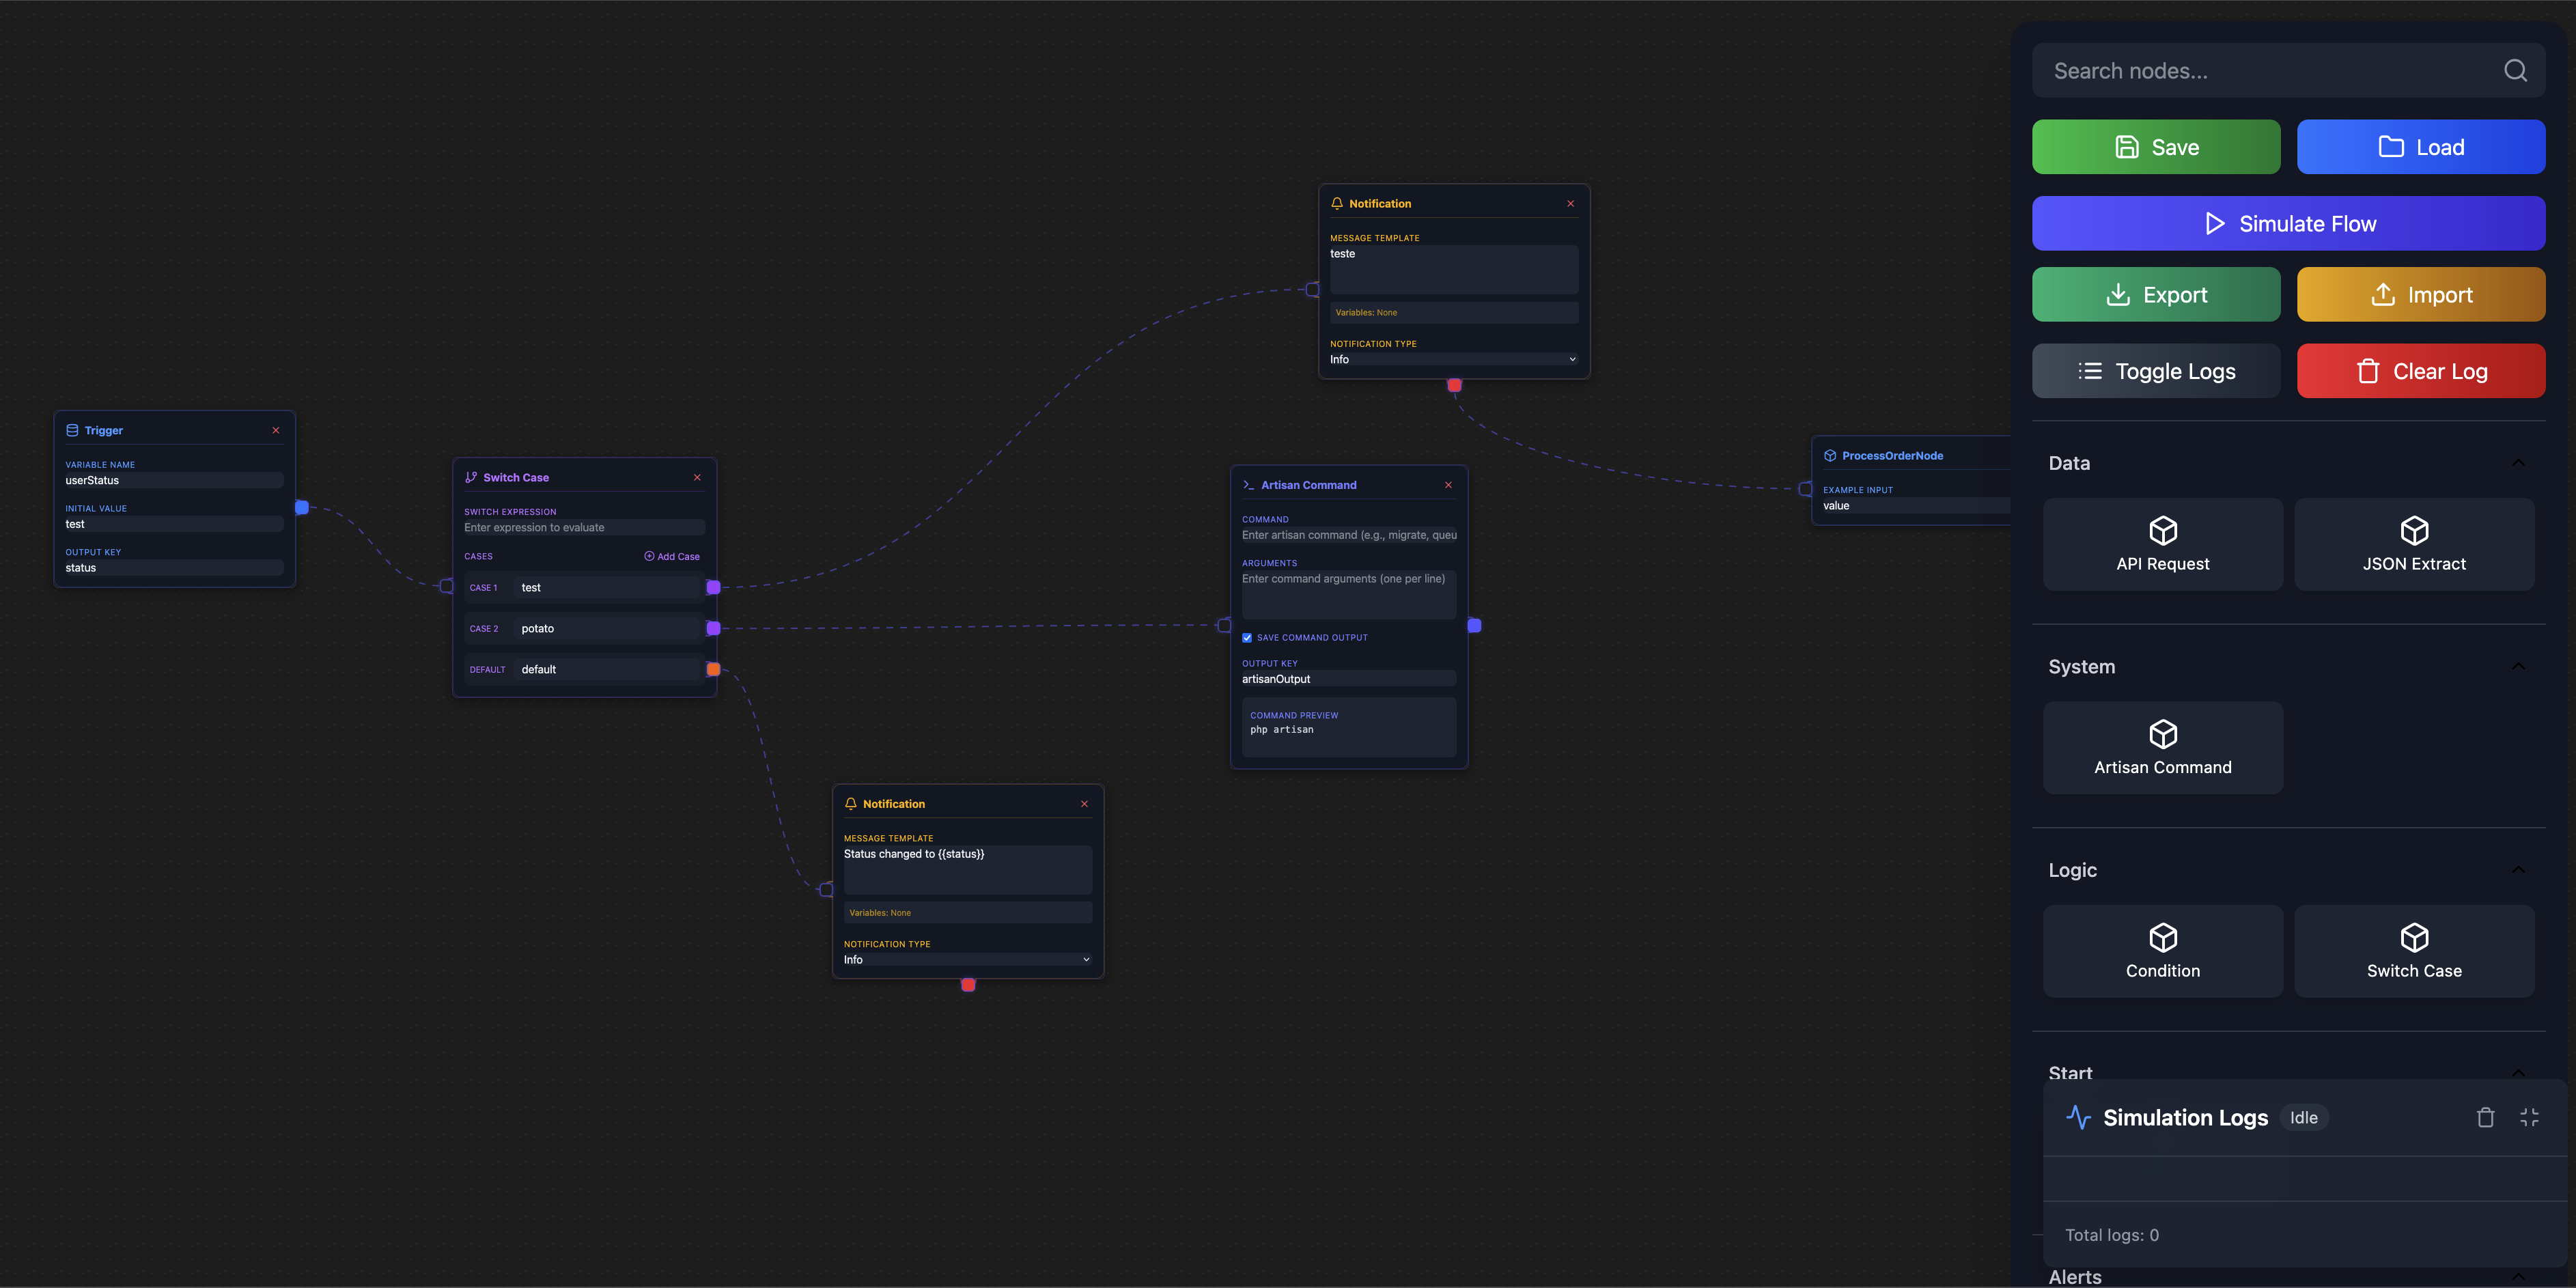
Create powerful workflows with a visual drag-and-drop editor. Perfect for automating business processes, data processing, and API integrations.
✨ Features
- 🎨 Visual Workflow Editor - Drag, drop, and connect nodes
- 🔄 Version Control - Automatic versioning with rollback support
- 🛡️ Protected Workflows - Mark workflows as non-deletable
- 📊 Simulation History - Track all workflow executions
- 🔗 Easy Integration - Simple helper functions for triggering workflows
- 🎯 Smart Triggers - Execute workflows programmatically with unique codes
🚀 Quick Start
Install
composer require mariojgt/witchcraft
Setup
php artisan migrate
Use
// Execute any workflow with one line
$result = witchcraft_trigger('FLOW_MY_WORKFLOW', ['data' => 'value']);
📝 Simple Usage Examples
Basic Workflow Execution
// Simple trigger
$result = witchcraft_trigger('FLOW_PROCESS_ORDER', [
    'order_id' => 123,
    'user_id' => 456
]);

// Safe trigger with error handling
$response = witchcraft_safe_trigger('FLOW_SEND_EMAIL', ['email' => 'user@example.com']);
if ($response['success']) {
    echo "Email sent successfully!";
} else {
    echo "Error: " . $response['error'];
}
Check if Workflow Exists
if (witchcraft_exists('FLOW_BACKUP_DATA')) {
    $result = witchcraft_trigger('FLOW_BACKUP_DATA');
}
Get Workflow Information
$info = witchcraft_info('FLOW_GENERATE_REPORT');
echo "Workflow: {$info['name']} (Version {$info['version']})";
🎯 Built-in Node Types
| Node Type | Purpose | Example Use |
|---|---|---|
| Model Select | Database triggers | Run workflow when user is created |
| Condition | Decision logic | If status = "active" then... |
| API Request | External calls | Send data to third-party service |
| Artisan Command | Laravel commands | Clear cache, send emails |
| Notification | Alerts & messages | Send user notifications |
| Variable | Data manipulation | Store and modify values |
| JSON Extract | Data parsing | Extract values from API responses |
🔧 Advanced Features
Automatic Versioning
- ✅ Auto-save versions when workflow structure changes
- ✅ Version history with search and filtering
- ✅ One-click restore to any previous version
- ✅ Version notes to track what changed
Workflow Protection
// Mark workflow as protected (cannot be deleted)
$workflow->update(['is_deletable' => false]);
Simulation Tracking
- 📊 Complete execution logs for every run
- 📈 Success/failure statistics
- ⏱️ Performance metrics and duration tracking
- 📋 Downloadable execution reports
Smart Trigger Codes
// Latest version always uses clean trigger code
witchcraft_trigger('FLOW_MY_PROCESS', $data); // Always runs latest version

// Old versions get versioned codes automatically:
// V1: FLOW_MY_PROCESS_OLD_V1
// V2: FLOW_MY_PROCESS_OLD_V2
// V3: FLOW_MY_PROCESS (current/latest)
🎨 Creating Custom Nodes
1. Generate Node
php artisan witchcraft:make-node ProcessPayment --category=Payments
2. Create Handler
namespace App\Witchcraft\Handlers;

use Mariojgt\Witchcraft\Contracts\NodeHandlerInterface;

class ProcessPaymentNodeHandler implements NodeHandlerInterface
{
    public function getMetadata(): array
    {
        return [
            'type' => 'process-payment',
            'category' => 'Payments',
            'icon' => 'CreditCardIcon',        // Lucide icon
            'label' => 'Process Payment',
            'component' => 'ProcessPaymentNode',
            'initialData' => [
                'amount' => 0,
                'currency' => 'USD'
            ]
        ];
    }

    public function execute(array $nodeData, array $variables): array
    {
        // Your payment processing logic here
        $amount = $nodeData['amount'];

        // Process payment...

        return [
            'success' => true,
            'payment_id' => 'pay_123456',
            'status' => 'completed'
        ];
    }
}
3. Build Assets
npm run build
🔗 Model Integration
Add workflow triggers to your models:
use Mariojgt\Witchcraft\Traits\HasWitchcraftTriggers;

class Order extends Model
{
    use HasWitchcraftTriggers;

    // Workflows will automatically trigger on:
    // - created, updated, deleted events
    // - Any model changes
}
⚙️ Configuration
Vite Setup (vite.config.js)
import { defineConfig } from 'vite';
import laravel from 'laravel-vite-plugin';
import vue from '@vitejs/plugin-vue';

export default defineConfig({
  plugins: [
    laravel({
      input: [
        'resources/vendor/Witchcraft/js/vue.js',
        'resources/vendor/Witchcraft/sass/app.scss',
      ],
      refresh: true,
    }),
    vue()
  ],
  build: {
    outDir: 'public/vendor/Witchcraft',
  }
});
🎯 Real-World Examples
E-commerce Order Processing
// When order is created, trigger workflow
witchcraft_trigger('FLOW_PROCESS_ORDER', [
    'order_id' => $order->id,
    'customer_email' => $order->customer->email,
    'total' => $order->total
]);
User Onboarding
// Welcome new users
witchcraft_trigger('FLOW_USER_WELCOME', [
    'user_id' => $user->id,
    'email' => $user->email,
    'name' => $user->name
]);
Data Backup
// Daily backup workflow
witchcraft_trigger('FLOW_DAILY_BACKUP', [
    'date' => now()->toDateString(),
    'tables' => ['users', 'orders', 'products']
]);
🛠️ Helper Functions Reference
| Function | Purpose | Returns |
|---|---|---|
witchcraft_trigger($code, $data) |
Execute workflow | Mixed result |
witchcraft_safe_trigger($code, $data) |
Execute with error handling | Array with success/error |
witchcraft_exists($code) |
Check if workflow exists | Boolean |
witchcraft_info($code) |
Get workflow details | Array with metadata |
witchcraft_execute($code, $data) |
Alias for trigger | Mixed result |
witchcraft_run($code, $data) |
Alias for trigger | Mixed result |
📊 Workflow Management
Access Editor
/witchcraft
Key Features
- 🎨 Drag & drop node creation
- 🔗 Visual connections between nodes
- 💾 Auto-save with version control
- 🔍 Search & filter workflows
- 📁 Category organization
- 🛡️ Protection settings
- 📈 Execution history
📚 Advanced Usage
Conditional Workflows
Create complex decision trees with condition nodes:
[Trigger] → [Check Status] → [If Active] → [Send Email]
                           → [If Inactive] → [Deactivate Account]
API Integration Workflows
[Trigger] → [API Request] → [Extract Data] → [Save to Database] → [Notify Admin]
Batch Processing
[Schedule] → [Get Records] → [Process Each] → [Update Status] → [Generate Report]
🤝 Contributing
- Fork the repository
- Create your feature branch (
git checkout -b feature/amazing-feature) - Commit your changes (
git commit -m 'Add amazing feature') - Push to the branch (
git push origin feature/amazing-feature) - Open a Pull Request
📄 License
This package is open-sourced software licensed under the MIT license.