laynefyc / php-monitor
A free, flexible, powerful tool that helps you monitor PHP Service.
Maintainers
Requires
- php: ^5.6 || ^7.0
- ext-json: *
- illuminate/database: ~5.8
- illuminate/pagination: ^5.8
- jenssegers/mongodb: ^3.5
Requires (Dev)
- phpunit/phpunit: ^9.0
Suggests
- ext-mongodb: Mongo is needed to store profiler results.
- ext-pdo_mysql: pdo_mysql is needed to store profiler results.
- ext-sqlite3: sqlite3 is needed to store profiler results.
- ext-uprofiler: You need to install either xhprof or uprofiler.
- ext-xhprof: You need to install either xhprof or uprofiler.
This package is auto-updated.
Last update: 2026-06-29 01:50:14 UTC
README
A free, flexible, powerful tool that helps you monitor PHP Service and profiling PHP code.
English | 简体中文
✨ Features
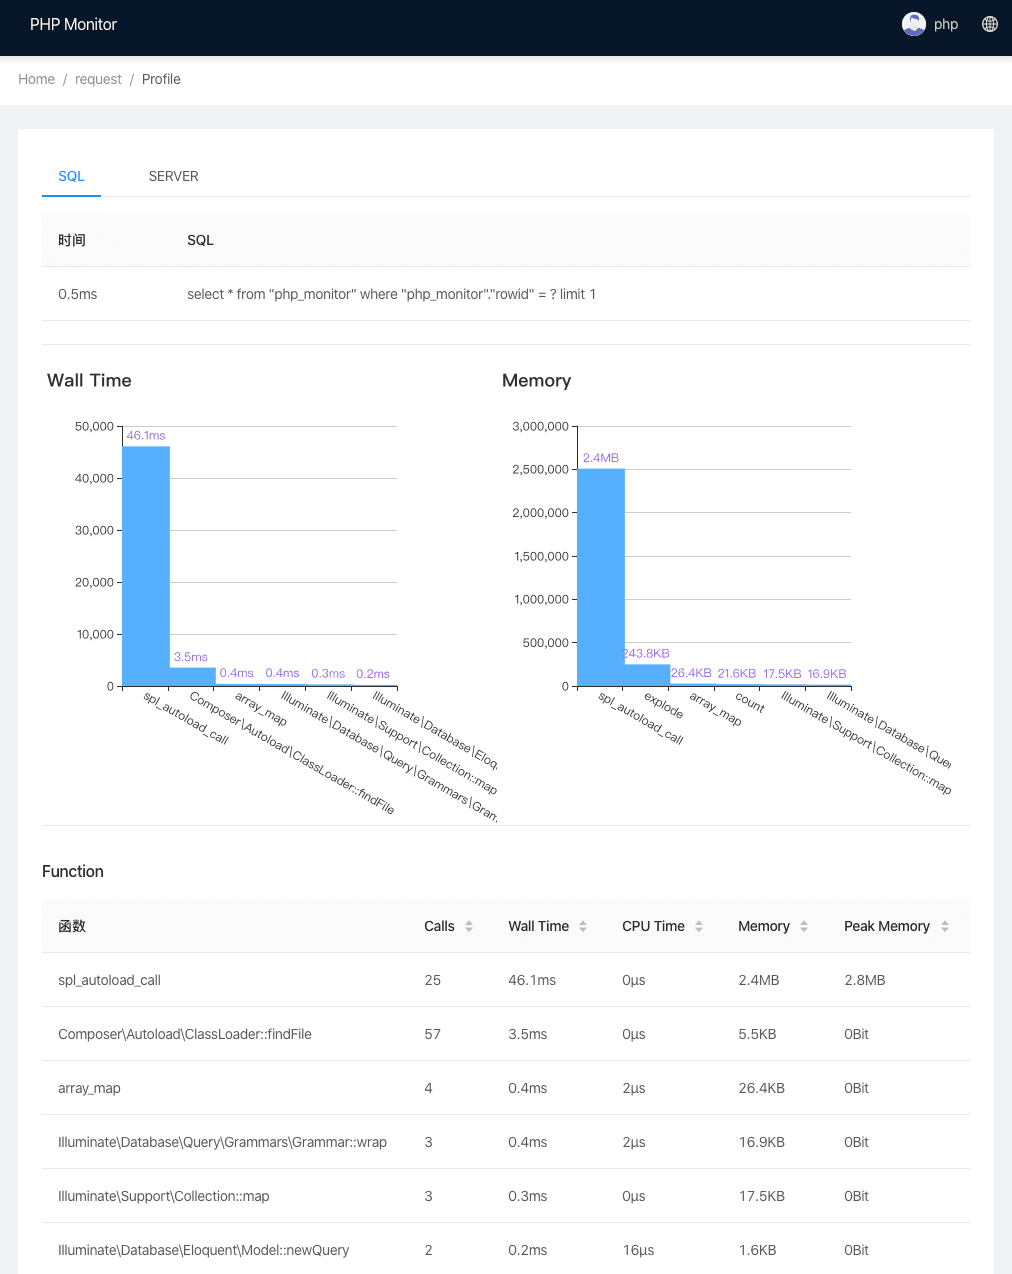
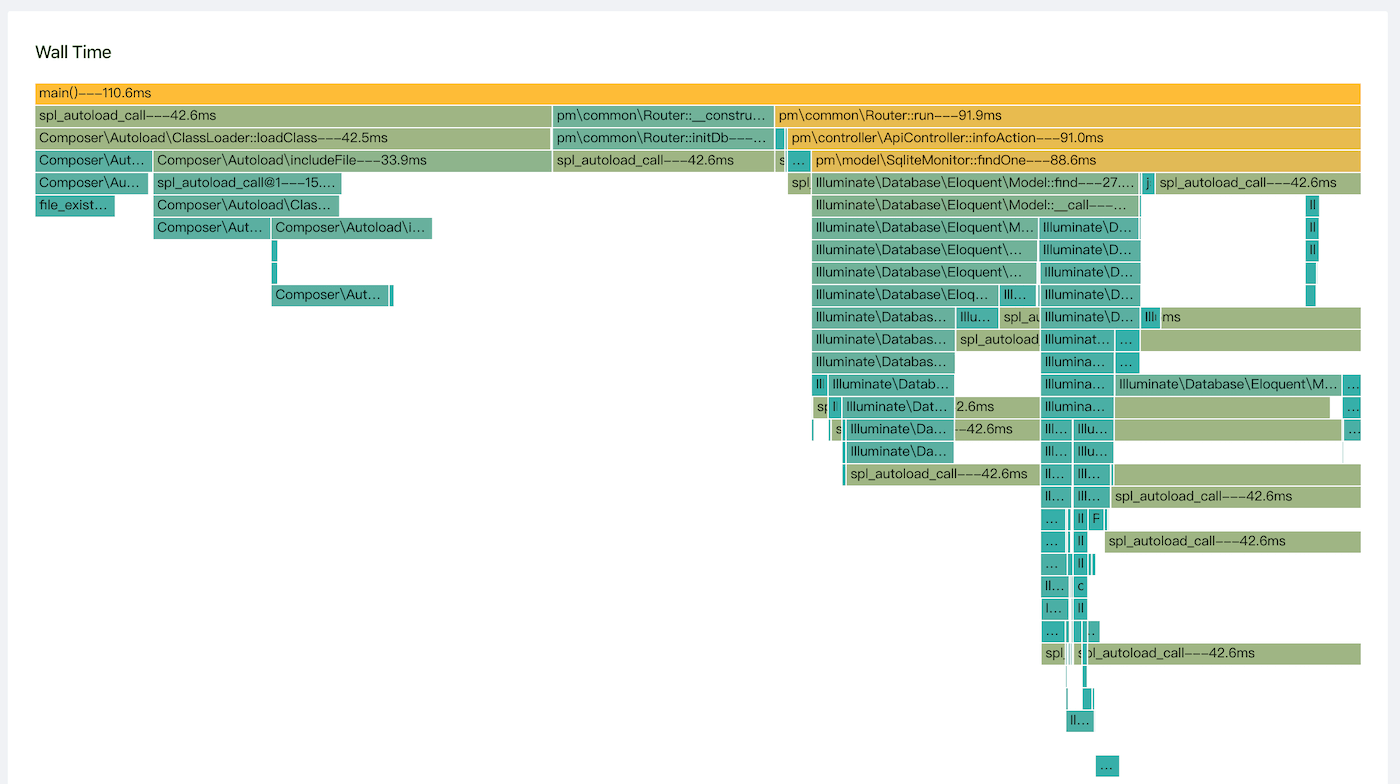
- 🌈 Get detailed PHP runtime data.
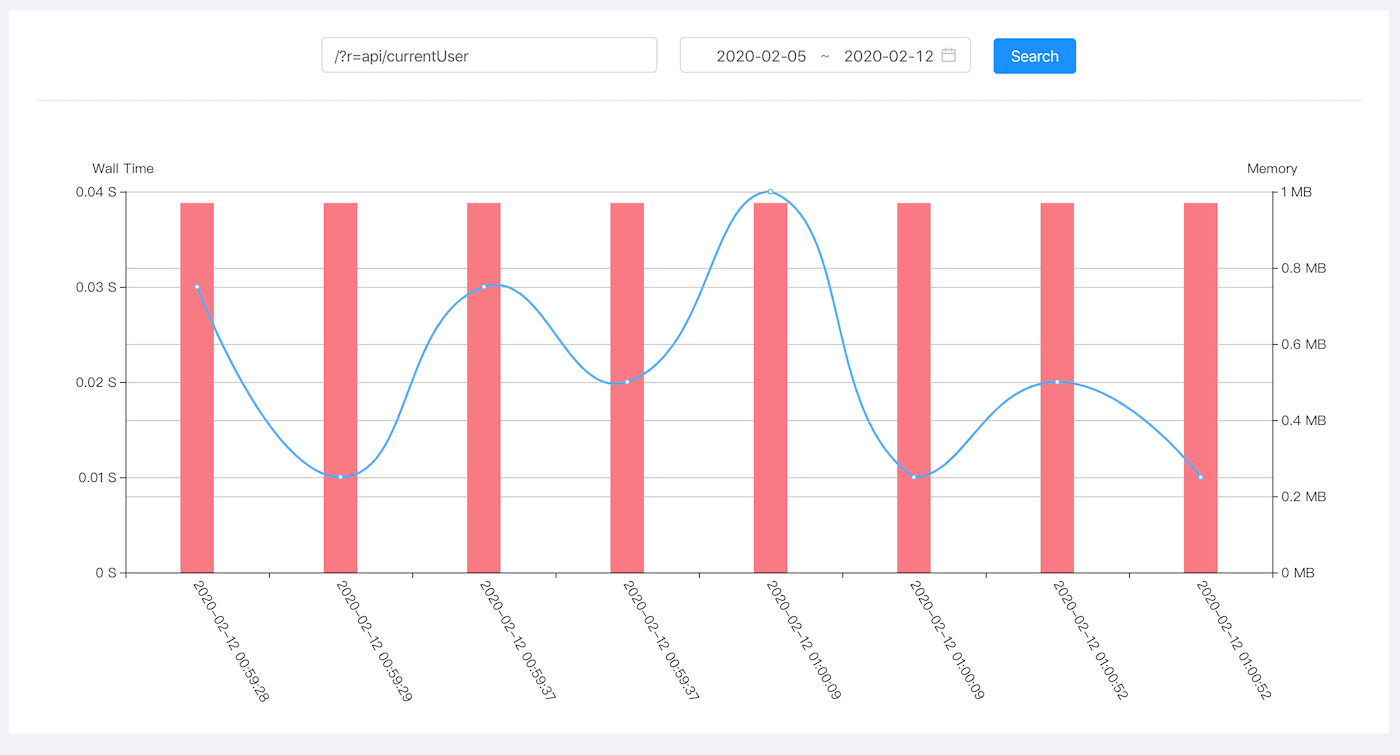
- 🌍 Monitor production environment time consuming requests.
- 🛡 Displays the memory and CPU consumption of the underlying function.
- 🎨 Use various kinds of visual graphics to display data.
⚙️ System requirements
- uprofiler,xhprof,tideways php extension(default tideways).
- composer
- PHP 5.6+
Install tideways extension
PHP 5.6(download tideways v4.1.5) PHP 7.0+(download tideways v4.1.7)
wget --no-check-certificate https://github.com/tideways/php-xhprof-extension/archive/v4.1.7.tar.gz && tar zxvf v4.1.7.tar.gz && cd php-xhprof-extension-4.1.7 && phpize && ./configure && make && sudo make install
Add configuration data on php.ini.You should see something like:
extension=tideways.so
Once installed, you can use the following command to check:
> php --ri tideways
tideways
tideways => 4.1.7
Install php-monitor
composer create-project --prefer-dist --ignore-platform-reqs laynefyc/php-monitor php-monitor && cd php-monitor/public && php -S 127.0.0.1:8066
Visit http://127.0.0.1:8066 and input account and password(php/php).
Detailed installation tutorial
-
Download & Update Projects
composer create-project --prefer-dist --ignore-platform-reqs laynefyc/php-monitor php-monitor
or
git clone https://github.com/laynefyc/php-monitor.git cd php-monitor composer update --ignore-platform-reqs -
The project can set data storage mode and supports MySQL, MongoDB, SQLite. Set in configuration file
src/config/config.php,The information is as follows:// 'save' => [ // 'driver' => 'mysql', // 'host' => '127.0.0.1:3306', // 'database' => 'php_monitor', // 'username' => '', // 'password' => 'abcd1234', // 'charset' => 'utf8mb4' // ], // 'save' => [ // 'driver' => 'mongodb', // 'host' => '127.0.0.1:27017', // 'database' => 'php_monitor', // 'username' => '', // 'password' => '' // ], 'save' => [ 'driver' => 'sqlite', 'database' => dirname(__DIR__).'/db/php_monitor.sqlite3' ],
SQLite is used by default in this project,if you use other databases, please uncomment them.
If you want to use MySQL to run the following table creation statement (table name cannot be modified):
CREATE TABLE `php_monitor` (
	`id` bigint(20) unsigned NOT NULL AUTO_INCREMENT COMMENT 'Auto-increment number ',
	`url` text CHARACTER SET utf8 COMMENT 'Request URL',
	`server_name` varchar(255) CHARACTER SET utf8 DEFAULT NULL COMMENT 'Service name',
	`get` text COMMENT 'GET parameter',
	`pmu` int(11) unsigned DEFAULT NULL COMMENT 'Memory spike',
	`wt` int(11) unsigned DEFAULT NULL COMMENT 'Total time spent in microseconds',
	`cpu` int(11) unsigned DEFAULT NULL COMMENT 'Total CPU cycle time',
	`ct` int(3) NOT NULL COMMENT 'Total calls',
	`mu` int(11) unsigned DEFAULT NULL COMMENT 'Current memory consumption',
	`request_time` int(10) unsigned NOT NULL DEFAULT '0' COMMENT 'Request time accurate to seconds',
	`request_time_micro` int(10) unsigned DEFAULT '0' COMMENT 'Request time accurate to microseconds',
	`profile` longblob NOT NULL COMMENT 'performance data,
	`server` longblob COMMENT 'SERVER parameter',
	`type` varchar(16) DEFAULT NULL COMMENT 'Request time includes GET,POST',
	`ip` varchar(16) DEFAULT NULL COMMENT 'IP address',
	PRIMARY KEY (`id`),
	KEY `idx_url` (`url`),
	KEY `idx_ip` (`ip`)
) ENGINE=MyISAM AUTO_INCREMENT=1 DEFAULT CHARSET=utf8mb4;
Mongodb database will build its own tables, but it needs to add indexes by yourself.The adding way as follows:
show dbs
use php_monitor //Please select your own database
db.php_monitor.createIndex({"url":1})
db.php_monitor.createIndex({"ip":1})
The table name for all data storage methods must be
php_monitorand does not support modification. -
The operation of monitoring platform
It can directly pass the following command during testing:
cd php-monitor/public
php -S 127.0.0.1:8066
After running successfully ,It can be accessed http://127.0.0.1:8066directly .
Non-test environment please use Nginx.The configuration is as follows:
server {
    listen       8066;
    server_name  localhost;
    root /home/www/cai/php-monitor/public;
    index  index.php index.html;
    location / {
        root /home/www/cai/php-monitor/public;
    }

    location ~ \.php$ {
        fastcgi_pass   127.0.0.1:9000;
        include        fastcgi_params;
        fastcgi_param  SCRIPT_FILENAME  $document_root/index.php;
    }
}
-
Login background
Login account password can be modified directly in the configuration file,
src/config/config.php。'user' => [ //login account and password ['account'=>'php','password'=>'php'], ['account'=>'admin','password'=>'abcd'] ]Please change the account number and password in time after release. If you require a higher level of security, please extend the method of Login Controller.php file.
-
Introduce monitoring into the project.
The project is monitored in a non-invasive way, without any interference to the service in operation.
There are two ways to add monitoring to a project. One is to modify the nginx configuration:
For example, to monitor the running service www.site.com, you only need to add a line of configuration information in the nginx configuration file
fastcgi_param PHP_VALUE "auto_prepend_file={php-monitor-path}/src/autoPrepend.php";
The effect of adding configuration is as follows (other content is just for demonstration, not the same nginx configuration):
server {
  listen 80;
  server_name www.site.com;
  root your/webroot/;
  location ~ \.php$ {
      fastcgi_pass   127.0.0.1:9000;
      include        fastcgi_params;
      fastcgi_param  SCRIPT_FILENAME  $document_root/index.php;
      fastcgi_param PHP_VALUE "auto_prepend_file={php-monitor-path}/src/autoPrepend.php";
  }
}
This way is to use the
auto_prepend_fileinterface provided by PHP,interfaceing https://www.php.net/manual/zh/ini.core.php#ini.auto-prepend-file.You need to restart nginx after adding configuration.The second way is to import the entry file that needs to monitor the project directly , usually add it in
public/index.php:require '/home/www/cai/php-monitor/src/autoPrepend.php';
The effect after adding configuration is as follows (except the core code, the other code is for demonstration):
<?php
use pm\common\Router;

//The core code is here
require '/home/www/cai/php-monitor/src/autoPrepend.php';

include 'vendor/autoload.php';
$config = require('src/config/config.php');
(new Router($config))->run();
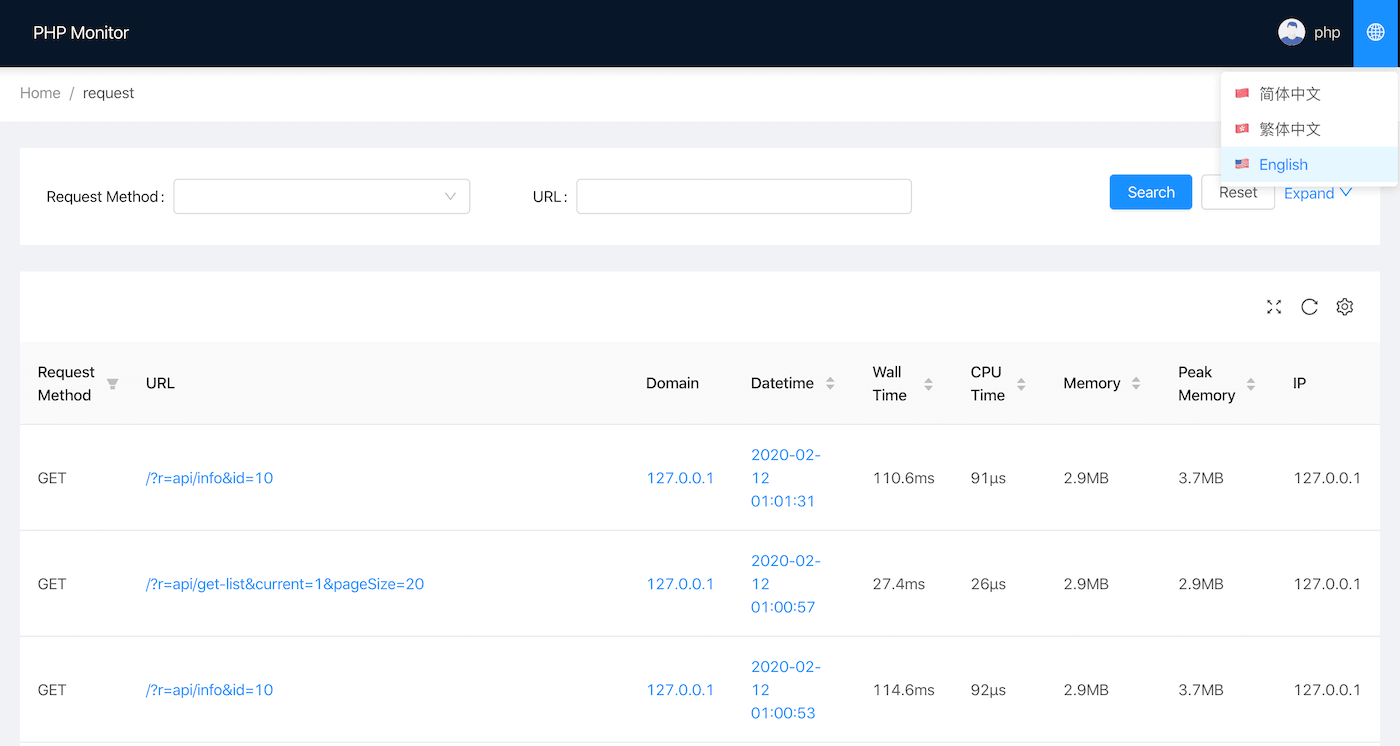
After adding the burying point, the request record of www.site.com project can be viewed in the http://127.0.0.1:8066 monitoring background.
-
More details
- MongoDB has the fastest storage speed. If you have high performance requirements, please use it first.
- Modify the profile.enable property of the configuration file to modify the sampling frequency. Generally speaking, it is not necessary to store all requests.For example, 'rand (1, 100) > 60' is to set the sampling rate to '40%';
- Modify the profiler.filter_path attribute of the configuration file to filter services that you do not want to collect, such as some intranet services that do not care about execution efficiency;
-
Swoole support
public function onReceive(\swoole_server $serv, $fd, $from_id, $dataSrc)
{
    require '/home/www/cai/php-monitor/src/autoPrepend.php';

    //your code

    \pm\common\PMonitor::shutdown($data['params']['route'],$serv->getClientInfo($fd,$from_id)['remote_ip'],'TCP');
}
TODO
- Sqlite storage mode development;
- Perfect internationalization;
- Improve documentation;
- CI process access;
- Supplementary unit test;
- Composer package encapsulation;
- Rewrite xhprof extension;
- Separation of buried point module and display module;
- Docker access;
Feedback
Please submit your issues.