jeroen-g / statinator
Next-gen PHP state machines
Installs: 18
Dependents: 0
Suggesters: 0
Security: 0
Stars: 5
Watchers: 1
Forks: 2
Open Issues: 2
pkg:composer/jeroen-g/statinator
Requires
- php: ^7.4|^8.0
Requires (Dev)
- infection/infection: 0.20
- phpunit/phpunit: ^9.2
- symplify/easy-coding-standard: ^8.3
This package is auto-updated.
Last update: 2026-01-06 21:31:28 UTC
README
Next-gen PHP state machines and state charts.
Installation
composer require jeroen-g/statinator
Usage
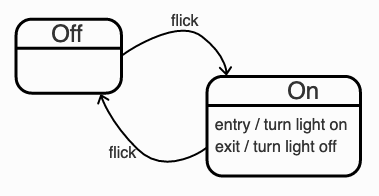
Imagine you want to create a state machine for a light switch in which the light can be in the state ON or OFF. A diagram would look as follows:
Source: statecharts.github.io
The Statinator configuration for this state machine would look like this:
$config = [
    'states' => [
      'LIGHTS_ON',
      'LIGHTS_OFF',
    ],
    'transitions' => [
        'FLICK_ON' => [
            'from' => ['LIGHTS_OFF'],
            'to' => ['LIGHTS_ON'],
        ],
        'FLICK_OFF' => [
            'from' => ['LIGHTS_ON'],
            'to' => ['LIGHTS_OFF'],
        ],
    ],
];
Then in your application you should instantiate Statinator with this configuration.
use JeroenG\Statinator\Statinator;
$statinator = new Statinator($config);
The Statinator accepts a second parameter as a repository implementing the ActionRepositoryInterface,
this (optionally) stores successful and failed actions.
Any object that you want to use with a state machine should implement the StatableInterface contract.
For the example of the light switch this might be:
use JeroenG\Statinator\StatableInterface;

class LightSwitch implements StatableInterface {
    private string $currentState;

    public function __construct(string $initialState)
    {
        $this->currentState = $initialState;
    }

    public function getState(): string
    {
        return $this->currentState;
    }

    public function setState(string $to): void
    {
        $this->currentState = $to;
    }
}
Anywhere in your code, you may use the Statinator instance to get a state machine and interact with its state and transitions.
$lightSwitch = new LightSwitch('LIGHTS_OFF');
$sm = $statinator->get($lightSwitch);

$sm->getState(); // LIGHTS_OFF
$sm->can('FLICK_ON'); // true
$sm->can('FLICK_OFF'); // false

$sm->apply('FLICK_ON');

$sm->getState(); // LIGHTS_ON
$sm->can('FLICK_ON'); // false
$sm->can('FLICK_OFF'); // true
While seeing objects move from one state to another is quite cool, the real power lies with the actions that you may define for transitions.
Before and after a state changes, the state machine executes any available actions. You can define actions as part of the global configuration, or by using a setter on the Statinator.
// Using the configuration
$config = [
    // ...
    'transitions' => [
        'FLICK_ON' => [
            'from' => ['LIGHTS_OFF'],
            'to' => ['LIGHTS_ON'],
            'on' => [
                'entry' => NotifyLightsAreOn::class,
                'exit' => NotifyLightsAreOff::class,
            ],
        ],
    // ...
    ],
];

// Or using a setter
$statinator->onEntry('FLICK_ON', NotifyLightsAreOn::class);
$statinator->onExit('FLICK_ON', NotifyLightsAreOff::class);
The actions can be a callable or a class implementing ActionableInterface.
$statinator->onEntry('FLICK_OFF', fn(StateMachineInterface $stateMachine, string $transition) => var_dump('Called it!'));
use JeroenG\Statinator\ActionableInterface;
use JeroenG\Statinator\StateMachineInterface;

class NotifyLightsAreOn implements ActionableInterface {
    private StateMachineInterface $stateMachine;
    private string $transition;

    public function getState(): string
    {
        return $this->stateMachine->getState();
    }

    public function execute(StateMachineInterface $stateMachine, string $transition): void
    {
        $this->stateMachine = $stateMachine;
        $this->transition = $transition;

        $notifier = new MyNotifier();
        $notifier->send('Lights are turned on');
    }

    public function getTransition(): string
    {
        return $this->transition;
    }
}
If your action implements the ActionableInterface it could be saved using a repository that is passed when you instantiated Statinator.
This package ships with an ArrayActionRepository that is used by default and does not persist the data. Another possibility
is the LogActionRepository, this one requires a PSR-compliant logger where the data will be persisted.
You can of course also make your own repository (maybe one that uses the database) as long as it implements the ActionRepositoryInterface.
Contributing
The project includes a Makefile to run install it, run the tests and check the code style.

