viewflex / ligero
A Laravel BREAD micro-framework supporting rapid modeling of domains with UI and API controllers, multiple view modes, advanced search, pagination, presenters, localization and caching.
Installs: 22
Dependents: 1
Suggesters: 0
Security: 0
Stars: 2
Watchers: 1
Forks: 0
Open Issues: 0
pkg:composer/viewflex/ligero
Requires
- laravel/framework: ~5.2
Suggests
- viewflex/forex: Providing live currency exchange rates, with configurable provider and caching.
This package is auto-updated.
Last update: 2026-02-13 17:03:57 UTC
README
QuickStart
A Laravel BREAD micro-framework supporting rapid modeling of domains with UI and API controllers, multiple view modes, advanced search, pagination, presenters, localization and caching.
QuickStart | Configuration | Advanced Usage
Installation
From your Laravel application's root directory, install using Composer:
$ composer require viewflex/ligero
Add the LigeroServiceProvider to the list of providers in Laravel's config/app.php file.
Viewflex\Ligero\LigeroServiceProvider::class,
Overview
The goal is to provide a versatile, extensible BREAD (Browse-Read-Edit-Add-Delete) micro-framework that can be easily understood and deployed, while integrating all the necessary class types, following SOLID design principles, and enabling rapid modeling of domains.
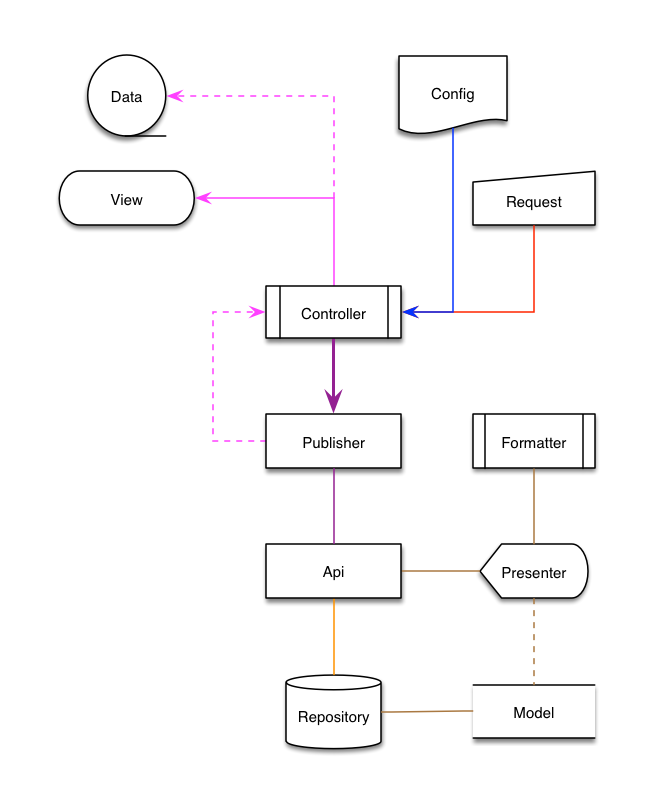
BREAD operations and generation of dynamic controls are performed via a Publisher object, which serves a particular representation of a business or application domain. A Publisher encapsulates a distinct set of components, representing configuration, request, and repository - through configuration of these components we customize a Publisher for the required tasks.
This package combines an elegant interface for creating, configuring and using Publishers, with a modular architecture that allows enhancement of all components via extension or decoration. With scaffolding for Publisher controllers and contexts, it provides a path for implementing both simple BREAD functionality and complex multi-domain applications and services.
This documentation, along with the included demo, shows various ways to implement a Publisher in real-world applications, but in it's simplest form, this one line creates a configured Publisher which returns a data bundle containing the requested results and UI data:
$data = (new Publisher($config, $request))->getData();
Managing Complexity
Let's face it, implementing even simple BREAD involves more than just calling a few Eloquent methods. As it turns out, though, much of the code, even for complex multi-domain applications, can be broken out into standard components for reuse. This package attempts to abstract as much of the functionality as possible to support easy declarative configuration of a domain Publisher or Context, allowing quick prototyping of domains and service layers.
Architecture
The assembly of various class types follows the Strategy Pattern, and provides all the necessary functionality for processing BREAD requests, returning raw or presented results, and generating dynamic contextual data for UI controls.
This pattern is easy to replicate for each domain, enabling rapid scaffolding of an application with many domains. The included demo illustrates deployment of both UI and API controllers, using the example Items domain. The demo also includes an example of a Context (in the DDD sense of the word), which encapsulates a Publisher and it's components.
A good place to start understanding any codebase is through the interfaces. In this package nearly every class implements an interface, providing a clear map of core functionality, and a decoupling of code that allows extension, decoration, or replacement of any class, without side-effects.
It's not necessary to learn about every component before you start using this package - all configuration can be done fluently without extending or decorating classes. See the following sections to get up and running quickly with your own custom BREAD domains.
Getting Started
This package provides several ways to create and deploy a domain Publisher, depending on the complexity of the requirements for a given domain. See Basic Usage (below) and the Advanced Usage documentation for examples.
Basic Usage
Because this package was designed for maximum extensibility, there are many different ways in which it can be used. Typically you will implement a Publisher in a UI controller or an API controller with at least the basic BREAD methods as endpoints for the routes. The example below illustrates creation of a stateful UI controller serving a domain Publisher. See the Advanced Usage documentation to learn how the demo also makes use of the built-in API controller.
The Items Demo
There are multiple ways to implement a Publisher - let's begin by looking at the demo UI controller.
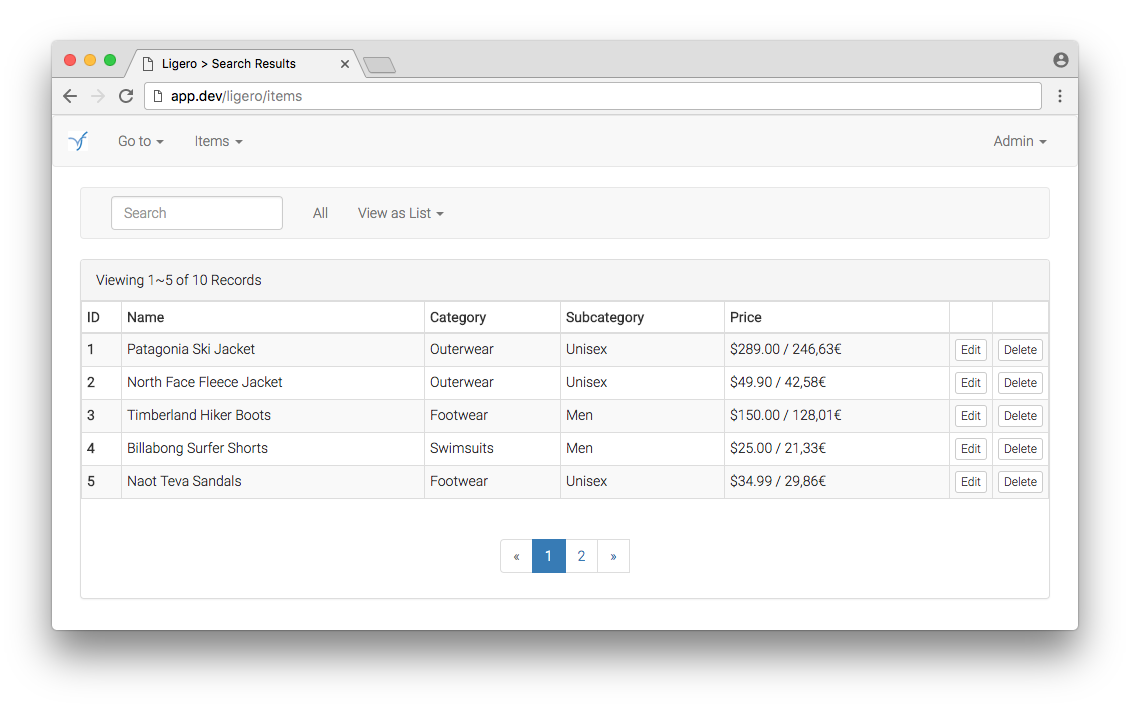
The Items UI pictured above is part of the demo provided in this package; you can try it out using the demo UI routes listed below. It implements a BREAD UI with three view modes and an input form for create/edit operations. The templates are all plain HTML with Bootstrap.css, but the generated data that is displayed could just as easily be presented using any front-end framework.
This package separates presentation from the application logic, generating results with all necessary data elements for dynamic UI components, pre-packaged in a standardized format (use the 'Items > Display as JSON' menu command to see the raw data).
Using the Demo as a Template
See the Publishing the Package Files subsection below to learn how to quickly scaffold new domains by publishing (copying) the demo and customizing it to suit the requirements.
Demo UI Controller
We start with a new controller extending BasePublisherController, to inherit the session-aware BREAD actions and generated UI controls. In the constructor we create a default Publisher and then override the default values as needed using fluent setter methods (see the Configuration documentation for a complete list).
namespace Viewflex\Ligero\Publish\Demo\Items;

use Viewflex\Ligero\Base\BasePublisherController;

class ItemsController extends BasePublisherController
{
    public function __construct()
    {

        $this->createPublisherWithDefaults();

        $this
            ->setDomain('Items')
            ->setTranslationFile('items')
            ->setTableName('ligero_items')
            ->setModelName('Viewflex\Ligero\Publish\Demo\Items\Item')
            ->setResultsColumns([
                'id',
                'active',
                'name',
                'category',
                'subcategory',
                'description',
                'price'
            ])
            ->setWildcardColumns([
                'category'
            ])
            ->setControls([
                'pagination'        => true,
                'keyword_search'    => true
            ])
            ->setKeywordSearchColumns([
                'name',
                'category',
                'subcategory',
                'description'
            ])
            ->setQueryRules([
                'active'            => 'boolean',
                'name'              => 'max:60',
                'category'          => 'max:25',
                'subcategory'       => 'max:25'
            ])
            ->setRequestRules([
                'active'            => 'boolean',
                'name'              => 'max:60',
                'category'          => 'max:25',
                'subcategory'       => 'max:25',
                'description'       => 'max:250',
                'price'             => 'numeric'
            ]);

    }

}
Demo UI Routes
In Laravel, a resourceful controller's routes can be specified with one line, but by using explicit routes, as shown below, we can ensure that the route parameter name is always {id}, as the codebase expects. Laravel would otherwise automatically use the singular form of the model name.
Additional routes should be declared first. These two add some special functions to the BREAD layer of the Items domain:
Route::get('ligero/items/json', array('as' => 'ligero.items.json', 'uses' => '\Viewflex\Ligero\Publish\Demo\Items\ItemsController@json', 'middleware' => 'web'));
Route::get('ligero/items/action', array('as' => 'ligero.items.action', 'uses' => '\Viewflex\Ligero\Publish\Demo\Items\ItemsController@action', 'middleware' => 'web'));
These are the standard resource controller routes for the Items demo domain:
Route::get('ligero/items', array('as' => 'ligero.items.index', 'uses' => '\Viewflex\Ligero\Publish\Demo\Items\ItemsController@index', 'middleware' => 'web'));
Route::get('ligero/items/create', array('as' => 'ligero.items.create', 'uses' => '\Viewflex\Ligero\Publish\Demo\Items\ItemsController@create', 'middleware' => 'web'));
Route::get('ligero/items/{id}', array('as' => 'ligero.items.show', 'uses' => '\Viewflex\Ligero\Publish\Demo\Items\ItemsController@show', 'middleware' => 'web'));
Route::get('ligero/items/{id}/edit', array('as' => 'ligero.items.edit', 'uses' => '\Viewflex\Ligero\Publish\Demo\Items\ItemsController@edit', 'middleware' => 'web'));
Route::post('ligero/items/store', array('as' => 'ligero.items.store', 'uses' => '\Viewflex\Ligero\Publish\Demo\Items\ItemsController@store', 'middleware' => 'web'));
Route::put('ligero/items/{id}', array('as' => 'ligero.items.update', 'uses' => '\Viewflex\Ligero\Publish\Demo\Items\ItemsController@update', 'middleware' => 'web'));
Route::delete('ligero/items/{id}', array('as' => 'ligero.items.destroy', 'uses' => '\Viewflex\Ligero\Publish\Demo\Items\ItemsController@destroy', 'middleware' => 'web'));
Demo API Routes
Besides the UI controller used in the demo, this package also includes a Context and API controller serving the API routes for the same Items domain. See the Advanced Usage documentation to understand how API calls are routed.
Thinking Beyond BREAD
Now that you see how easy it is to implement a Publisher, you may be wondering how they can be used in the wider context of the application under development. If you are thinking along the lines of Domain-Driven Design (DDD) in designing your application, see the Advanced Usage documentation to understand the built-in support for bounded contexts.
Customization
This package comes with a demo domain that provides examples of publishing a domain with both a UI controller and an API controller. To install an editable copy of the demo Items domain to use as boilerplate for a new domain, just run the publish command with the ligero tag, run the migration, and seed the demo database table, as described below.
Copy and rename the demo files you need and change the class names. Copy and rename the resource files (views and lang), and customize as needed. Create and seed new database tables as needed.
Publishing the Package Files
The package service provider configures artisan to publish specific file groups with tags. There are several options available.
Routes
Run this command to publish the routes.php file to the project's publish/viewflex/ligero directory:
php artisan vendor:publish --tag='ligero-routes'
Config
Run this command to publish the ligero.php config file to the project's config directory for customization:
php artisan vendor:publish --tag='ligero-config'
Resources
Run this command to publish the blade templates for the demo UI, and lang files for package messages and UI strings:
php artisan vendor:publish --tag='ligero-resources'
Routes, Demo Migration and Seeder
Run this command to install the migration and seeder for the 'Items' demo domain:
php artisan vendor:publish --tag='ligero-data'
After publishing the demo migration and seeder, run the migration:
php artisan migrate
Then run the seeder:
php artisan db:seed --class="LigeroSeeder"
Routes, Config, Resources, Demo Migration and Seeder
Use this command to publish config, demo views, and lang files for modification. The demo migration and seeder are also copied to their proper directories:
php artisan vendor:publish --tag='ligero'
Extending or Decorating Base Classes
Ligero's architecture is based on a distinct pattern of class types, each defined by an interface; since classes relate to each other as abstract types, you can easily substitute your own custom classes, provided that they implement the same interfaces.
Namespace for Custom Classes
The Viewflex\Ligero\Publish namespace, corresponding to the publish/viewflex/ligero directory, is recognized by the package, and is intended for organization of your custom classes. The Items demo classes will be published (copied) to this directory for customization, along with the demo routes file.
Tests
The phpunit tests can be run as described in the Test Documentation.
License
This software is offered for use under the MIT License.
Changelog
Release versions are tracked in the Changelog.
Contributing
Please see the Contributing Guide to learn more about the project goals and how you can help.


