rubix / iris
An introduction to machine learning in Rubix ML using the famous Iris dataset and the K Nearest Neighbors classifier.
Installs: 389
Dependents: 0
Suggesters: 0
Security: 0
Stars: 34
Watchers: 1
Forks: 9
Open Issues: 0
Type:project
pkg:composer/rubix/iris
Requires
- php: >=7.4
- rubix/ml: ^2.0
This package is auto-updated.
Last update: 2026-01-25 21:14:14 UTC
README
A lightweight introduction to machine learning in Rubix ML using the famous Iris dataset and the K Nearest Neighbors algorithm. By the end of this tutorial, you'll know how to structure a project, instantiate a learner, and train it to make predictions on some test data.
- Difficulty: Easy
- Training time: Less than a minute
Installation
Clone the project locally using Composer:
$ composer create-project rubix/iris
Requirements
- PHP 7.4 or above
Tutorial
Introduction
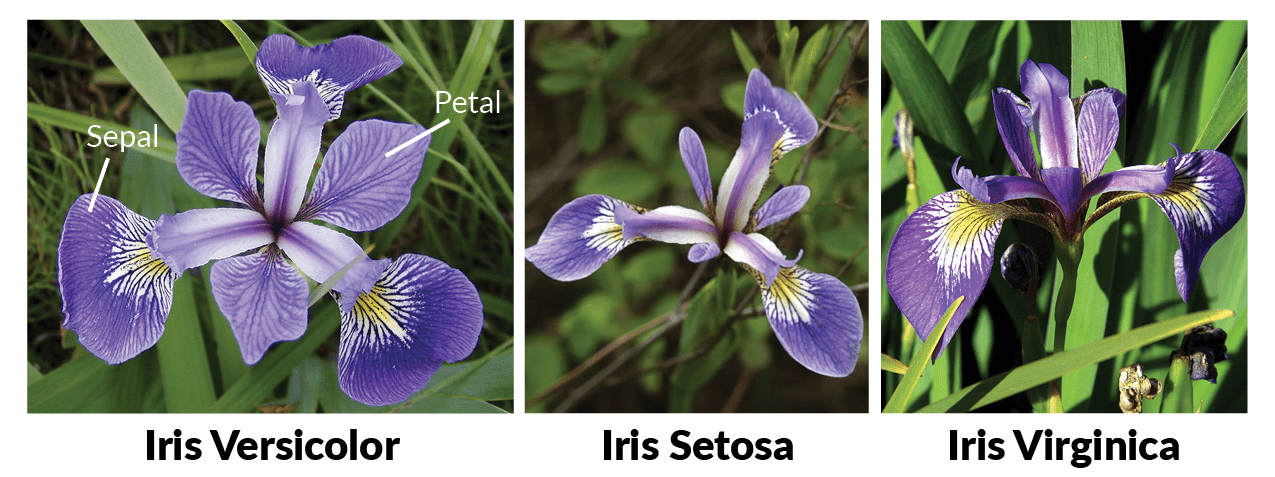
The Iris dataset consists of 50 samples for each of three species of Iris flower - Iris setosa, Iris virginica, and Iris versicolor (pictured below). Each sample is comprised of 4 measurements or features - sepal length, sepal width, petal length, and petal width. Our objective is to train a K Nearest Neighbors (KNN) classifier to determine the species of Iris flower from a set of unknown test samples using the Iris dataset. Let's get started!
Extracting the Data
The first step is to extract the Iris dataset from the dataset.ndjson file in our project folder into our training script. You'll notice that we've provided the Iris dataset in CSV (Comma-separated Values) format as well. This is strictly for convenience in case you wanted to view the dataset in your favorite spreadsheet software. To instantiate a new Labeled dataset object we'll pass an NDJSON extractor pointing to the dataset file in our project folder to the fromIterator() factory method. The factory uses the last column of the data table for the labels and the rest of the columns for the values of the sample features. We'll call this our training set.
Note: The source code for this example can be found in the train.php file in project root.
use Rubix\ML\Datasets\Labeled;
use Rubix\ML\Extractors\NDJSON;

$training = Labeled::fromIterator(new NDJSON('dataset.ndjson'));
Next, we'll set aside 10 random samples that we'll use later to make some example predictions and score the model. The randomize() method on the dataset object will handle shuffling the data to ensure randomness and the take() method pulls the first n rows from the training set and puts them into a separate dataset object. We do this because we want to test the model on samples that it hasn't been trained with.
$testing = $dataset->randomize()->take(10);
Instantiating the Learner
Next, we'll instantiate the K Nearest Neighbors classifier and choose the value of the k hyper-parameter. Hyper-parameters are constructor parameters that effect the behavior of the learner during training and inference. KNN is a distance-based algorithm that finds the k closest samples from the training set and predicts the label that is most common. For example, if we choose k equal to 5, then we may get 4 labels that are Iris setosa and 1 that is Iris virginica. In this case, the estimator would predict Iris-setosa because that is the most common label. To instantiate the learner, pass the value of hyper-parameter k to the constructor of the learner. Refer to the docs for more info on KNN's additional hyper-parameters.
use Rubix\ML\Classifiers\KNearestNeighbors;

$estimator = new KNearestNeighbors(5);
Training
Now, we're ready to train the learner by calling the train() method with the training set we prepared earlier.
$estimator->train($training);
Making Predictions
With the model trained, we can make predictions using the testing data by calling the predict() method on the testing set.
$predictions = $estimator->predict($testing);
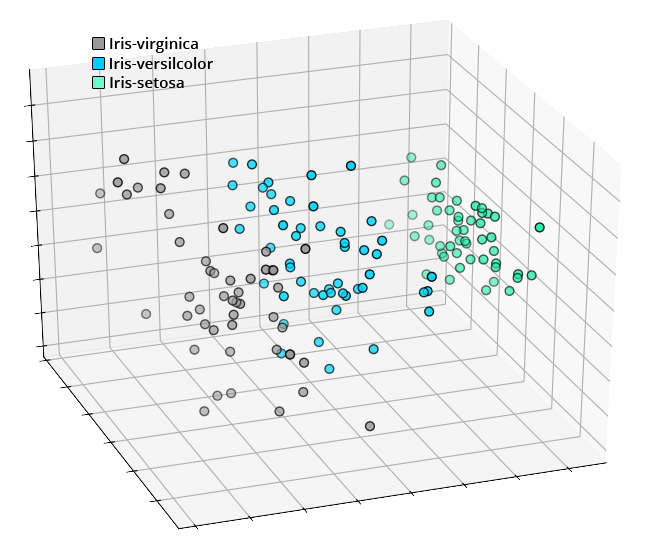
During inference, the KNN algorithm interprets the features of the samples as spatial coordinates and uses the distance between samples to determine the most similar samples from the data it has already seen. From the visualization below, the features of each species of Iris flower form distinct clusters that can be learned by the K Nearest Neighbors algorithm.
Validation Score
We can test the model generated during training by comparing the predictions it makes to the ground-truth labels from the testing set. We'll need to choose a cross validation Metric to output a score that we'll interpret as the generalization ability of our newly trained estimator. The Accuracy is a simple classification metric that ranges from 0 to 1 and is calculated as the number of correct predictions to the total number of predictions. To obtain the accuracy score, pass the predictions we generated from the model earlier along with the labels from the testing set to the score method on the metric instance.
use Rubix\ML\CrossValidation\Metrics\Accuracy;

$metric = new Accuracy();

$score = $metric->score($predictions, $testing->labels());
Now you're ready to run the training script from the command line.
php train.php
Next Steps
Congratulations on completing the introduction to machine learning in PHP with Rubix ML using the Iris dataset. Now you're ready to experiment on your own. For example, you may want to try different values of k or swap out the default Euclidean distance kernel for another one such as Manhattan or Minkowski.
Original Dataset
Creator: Ronald Fisher Contact: Michael Marshall Email: (1) MARSHALL%PLU '@' io.arc.nasa.gov
References
- R. A. Fisher. (1936). The use of multiple measurements in taxonomic problems.
- Dua, D. and Graff, C. (2019). UCI Machine Learning Repository [http://archive.ics.uci.edu/ml]. Irvine, CA: University of California, School of Information and Computer Science.
License
The code is licensed MIT and the tutorial is licensed CC BY-NC 4.0.


