ping-xiong / idoc
Generate beautiful API documentation from your Laravel application
Maintainers
Requires
- php: >=7.0.0
- fakerphp/faker: ^1.12
- illuminate/console: 5.5.* || 5.6.* || 5.7.* || 5.8.* || ^6.0 || ^7.0 || ^8.0
- illuminate/routing: 5.5.* || 5.6.* || 5.7.* || 5.8.* || ^6.0 || ^7.0 || ^8.0
- illuminate/support: 5.5.* || 5.6.* || 5.7.* || 5.8.* || ^6.0 || ^7.0 || ^8.0
- mpociot/reflection-docblock: ^1.0.1
- ramsey/uuid: ^3.8 || ^4.0
Requires (Dev)
- dingo/api: 2.0.0-alpha1
- league/fractal: ^0.17.0
- mockery/mockery: ^1.2.0
- orchestra/testbench: 3.5.* || 3.6.* || 3.7.* || 5.1.* || ^6.0
- phpunit/phpunit: ^6.0.0 || ^7.4.0 || ^9.0
This package is auto-updated.
Last update: 2026-07-11 22:20:40 UTC
README
              Follow me anywhere @ovac4u                         | GitHub
              _________                          _________       | Twitter
             |   ___   |.-----.--.--.---.-.----.|  |  |.--.--.   | Facboook
             |  |  _   ||  _  |  |  |  _  |  __||__    |  |  |   | Instagram
             |  |______||_____|\___/|___._|____|   |__||_____|   | Github + @ovac
             |_________|                        www.ovac4u.com   | Facebook + @ovacposts
Laravel IDoc - The API Documentation Generator
Automatically generate an interactive API documentation from your existing Laravel routes. Take a look at the example documentation. Inspired by Laravel Api Documentation Generator
Introduction.
Laravel IDoc generator (interactive documentation generator) is a seamless and complete plugin for generating API documentation from your Laravel's codebase. It is inspired by the laravel-apidoc-generator, ReDoc and the Open API initiative from Swagger. IDoc has been built with extendability so that it can easily adapt with your use case.
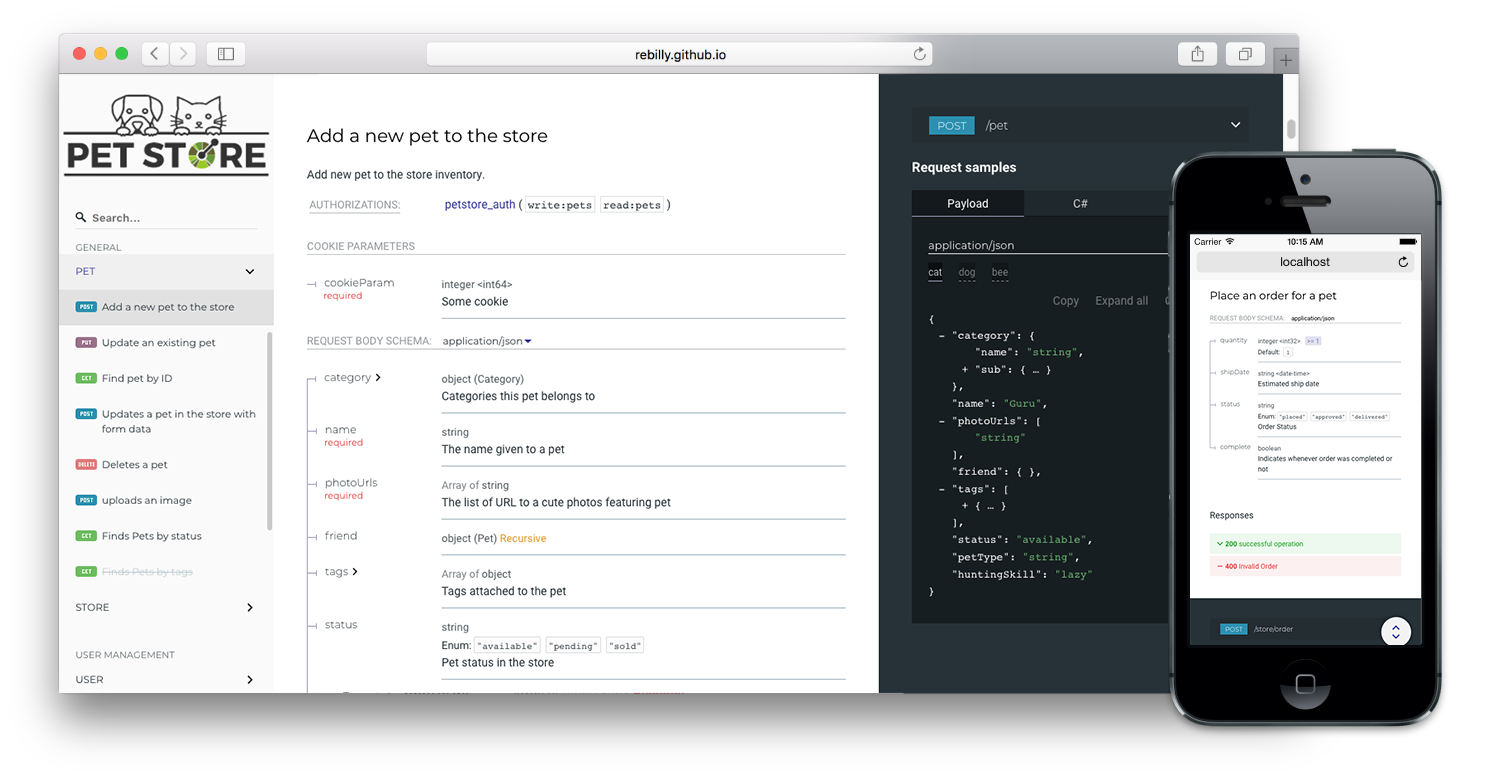
Features
- Extremely easy deployment
- Server Side Rendering ready
- The widest OpenAPI v2.0 features support
 {.inline}
 - OpenAPI 3.0 support
- Neat interactive documentation for nested objects
 {.inline}
 - Automatic code sample support
 {.inline}
 - Responsive three-panel design with menu/scrolling synchronization
- Integrate API Introduction into side menu.
- High-level grouping in side-menu.
- Branding/customizations.


Installation
Note: PHP 7 and Laravel 5.5 or higher are the minimum dependencies.
$ composer require ovac/idoc
Laravel
Publish the config file by running:
php artisan vendor:publish --tag=idoc-config
This will create an idoc.php file in your config folder.
Lumen
- Register the service provider in your
bootstrap/app.php:
$app->register(\OVAC\IDoc\IDocServiceProvider::class);
- Copy the config file from
vendor/ovac/idoc/config/idoc.phpto your project asconfig/idoc.php. Then add to yourbootstrap/app.php:
$app->configure('idoc');
Usage
$ php artisan idoc:generate
Configuration
Before you can generate your documentation, you'll need to configure a few things in your config/idoc.php.
pathThis will be used to register the necessary routes for the package.
'path' => 'idoc',
logoYou can specify your custom logo to be used on the generated documentation. A relative or absolute url to the logo image.
'logo' => 'https://res.cloudinary.com/ovac/image/upload/h_300,w_380,c_fill,r_30,bo_20px_solid_white/aboust_ey5v1v.jpg',
titleHere, you can specify the title to place on the documentation page.
'title' => 'iDoc API Reference',
descriptionThis will place a description on top of the documentation.
'description' => 'iDoc Api secification and documentation.',
-
versionDocumentation version number. -
terms_of_serviceThis is the url to the terms and conditions for use your API. -
contactHere you can configure contact information for support.
'contact' => [
        'name' => 'API Support',
        'email' => 'iamovac@gmail.com',
        'url' => 'http://www.ovac4u.com'
],
licenseA short and simple permissive license with conditions only requiring preservation of copyright and license notices
'license' => [
        'name' => 'MIT',
        'url' => 'https://github.com/ovac/idoc/blob/master/LICENSE.md'
],
-
outputThis package can automatically generate an Open-API 3.0 specification file for your routes, along with the documentation. This is the file path where the generated documentation will be written to. Default: public/docs -
hide_download_buttonThis section is where you can configure if you want a download button visible on the documentation. -
routerThe router to use when processing the route (can be Laravel or Dingo. Defaults to Laravel) -
serversThe servers array can be used to add multiple endpoints on the documentation so that the user can switch between endpoints. For example, This could be a test server and the live server.
'servers' => [
   [
       'url' => 'https://www.ovac4u.com',
       'description' => 'App live server.',
   ],
   [
       'url' => 'https://test.ovac4u.com',
       'description' => 'App test server.',
   ],
],
-
tag_groupsThis array is used to separate groups that you have defined in little sections in the side menu. If you want to use it, make sure you add all groups because the unadded group will not be displayed. -
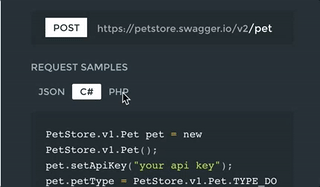
language-tabsThis is where you can set languages used to write request samples. Each item in array is used to generate a request template for a given language. New languages can be added and the existing ones modified after. You can add or edit new languages tabs by publishing the view files and editing them or adding custom view files to:
'resources/views/vendor/idoc/languages/LANGUAGE.blade.php',
securityThis is where you specify authentication and authorization schemes, by default the HTTP authentication scheme using Bearer is setting but you can modify it, add others or even define it as null according to the requirements of your project. For more information, please visit Swagger Authentication.
'security' => [
       'BearerAuth' => [
           'type' => 'http',
           'scheme' => 'bearer',
           'bearerFormat' => 'JWT',
       ],
   ],
routesThis is where you specify what rules documentation should be generated for. You specify routes to be parsed by defining conditions that the routes should meet and rules that should be applied when generating documentation. These conditions and rules are specified in groups, allowing you to apply different rules to different routes.
For instance, suppose your configuration looks like this:
return [
     //...,

     /*
     * The routes for which documentation should be generated.
     * Each group contains rules defining which routes should be included ('match', 'include' and 'exclude' sections)
     * and rules which should be applied to them ('apply' section).
     */
    'routes' => [
        [
            /*
             * Specify conditions to determine what routes will be parsed in this group.
             * A route must fulfill ALL conditions to pass.
             */
            'match' => [

                /*
                 * Match only routes whose domains match this pattern (use * as a wildcard to match any characters).
                 */
                'domains' => [
                    '*',
                    // 'domain1.*',
                ],

                /*
                 * Match only routes whose paths match this pattern (use * as a wildcard to match any characters).
                 */
                'prefixes' => [
                    'api/*',
                ],

                /*
                 * Match only routes registered under this version. This option is ignored for Laravel router.
                 * Note that wildcards are not supported.
                 */
                'versions' => [
                    'v1',
                ],
            ],

            //...
        ],
    ],
This means documentation will be generated for routes in all domains ('*' is a wildcard meaning 'any character') which match any of the patterns 'api/*' or 'v2-api/*', excluding the 'users.create' route and any routes whose names begin with admin., and including the 'users.index' route and any routes whose names begin with healthcheck.. (The versions key is ignored unless you are using Dingo router).
Also, in the generated documentation, these routes will have the header 'Authorization: Bearer: {token}' added to the example requests.
You can also separate routes into groups to apply different rules to them:
<?php
return [
     //...,

     'routes' => [
          [
              'match' => [
                  'domains' => ['v1.*'],
                  'prefixes' => ['*'],
              ],
              'include' => [],
              'exclude' => [],
              'apply' => [
                  'headers' => [
                      'Token' => '{token}',
                      'Version' => 'v1',
                  ],
              ],
          ],
          [
              'match' => [
                  'domains' => ['v2.*'],
                  'prefixes' => ['*'],
              ],
              'include' => [],
              'exclude' => [],
              'apply' => [
                  'headers' => [
                      'Authorization' => 'Bearer: {token}',
                      'Api-Version' => 'v2',
                  ],
              ],
          ],
];
With the configuration above, routes on the v1.* domain will have the Token and Version headers applied, while routes on the v2.* domain will have the Authorization and Api-Version headers applied.
Note: the
includeandexcludeitems are arrays of route names. THe * wildcard is supported. Note: If you're using DIngo router, theversionsparameter is required in each route group. This parameter does not support wildcards. Each version must be listed explicitly,
To generate your API documentation, use the idoc:generate artisan command.
$ php artisan idoc:generate
It will generate documentation using your specified configuration.
Documenting your API
This package uses these resources to generate the API documentation:
Grouping endpoints
This package uses the HTTP controller doc blocks to create a table of contents and show descriptions for your API methods.
Using @group in a controller doc block creates a Group within the API documentation. All routes handled by that controller will be grouped under this group in the sidebar. The short description after the @group should be unique to allow anchor tags to navigate to this section. A longer description can be included below. Custom formatting and <aside> tags are also supported. (see the Documentarian docs)
Note: using
@groupis optional. Ungrouped routes will be placed in a "general" group.
Above each method within the controller you wish to include in your API documentation you should have a doc block. This should include a unique short description as the first entry. An optional second entry can be added with further information. Both descriptions will appear in the API documentation in a different format as shown below.
You can also specify an @group on a single method to override the group defined at the controller level.
/**
 * @group User management
 *
 * APIs for managing users
 */
class UserController extends Controller
{

	/**
	 * Create a user
	 *
	 * [Insert optional longer description of the API endpoint here.]
	 *
	 */
	 public function createUser()
	 {

	 }

	/**
	 * @group Account management
	 *
	 */
	 public function changePassword()
	 {

	 }
}
Specifying request parameters
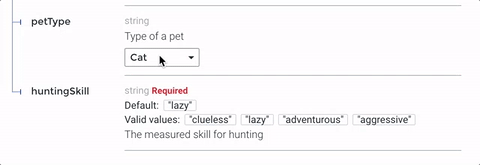
To specify a list of valid parameters your API route accepts, use the @bodyParam, @queryParam and @pathParam annotations.
- The
@bodyParamannotation takes the name of the parameter, its type, an optional "required" label, and then its description. - The
@queryParamannotation takes the name of the parameter, an optional "required" label, and then its description - The
@pathParamannotation takes the name of the parameter, an optional "required" label, and then its description
/**
 * @group Items
 */
class ItemController extends Controller
{

    /**
     * List items
     *
     * Get a list of items.
     *
     * @authenticated
     * @responseFile responses/items.index.json
     *
     * @return \Illuminate\Http\Response
     */
    public function index()
    {
        //...
    }

    /**
     * Store item
     *
     * Add a new item to the items collection.
     *
     * @bodyParam name string required
     * The name of the item. Example: Samsung Galaxy s10
     *
     * @bodyParam price number required
     * The price of the item. Example: 100.00
     *
     * @authenticated
     * @response {
     *      "status": 200,
     *      "success": true,
     *      "data": {
     *          "id": 10,
     *          "price": 100.00,
     *          "name": "Samsung Galaxy s10"
     *      }
     * }
     *
     * @param  \Illuminate\Http\Request  $request
     * @return \Illuminate\Http\Response
     */
    public function store(Request $request)
    {
        //...
    }


    /**
     * Get item
     *
     * Get item by it's unique ID.
     *
     * @pathParam item integer required
     * The ID of the item to retrieve. Example: 10
     *
     * @response {
     *      "status": 200,
     *      "success": true,
     *      "data": {
     *          "id": 10,
     *          "price": 100.00,
     *          "name": "Samsung Galaxy s10"
     *      }
     * }
     * @authenticated
     *
     * @param  \App\Item  $item
     * @return \Illuminate\Http\Response
     */
    public function show(Item $item)
    {
        //...
    }
They will be included in the generated documentation text and example requests.
Result:
Note: a random value will be used as the value of each parameter in the example requests. If you'd like to specify an example value, you can do so by adding Example: your-example to the end of your description. For instance:
    /**
     * @pathParam location_id required The id of the location.
     * @queryParam user_id required The id of the user. Example: me
     * @queryParam page required The page number. Example: 4
     * @bodyParam user_id int required The id of the user. Example: 9
     * @bodyParam room_id string The id of the room.
     * @bodyParam forever boolean Whether to ban the user forever. Example: false
     */
Note: You can also add the @bodyParam annotations to a \Illuminate\Foundation\Http\FormRequest subclass:
/**
 * @bodyParam title string required The title of the post.
 * @bodyParam body string required The title of the post.
 * @bodyParam type string The type of post to create. Defaults to 'textophonious'.
 * @bodyParam author_id int the ID of the author
 * @bodyParam thumbnail image This is required if the post type is 'imagelicious'.
 */
class MyRequest extends \Illuminate\Foundation\Http\FormRequest
{

}

public function createPost(MyRequest $request)
{
    // ...
}
Indicating auth status
You can use the @authenticated annotation on a method to indicate if the endpoint is authenticated. A field for authentication token will be made available and marked as required on the interractive documentation.
Providing an example response
You can provide an example response for a route. This will be displayed in the examples section. There are several ways of doing this.
@response
You can provide an example response for a route by using the @response annotation with valid JSON:
/**
 * @response {
 *  "id": 4,
 *  "name": "Jessica Jones",
 *  "roles": ["admin"]
 * }
 */
public function show($id)
{
    return User::find($id);
}
Moreover, you can define multiple @response tags as well as the HTTP status code related to a particular response (if no status code set, 200 will be returned):
/**
 * @response {
 *  "id": 4,
 *  "name": "Jessica Jones",
 *  "roles": ["admin"]
 * }
 * @response 404 {
 *  "message": "No query results for model [\App\User]"
 * }
 */
public function show($id)
{
    return User::findOrFail($id);
}
@transformer, @transformerCollection, and @transformerModel
You can define the transformer that is used for the result of the route using the @transformer tag (or @transformerCollection if the route returns a list). The package will attempt to generate an instance of the model to be transformed using the following steps, stopping at the first successful one:
- Check if there is a
@transformerModeltag to define the model being transformed. If there is none, use the class of the first parameter to the transformer'stransform()method. - Get an instance of the model from the Eloquent model factory
- If the parameter is an Eloquent model, load the first from the database.
- Create an instance using
new.
Finally, it will pass in the model to the transformer and display the result of that as the example response.
For example:
/**
 * @transformercollection \App\Transformers\UserTransformer
 * @transformerModel \App\User
 */
public function listUsers()
{
    //...
}

/**
 * @transformer \App\Transformers\UserTransformer
 */
public function showUser(User $user)
{
    //...
}

/**
 * @transformer \App\Transformers\UserTransformer
 * @transformerModel \App\User
 */
public function showUser(int $id)
{
    // ...
}
For the first route above, this package will generate a set of two users then pass it through the transformer. For the last two, it will generate a single user and then pass it through the transformer.
Note: for transformer support, you need to install the league/fractal package
composer require league/fractal
@responseFile
For large response bodies, you may want to use a dump of an actual response. You can put this response in a file (as a JSON string) within your Laravel storage directory and link to it. For instance, we can put this response in a file named users.get.json in storage/responses:
{"id":5,"name":"Jessica Jones","gender":"female"}
Then in your controller, link to it by:
/**
 * @responseFile responses/users.get.json
 */
public function getUser(int $id)
{
  // ...
}
The package will parse this response and display in the examples for this route.
Similarly to @response tag, you can provide multiple @responseFile tags along with the HTTP status code of the response:
/**
 * @responseFile responses/users.get.json
 * @responseFile 404 responses/model.not.found.json
 */
public function getUser(int $id)
{
  // ...
}
Generating responses automatically
If you don't specify an example response using any of the above means, this package will attempt to get a
response by making a request to the route (a "response call"). A few things to note about response calls:
- They are done within a database transaction and changes are rolled back afterwards.
- The configuration for response calls is located in the
config/idoc.php. They are configured within the['apply']['response_calls']section for each route group, allowing you to apply different settings for different sets of routes. - By default, response calls are only made for GET routes, but you can configure this. Set the
methodskey to an array of methods or '*' to mean all methods. Leave it as an empty array to turn off response calls for that route group. - Parameters in URLs (example:
/users/{user},/orders/{id?}) will be replaced with '1' by default. You can configure this, however. Put the parameter names (including curly braces and question marks) as the keys and their replacements as the values in thebindingskey. - You can configure environment variables (this is useful so you can prevent external services like notifications from being triggered). By default the APP_ENV is set to 'documentation'. You can add more variables in the
envkey. - By default, the package will generate dummy values for your documented body and query parameters and send in the request. (If you specified example values using
@bodyParamor@queryParam, those will be used instead.) You can configure what headers and additional query and parameters should be sent when making the request (theheaders,query, andbodykeys respectively). - By default all middlewares are enabled, but you can set the
without_middlewarearray to specify the middlewares you prefer to disable, you can even use ['*'] to disable all.
Open-API 3.0 spec file
The generator automatically creates an Open-API 3.0 spec file, which you can import to use within any external api application.
The default base URL added to the spec file will be that found in your Laravel config/app.php file. This will likely be http://localhost. If you wish to change this setting you can directly update the url or link this config value to your environment file to make it more flexible (as shown below):
'url' => env('APP_URL', 'http://yourappdefault.app'),
If you are referring to the environment setting as shown above, then you should ensure that you have updated your .env file to set the APP_URL value as appropriate. Otherwise the default value (http://yourappdefault.app) will be used in your spec file. Example environment value:
APP_URL=http://yourapp.app
Further modification
The info file in the view folder can be further modified to add introductions and further documentation.
Credits
This software uses the following open source packages:
You may also like...
- Laravel Api Documentation Generator - A laravel api documentation generator.
License
MIT