jackiedo / xampp-php-switcher
Allow to use and switch between different versions of PHP for Xampp on Windows OS.
Maintainers
Package info
github.com/JackieDo/Xampp-PHP-Switcher
Type:project
pkg:composer/jackiedo/xampp-php-switcher
Requires
- php: >=5.4
This package is auto-updated.
Last update: 2026-06-17 06:47:07 UTC
README
Use and switch between different versions of PHP for Xampp on Windows OS.
Xampp is an easy to install Apache distribution containing MariaDB, PHP, and Perl. It has been around for more than 10 years – there is a huge community behind it. Currently, there are many other applications launched with more advantages. However, many people still love Xampp because of its ease of use. The problem is that quite a lot of people have not exploited the full power of Xampp.
Therefore, I have created 2 separate projects to take full advantage of what Xampp has to add to the features that many people desire to have in Xampp:
- One is the feature that allows the use of different versions of PHP (this project).
- One is the vhosts management feature, comes with self-signed SSL certificates (see here).
With this project, using and switching between different PHP versions for Xampp became easy. This will be useful for those who want to ensure their applications work smoothly on different PHP platforms or those who are researching PHP programming.
Note: Currently this project only supports Windows users.
Features of this project
- Install and manage various PHP builds for a single Xampp version.
- Switch between different versions of PHP quickly and easily.
Overview
Look at one of the following topics to learn more about Xampp PHP Switcher.
- Xampp PHP Switcher
- Features of this project
- Overview
Compatibility
- Compatible with all installed Xampp versions using PHP 5.4 or higher.
- Currently, this project does not yet support the portable Xampp version.
Requirement
Xampp PHP Switcher takes full advantage of what's included in Xampp, nothing more needed. So, you just need following things:
- Xampp installed successfully.
- Added the path to PHP directory of Xampp into Windows Path Environment Variable.
- (Optional) Installed Composer.
Note: See here to know how to add Windows Path Environment Variable.
Installation
There are two installation methods, via Composer or manual download. It is recommended to use the method via Composer if you already have it installed.
Via Composer Create-Project
- Open a terminal.
- Navigate to the directory you want to install Xampp PHP Switcher into
(example: cd /D D:\). - Run composer create-project command:
$ composer create-project jackiedo/xampp-php-switcher xphp "1.*"
Via Manual Download
- Download the latest release version.
- Extract the archive to a shared location
(example: D:\xphp). Note: Should not place inC:\Program Filesor anywhere else that would require Administrator access for modifying configuration files. - Open a terminal in Administrator mode
(run as Administrator). - Navigate to the directory you have placed Xampp PHP Switcher
(example: cd /D D:\xphp). - Execute the command
xphp installand follow the required steps. - Exit terminal (to remove temporary environment variables).
Note: See here to know how to to open the command prompt as Administrator.
Updation
Currently, Xampp PHP Switcher does not have an automatic update mechanism, we have to do it manually step by step as follows:
- Backup the file
settings.iniin the folder where Xampp PHP Switcher application is installed to somewhere else. - Remove all files and sub-folders in Xampp PHP Switcher application folder.
- Download the latest release version and extract it into Xampp PHP Switcher application folder.
- Copy the previously backed up
settings.inifile into the Xampp PHP Switcher application folder back.
Add other PHP versions to your Xampp
Important notes
After successfully installing Xampp PHP Switcher, by default you will have a built-in PHP version of your Xampp. In order to use other versions of PHP, we will proceed to add those builds to the repository. This will also be easily done. But you need to keep in mind the following requirements:
- Only add builds downloaded from the Xampp official website, or builds that have been added to the Xampp PHP Switcher repository.
- Only builds with the same architecture (32 or 64 bit runtime) may be added to the current build.
Step by step process of adding build
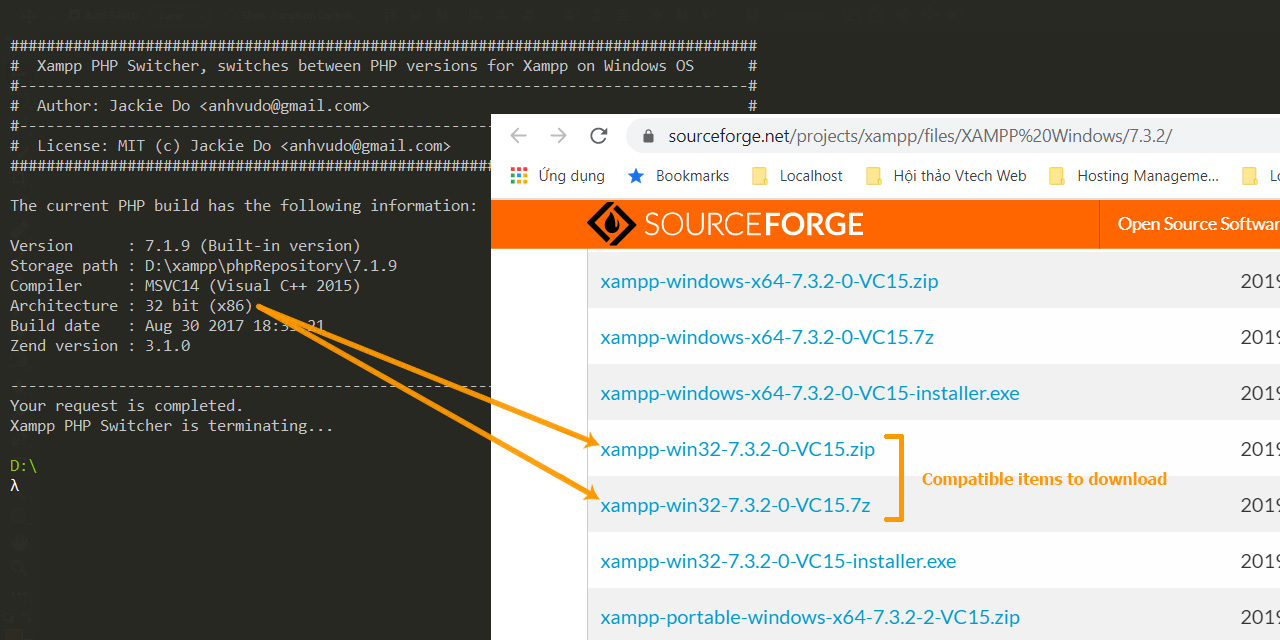
Check architectural information of the current build
Execute the following command:
$ xphp info current
View the information in Architecture section and remember it.
Download compatible PHP builds
- Download compatible Xampp builds from Official Download page at here.
- When downloading, note that the architecture of the build to download must be the same as the current build architecture we have just seen above.
- Do not download the Portable builds, nor download the installer (.exe).
- After downloading, extract it to somewhere on our computer and note the path to the PHP directory inside the newly extracted Xampp directory.
Compatible items to download
Add recent downloaded PHP build
Execute the xphp add command:
$ xphp add "drive:\path\to\above\xampp-php-directory"
or more simply with the second syntax:
$ xphp add
And then provide the link above when requested.
Note: If you use the first syntax, you should put the path in the double quotes (") to avoid the errors of the effect of whitespaces.
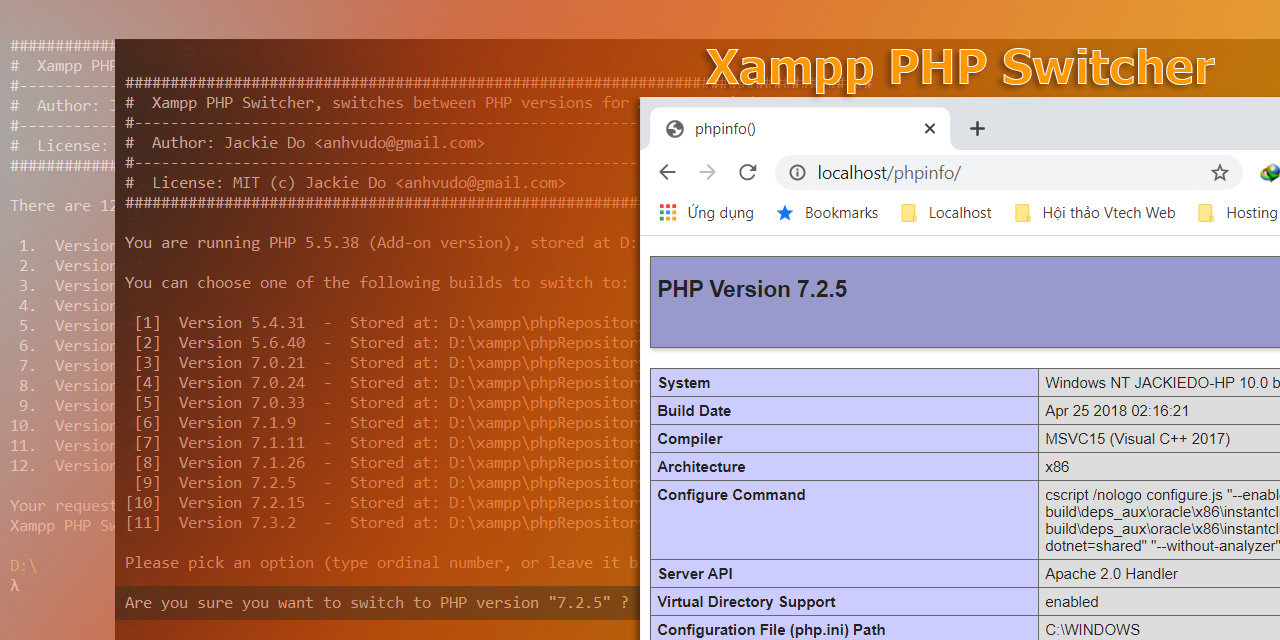
And now we have many different versions of PHP to use. We can switch between versions with the xphp switch command.
Behind the process of adding PHP build
When we use the xphp add command, Xampp PHP Switcher will do the following:
- Copy the entire directory containing the PHP build into the repository located in your Xampp.
- Conduct standardization of the paths in some files of new PHP build so that it to works correctly with your Xampp.
- Create a file containing the PHP build archive information (with the name ".storage") and place it in new build's directory in the repository.
- Create a file named "xampp-httpd-php(x).conf" (x is the corresponding PHP major-version) so that Apache in your Xampp can handle the new PHP build. Based on that, you can switch between different PHP versions.
Update the process of adding PHP builds in the future
The process of standardize paths is done based on a file named "need_standardize.lst" located in the "src" folder of project directory. Currently, this file has supported the path standardization for PHP builds from versions 5.4 (Xampp 1.8.3) to 8.0 (Xampp 8.0.x).
Every time a new version of Xampp is released, this file will be checked and updated. You only need to copy the whole new content of this file and overwrite your existing file in your Xampp PHP Switcher directory. Or you proceed to update Xampp PHP Switcher according to the instructions here.
Usage
Because of a path to the Xampp PHP Switcher application directory has been added to the Windows Path Environment Variables during the installation process, now you can just open the terminal (no need to open in Administrator mode anymore) anywhere and excute one of the following xphp commands:
Display the help message
Syntax:
$ xphp help
Display information of current PHP version
Syntax:
$ xphp info current
Display information of existing PHP version in repository
Syntax:
$ xphp info [VERSION]
Example:
$ xphp info 5.6.40
Note: The VERSION parameter is optional. If you do not pass it to the command statement, you will also be asked to enter this information later.
List all existing PHP versions in repository
Syntax:
$ xphp list
Remove an existing PHP version outof repository
Syntax:
$ xphp remove [VERSION]
Example:
$ xphp remove 5.6.40
Add one PHP version to repository
Syntax:
$ xphp add [PATH_TO_ANOTHER_XAMPP_PHP_DIRECTORY]
Example:
$ xphp add "D:\download\xampp-win32-5.5.19-0-VC11\php"
Switch to specific PHP version to use
Syntax:
$ xphp switch [VERSION]
Example:
$ xphp switch 5.5.19
The file php.ini editing
Once you have added the various PHP versions to your Xampp, they will be put in a repository located in a directory named "phpRepository" located in your Xampp directory. And they will have separate "php.ini" configuration files. If you need to edit the configuration for PHP, you must edit each "php.ini" file for each corresponding version in the repository.
License
MIT © Jackie Do