j0hnys / vista
A laravel package for developing Client UI using Iview, Vue
Installs: 60
Dependents: 0
Suggesters: 0
Security: 0
Stars: 2
Watchers: 0
Forks: 0
Open Issues: 3
Type:project
pkg:composer/j0hnys/vista
Requires
- doctrine/dbal: ^2.10
- mustache/mustache: ^2.0
Requires (Dev)
- orchestra/testbench: ^5.0
This package is auto-updated.
Last update: 2026-01-27 23:59:35 UTC
README
A laravel UI generator following Domain Driven Design (DDD) and Test Driven Development (TDD) principles using Vue, iView
Introduction
The purpose of this package is to generate a web UI for a laravel application using laravel's models, migrations and validations (Form Request Validation).
The package generates a Single Page Application (SPA) and functionality through custom artisan commands which generate code. It uses vue js and iView UI Toolkit as a foundation.
video introduction at: https://www.youtube.com/watch?v=4zuZATtU1GA
Application architecture
Preface
The main design principles behind the SPA architecture is to set a thin client structure which communicates with the server through restful API's. It wants to promote the notion that the front-end should be for presentation only, leaving the back-end to do the heavy lifting. This is the main reason for a simple routing and menu architecture. The code generators that are provided follow this simplicity.
Folder structure
The package on install creates among others the following folder structure
|* public_*
    |- css
    |- js
    |->.htaccess
    |->favicon.ico
    |->index.php
    |->robots.txt
|* resources_*
    |- client_app
        |- application
            |- api
            |->router.js
            |->router.pages.js
            |->router.submenus.js
            |->store.js
            |->store.pages.js
        |- infrastructure
            |- autoload
            |- plugins
            |- type_checker
            |->app.js
            |->app.vue
            |->bootstrap.js
        |- presentation
            |- components
            |- constants
            |- mixins
            |- models
            |- pages
            |- stores
            |- styles
            |- tests
    |- views
        |->iview.blade.php
Where |* public_* and |* resources_* are the SPA's directories in the root folder of a laravel application. Every component is stateless and every page implements the main content and handles storage. Vue page component data can be type checked as can all other inputs, more details are seen in Strict Types section below.
This package supports multiple SPA's from one laravel instance. For example we could have a pair |* public_front_end, |* resources_front_end and |* public_back_end, |* resources_back_end that work in parallel with the same controllers, models, e.t.c. just by configuring webpack.mix.js accordingly. This is described in more detail at the installation section below.
The general workflow for adding a new page follows the following pattern:
- creating a vue component in the
pagesfolder - updating the
router.pages.jswith this new vue component - updating the
router.jswith this new vue component - updating the
store.pages.jswith this new vue component - updating the
store.jswith this new vue component - updating the
main_menu.jsin order to have a visual route to the new page
The main layout of a SPA is presented in the image below
There are four menu levels split in main menu and sub menus. Main menu is at the left sidebar and is the same for every page, it can facilitate two levels. Sub menu's are defined in the router and presented above the content and can facilitate another two levels. There is also place for notifications and user account menus in the top right corner.
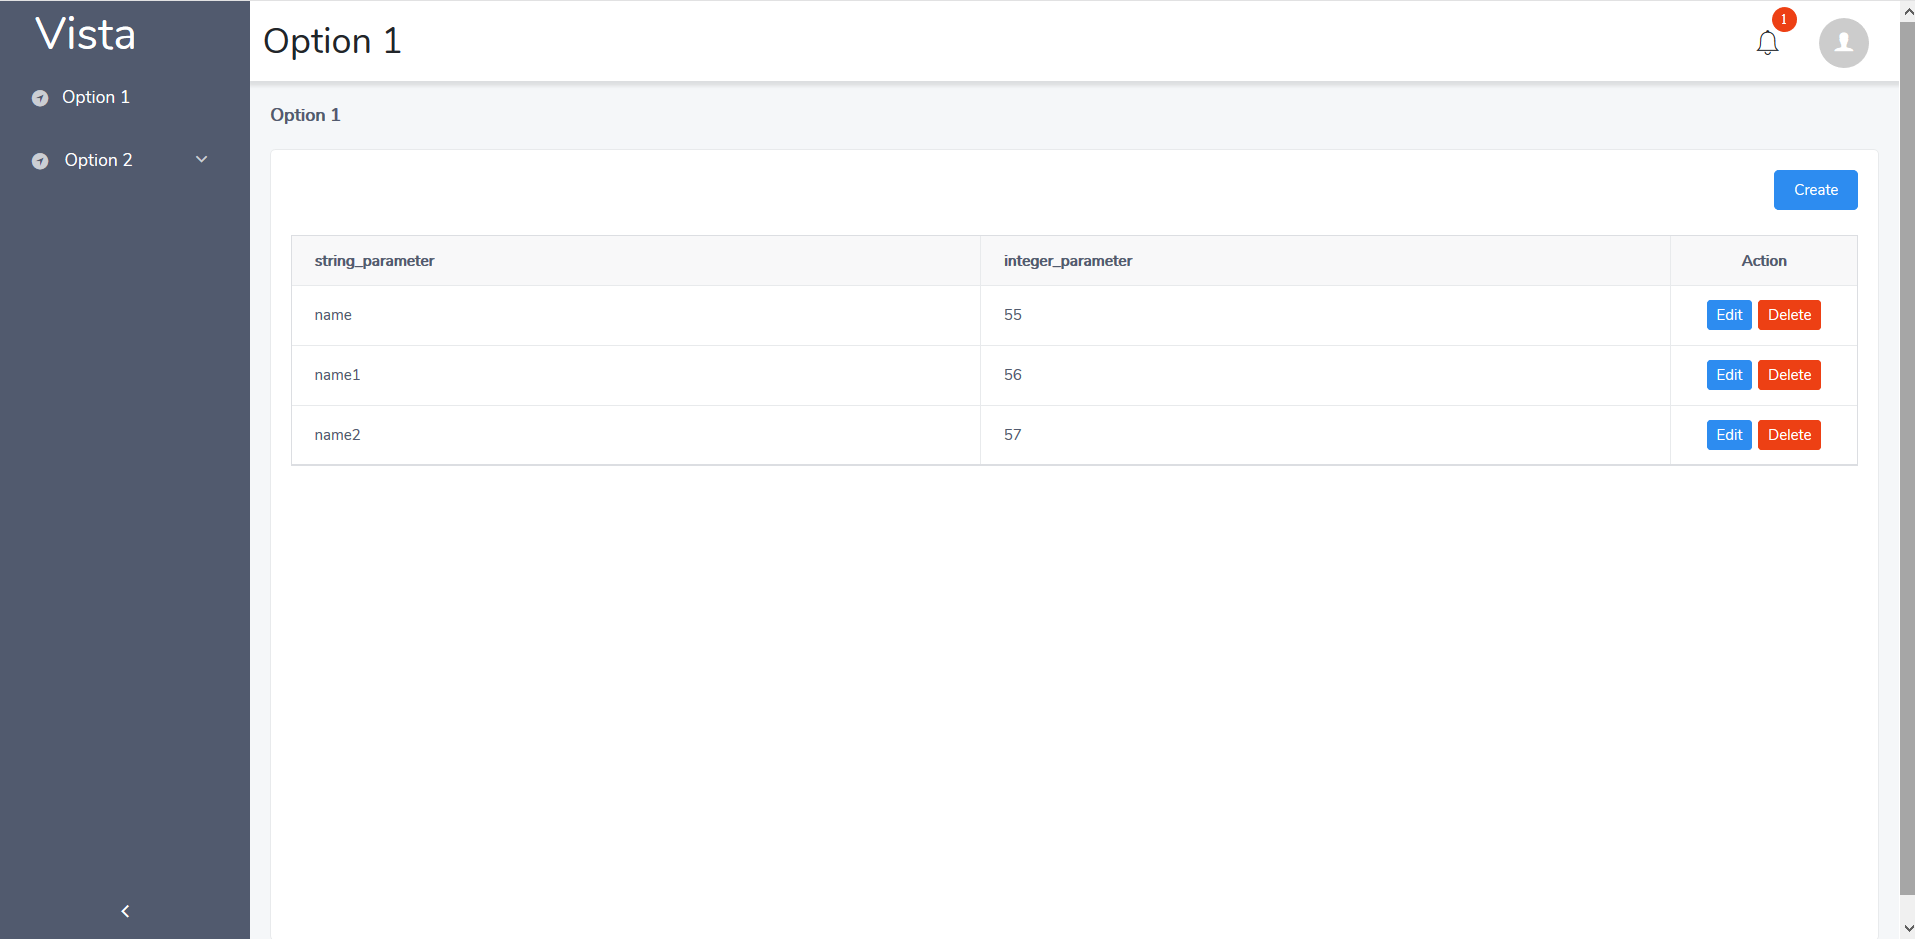
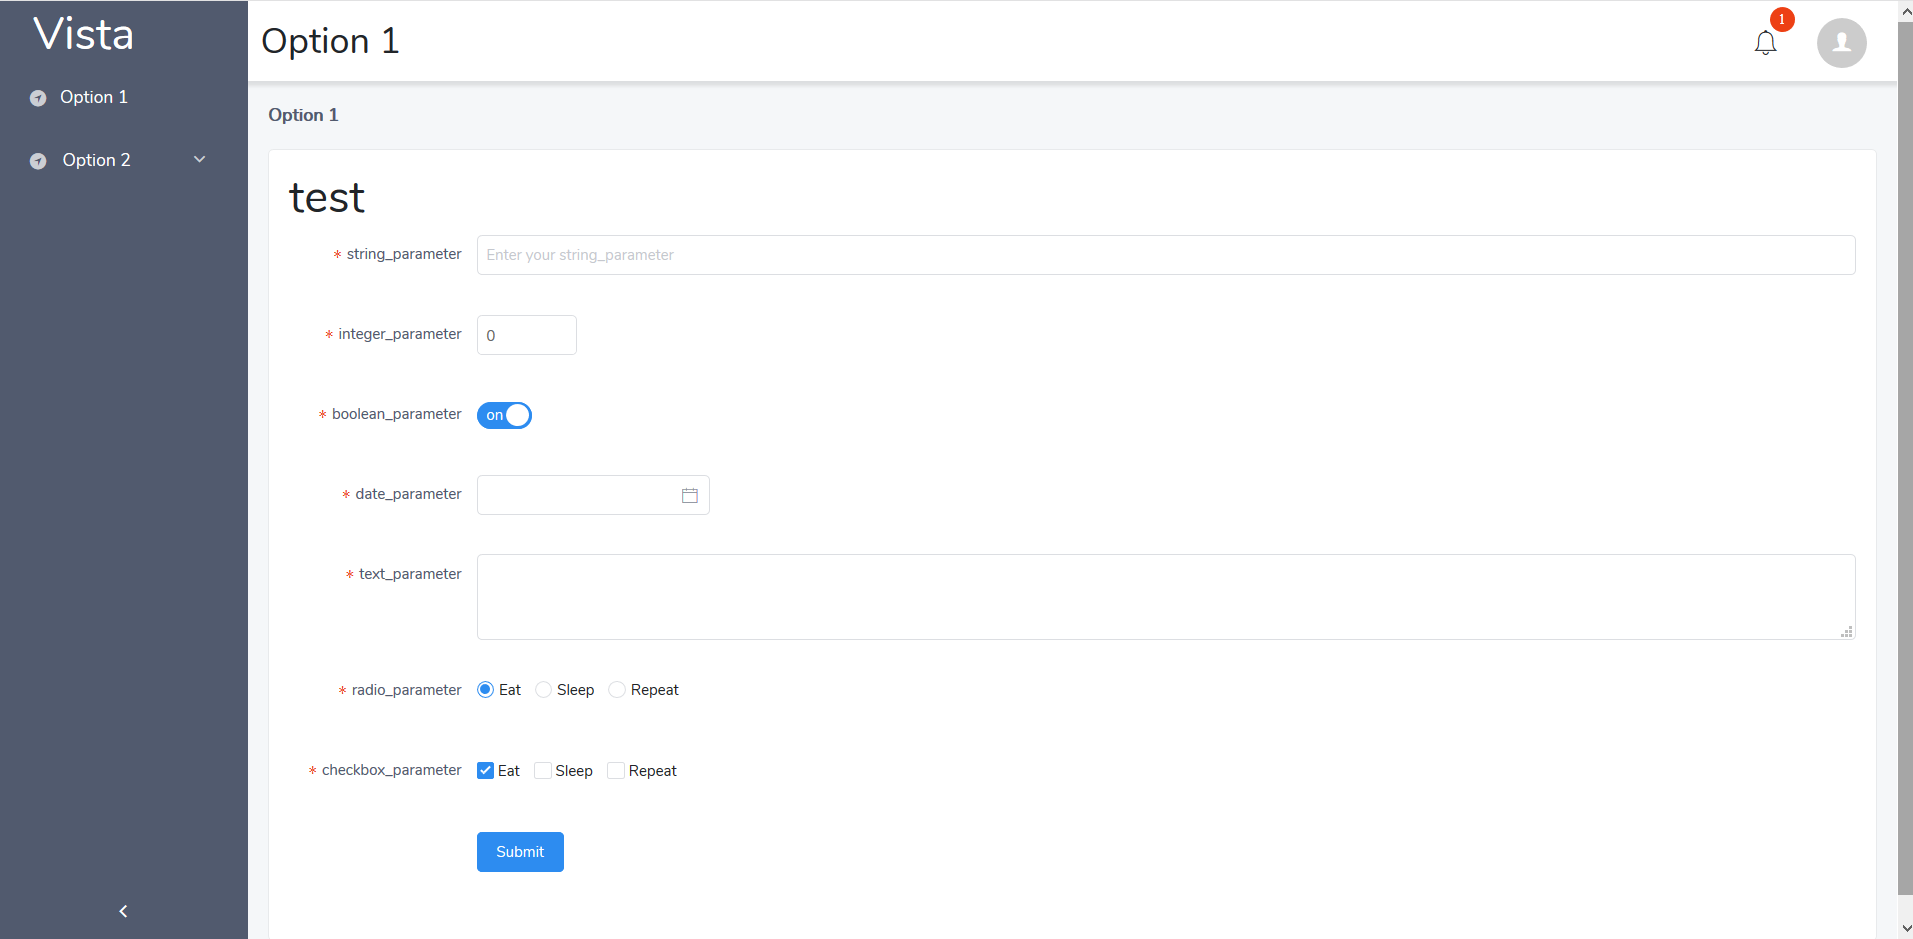
As of now an automated CRUD functionality is provided by code generation. It creates three pages (*Create.vue, *ListDelete.vue, *Update.vue) at the pages folder which correspond to viewing and deleting and creating, updating records to the database from a specific model. For every page it is assumed that there is a resource (restful CRUD from laravel). For example UserCreate.vue assumes that there is a resource named user. Endpoint uris can be set when creating the pages. In the images below this functionality is presented.
List/Delete:
Create/Update:
installation
to add to a laravel project as a package
composer require j0hnys/vista
add
"dependencies": {
    "hello-type": "2.24.5",
    "view-design": "^4.0.0",
    "iview-loader": "^1.3.0",
    "vue": "^2.6.11",
    "vue-router": "^2.8.1",
    "vuex": "^3.1.3",
    "vuex-persistedstate": "2.5.4"
}
to laravel's package.json and then execute npm install
After publishing the configuration of this package (php artisan vendor:publish) the configuration can be found at config/vista.php. Below there is a snippet of that file
<?php

return [

    /*
    |--------------------------------------------------------------------------
    | Single Page Application Paths
    |--------------------------------------------------------------------------
    */

    'spas' => [
        [
            'browser_local_storage_key' => 'vista_test',
            'resource_folder_name' => 'resources_front_test',
            'public_folder_name' => 'public_front_test',
            'mix_base_url_env_name' => 'MIX_BASE_URL_FRONT_TEST',
            'mix_base_relative_url_env_name' => 'MIX_BASE_RELATIVE_URL_FRONT_TEST',
            'mix_storage_url_env_name' => 'MIX_STORAGE_URL_FRONT_TEST',
        ],
    ],

];
MIX_BASE_* are set in the .env file and follow the rules below
MIX_BASE_URL_FRONT_TEST: link to index.php in public folder,MIX_BASE_RELATIVE_URL_FRONT_TEST: public uri if public link is in subfolderMIX_STORAGE_URL_FRONT_TEST: public link to storage
e.x.
MIX_BASE_URL_TEST=http://localhost/laravel_test/public_front_test
MIX_BASE_RELATIVE_URL_TEST=/laravel_test/public_front_test
MIX_STORAGE_URL_TEST=http://localhost/laravel_test/public_front_test/storage/app
As said in the application architecture section more than one SPA's can be created
After setting the configuration file execute:
php artisan vista:install resources_front_test
to install the resources_front_test SPA.
Lastly the webpack.mix.js has to be modified in order to support more than one SPA's. A sample webpack.mix.js is provided below:
const mix = require('laravel-mix');

/*
 |--------------------------------------------------------------------------
 | Mix Asset Management
 |--------------------------------------------------------------------------
 |
 | Mix provides a clean, fluent API for defining some Webpack build steps
 | for your Laravel application. By default, we are compiling the Sass
 | file for the application as well as bundling up all the JS files.
 |
 */

mix.setPublicPath(('../vista-framework/'));

mix.js('resources/js/app.js', 'public/js')
   .sass('resources/sass/app.scss', 'public/css');

mix.js('resources_front_test/client_app/infrastructure/app.js', 'public_front_test/js')
   .sass('resources_front_test/client_app/presentation/styles/app.scss', 'public_front_test/css');
where vista-framework is the name of the folder that laravel is installed.
Available artisan commands
| Command | Description | Parameters |
|---|---|---|
| vista:export:model | export a model's schema | {entity_name} {entity_namespace} |
| vista:generate:crud | Create a Spa CRUD | {name} {--schema_path=} {--resources_relative_path_name=} |
| vista:install | Vista installer | {resources_relative_path_name?} |
Basic usage
CRUD
First we need to retrive the data from the model in order to create the CRUD pages.
To do that we need to export the data to a json file using the following artisan command
php artisan vista:export:model test_model
where test_model is the name of a laravel model located at app folder. After that we can edit the exported schema accordingly, like change the default generated endpoints
Than execute:
php artisan vista:generate:crud DemoPage --schema_path="/app/Models/Schemas/Exports/test_model.json" --resources_relative_path_name="resources_front_test"
where the first parameter is the prefix of the pages, the next parameter is the exported model and the last is the SPA that the pages are going to be placed.
After completing this process the following changes have taken place:
- A new set of pages will be created at
client_app/presentation/pagesfolder - A new set of components for the pages will be created at
client_app/presentation/componentsfolder - A new set of mixins for the pages will be created at
client_app/presentation/mixinsfolder - A new set of models for the pages will be created at
client_app/presentation/models/Typesfolder - A new set of stores for the pages will be created at
client_app/presentation/store/pagesfolder - A new set of components for the pages will be created at
client_app/presentation/componentsfolder - the
router.jsandrouter.pages.jswill be automatically updated with the routes for the new pages - the
store.jsandstore.pages.jswill be automatically updated with the stores for the new pages
It is noted once again that a resource named DemoPage should exist in laravel and a specific uri given.
Menu placement is left to the developer. It is done by modifying main_menu.js or sub_menus accordingly.
Autoloading
In order to separate and test functionality easily an autoloading and registering mechanism has been implemented. Every componenent, mixin, model, page, api needs to have the namespace top level property set in order to utilize this. The architecture implemented here follows DDD principles to the extend that is possible and for this reason the pages here are considered the equivalent of "Services" in DDD terms. So every page component has a "style", "template", "script" tag as usual but the page methods are only called when an event is fired and only execute function calls, variable assignments and simple conditions if necessary. In order to "inject" any other dependency in the page the use top level property is used. For example let's see the following page component:
<style scoped>

</style>
<template>
    <div class="random_entity_update">

        <RandomEntityUpdate
            :form_data="form_data"
            @on-form-submitted-successfully="onSubmit"
        ></RandomEntityUpdate>

    </div>
</template>
<script>
    export default {
        namespace: 'presentation/page/RandomEntityUpdatePage',
        name: 'RandomEntityUpdatePage',
        use: [
            {
                alias: 'ajax',
                namespace: 'application/api/server/RandomEntityUpdate',
            }
        ],
        computed: {
            form_data() {
                return this.$store.getters['pages/RandomEntityUpdate/formValidate'].data;
            }
        },
        methods: {
            async onSubmit(form_data) {
                let id = this.$route.params.id;
                await this.ajax.update(id, form_data);
                this.$store.dispatch('pages/RandomEntityUpdate/setFormValidate', form_data);
                this.$Message.success('Success!');
            },
            async onMounted() {
                let data = await this.ajax.get(this.$route.params.id);
                this.$store.dispatch('pages/RandomEntityUpdate/setFormValidate', data);
            }
        },
        mounted() {
            this.onMounted();
        },
    }
</script>
Here every method in page is only executed from the triggering of an event ("on-form-submitted-successfully" and components "mounted") and every function only has calls to other functions and variable assignments. With the help of use we can select the dependency that we want to use. In this example we inject "ajax" which implements the actual call to the server.
By giving the "alias" we choose the variable name in the component which will host the contents of the injected ontology. So by setting alias: "ajax" we then have an "ajax" property in the component instance as seen used above (for e.x. in this.ajax.get(this.$route.params.id);)
It is important to note that there is no use of import {...} from "..."; anywhere here and that is on purpose. By not using the "import" we make the mocking of dependencies easier in our tests as we only have to mock every dependency as a function (like ajax.update = jest.fn();) which simplifies testing.
Strict Types
In order to make functionality more descriptive a type system have been implemented in the vue project. The main purpose is to define the structures of all data that run through the application, from function parameters to Vue component data. The concept has similarities to Data Tranfer Objects (DTO's) but the main mechanism that the structure is "forced" upon is through validation of the data to be examined.
Let's say for example that we have the following definition (must be in ./types/schemas folder):
import HelloType, { Dict, Enum, Tuple, List, Type, Rule, Self, IfExists } from 'hello-type'

const PersonInfo = new Type({
    firstname: String,
    lastname: String
});

export default {
    namespace: 'test/test/test',
    assert(data) {
        PersonInfo.assert(data);
    },
};
we can use this definition to validate the vue components data() Object API property or in any other situation. An example component is shown below:
<template>
    <div>
        firstname: {{firstname}}
        lastname: {{lastname}}
    </div>
</template>

<script>
    export default {
        namespace: 'pages/example',
        name: 'example',
        data() {
            return {
                firstname: 'John',
                lastname: 'John',
            };
        },
        types: {
            namespace: 'test/test/test',
        },
        mounted() {

            this.$typeChecker.check('test/test/test',{
                firstname: '1',
                lastname: 11,
            });

        },
    }
</script>
Using the types top level component property we can check that the data() follows the spec that is defined above. We can check this structure anywhere using the TypeChecker's check function. In that way we can type check any function's paremeters. e.x. snippet
methods: {
    someFunction(data) {
        this.$typeChecker.check('test/test/test', data);
    },
}
If the data that are passed to the type checker do not much the specification an error will be thrown describing the issue. For performance reasons all the type checks and definitions are excluded from the production build.
Global events
Vue has a custom events system in place, which for most cases is fine. There are scenarios when we would like to have more control on custom events, some of those scenarios can be:
- Emit and listen to events that are not part of the vue app. This is case is more common when integrating vue with existing front-end application
- Organize event listeners in a more flexible way or centralized (without the need of having a direct parent-child relationship).
For this reason a $globalEvents property has been implemented in the base Vue Object. Using global events we could register and fire events like in the snipper below:
<template>
    <div>
        <button @click="onButtonClicked"> CLICK ME </button>
    </div>
</template>

<script>
    export default {
        data() {
            return {
                firstname: 'John',
                lastname: 'John',
            };
        },
        methods: {
            onButtonClicked() {
                this.$globalEvents.$emit('pages/Index/test','emited string');
            },
        }
        mounted() {

            this.$globalEvents.$on('pages/Index/test',(data) => {
                console.log('pages/Index/test global event fired with data: "'+data+'"');
            });

        },
    }
</script>

.png)

