ekwav / uf_oauth2_server
OAuth2 Api module for UserFrosting.
Maintainers
Package info
github.com/Ekwav/UF_OAUTH2-SERVER
Type:userfrosting-sprinkle
pkg:composer/ekwav/uf_oauth2_server
Requires
- league/oauth2-server: ^5.1
This package is not auto-updated.
Last update: 2026-07-05 12:25:19 UTC
README
Implementation of league/oauth2-server in userfrosting4
What does it do?
With this sprinkle, you can securely connect your app to userfrosting with the OAuth2 authorization flow.
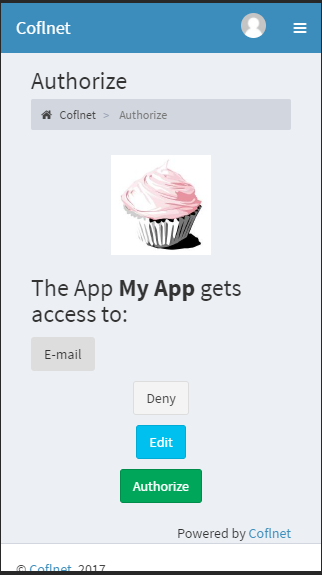
In short, this is the This App wants to get access to ... that you know from Google Facebook and others for Userfrosting.
To get access to some data you have to redirect the user to YourDomain.com/authorize/{{AppID}}/token/{{scope}} while AppID
is a unique identifier to your app (you can have as many as you want) that will be generated when you register your app.
And {{scope}} is a list of permissions for your app separated by + or space.
You can also replace token with code to obtain an access code instead of a token, more on this here,
but I would recommend using the token for people that just want to connect their unity3d game to their own server.
And also for other people that are just getting started.
Installation
- Edit UserFrosting
app/sprinkles.jsonfile and add the following to therequirelist :"ekwav/uf_oauth2_server": "dev-master". AddOAuth2Serverto thebaselist. Yoursprinkles.jsonshould look like this:
{
    "require": {
        "ekwav/uf_oauth2_server": "dev-master"
    },
    "base": [
        "core",
        "account",
        "admin",
        "OAuth2Server"
    ]
}
- Run
composer updateto download the sprinkle. - Then you have to create a public and private key, we need them in order to encrypt the tokens.
Navigate toapp/sprinkles/Api/src/OAuth2open the terminal and runopenssl genrsa -out private.key 1024you can also replace 1024 with 2048 to generate a stronger key Then you have to extract the public key from the private key withopenssl rsa -in private.key -pubout -out public.key. You can also generate the keys somewhere else, if you do so, change thepublicKeyandprivatKeypath in your config (Look intoconfig/default.phpto see the exact shema). More information on the keys here. - Generate a
EncryptionKeyand change the one in the default config, you can usephp -r 'echo base64_encode(random_bytes(32)), PHP_EOL;'in your commandline to do that.
You can use this template for your config. Please check, that you have set this as a root element:
'oauthserver' => [
'EncryptionKey' => 'YOURKEY'
]
- Open the terminal in your root Userfrosting directory and run
php bakery bakewait untill it finishes and closes the terminal.
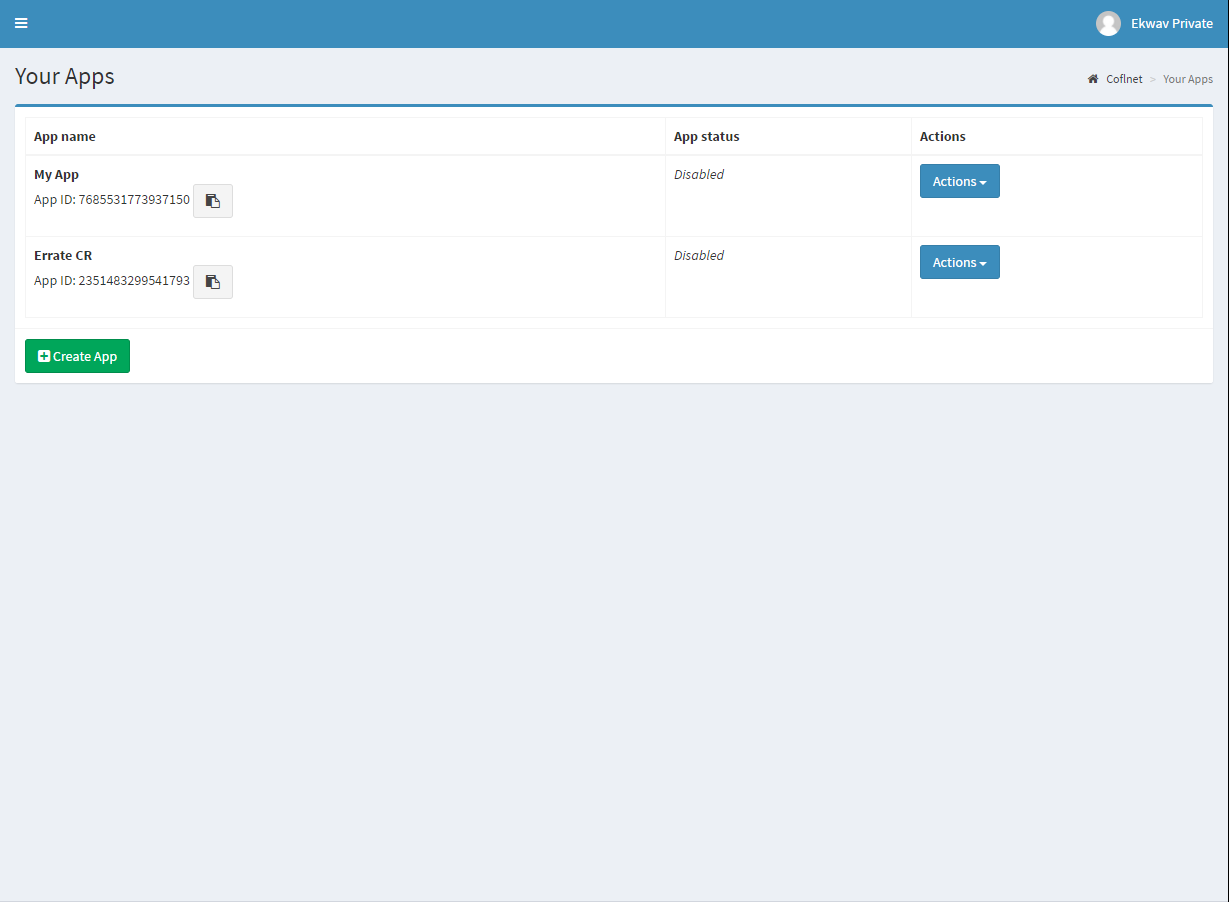
You can now createClientsaka Applications. - Open
YourDomain/appsand continue there.
It looks like this

Important things to know
My sprinkle may contain bugs and errors of any type, if you find one, please report it in the issues tab.
If you need help, you can find me in the userfrosting chat.
-You have to add every API-endpoint to the csrf blacklist in your config.-
Currently (1.7.2017) this didn't work for me, for that I recommend you to create
your routes after the schema remoteapi/CUSTOMNAME to cover them automatically.
'csrf' => [
    // A list of URL paths to ignore CSRF checks on
    'blacklist' =>  [
      "^remoteapi/userinfo",
	    "^remoteapi/anotherEndpoint"
]
Usage
Protect your API endpoints by adding ->add(new ResourceServerMiddleware($this->ci->ResourceServer)); to the routes you want to protect. Remember adding it to the csrfBlacklist.
Now that route is protected and can only be accessed by using POST and an Authorization header with the value access token.
How to get an access_token
Getting an access token is as easy as redirecting the user from your application, mobile app or other server to your Userfrosting installation. The URL has to follows the schema https://YOURDOMAIN.COM/authorize/APPID/code/SCOPES
you can find your APPID on the page /apps
SCOPES is an array of permissions you want to get separated by space or + (URL encoded space).
The user can then review the requested permissions and authorize, edit or deny it.
If the user authorizes the request he will be redirected to the URL specified on app creation with an authorization code as a parameter. You then have to grab it from the URL and send it along with your app secret that you can also find on the /apps page, to your Userfrosting installation, but this time as a POST and to the url https://YOURDOMAIN/oauth2/access_token, with the following Parameters:
grant_type = authorization_code
client_id = your application id (from the /apps page)
client_secret= your application secret
code= the athorization_code you received in the first request.
this will return a JSON response with the access_token and an refresh_token you have to save both to the device/server storage.
Making requests
Now you have the token on your user's device, you are able to send requests.
POST it as a header with the key Authorization to the route you have protected and everything should work fine.
But what is the refresh_token you ask? After 6 hours (you can change that in the config) the access_token gets invalid, this has the purpose that if the token is stolen by a third party, it will become useless. Anyways, you have to get a new access_token how do you do that?
Refreshing access
To get a new access_token you have to send a POST request to /oauth2/access_token with the Body parameters:
grant_type=refresh_token
client_id= your application id (from the /apps page)
client_secret= your application secret
refresh_token= the refresh token you received in the second request.
This will return a new access_token and a new refresh_token the old tokens should now be replaced by the new ones.
Serverside
But how do you know, what user is requesting data from you at the server side in your Userfrosting Controller? It turns out, that the access token is an encrypted JSON array aka JSON Web Token that contains all important information about the token. It stores:
- The user_id
- The app/client_id
- The scopes
- The expiration time.
- The access token ID. (Can be used for disabling it from the server side or tracking purposes)
For an example on how to use these look at the
getUserInfo()function in the ApiAuthController
Don't remove the Powered by Coflnet from the authorization page, it has to stay visible. You can modify everything else under MIT to fit your needs.