Search by 
chengciming / tcp-port-mapping
使用workerman框架开发的TCP端口映射项目
Maintainers
Package info
github.com/chengciming/tcp-port-mapping
Type:project
pkg:composer/chengciming/tcp-port-mapping
1.0.0
2019-12-12 02:09 UTC
Requires
- php: >=7.0
- workerman/workerman: ^3.5.22
Suggests
- ext-event: For better performance.
- ext-swoole: For better performance.
This package is auto-updated.
Last update: 2026-05-12 16:51:17 UTC
README
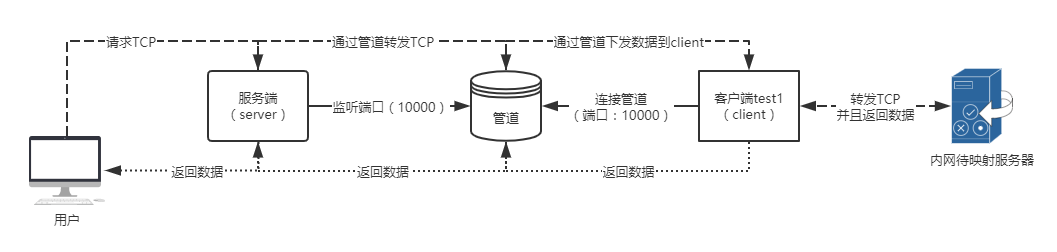
这是一个使用workerman框架开发的,针对内网环境TCP端口映射到外网环境指定端口。
亲,有在应用的同学请给个星星,有星星表示有人应用,好持续更新维护代码。
环境假设
- 外网服务器:可运行PHP,映射后通过这台机访问。
- 内网服务器:可运行PHP,连接外网服务器做转发,或者与目标服务器同一台。
- 目标服务器:需要被映射到外网的服务器。
运行环境
- PHP >= 7.0
- Composer
快速下载
下载:
[composer@localhost test]# composer create-project chengciming/tcp-port-mapping
启动:
[composer@localhost test]# cd tcp-port-mapping
[composer@localhost tcp-port-mapping]# php client start
[composer@localhost tcp-port-mapping]# php server start
配置
公共配置:Config/Config.php
<?php

return array(
    /**
     * 是否开启debug模式
     */
    'debug' => false,
    /**
     * 开启的协议类型
     *
     * 注意:每个类型对应***Conf.php文件配置,无配置等同未开启
     *
     */
    'protocol_support' => array(
        'http',
        'https',
        'ssh',
    ),
    /**
     * 服务端配置 - 管道监听端口
     */
    'channel_server'=>array(
        'ipaddress'=>'0.0.0.0',
        'port'=>10000
    ),
    /**
     * 基础配置
     */
    'worker'=>array(
        'client' => array(
            'daemonize' => true,  //是否后台运行
            'worker_num' => 4,  //工作进程数量
            'name' => 'Proxy', //服务名称
            'log_file' => ROOT_PATH . '/Storage/logs/proxy.client.log',  //日记文件
            'pid_file' => ROOT_PATH . '/Storage/pid/proxy.client.pid',  //服务PID文件
            'stdout_file' => '',  //屏幕打印输出到文件,不设置或者为空则打印到频幕
        ),
        'server' => array(
            'daemonize' => true,  //是否后台运行
            'worker_num' => 4,  //工作进程数量
            'name' => 'Proxy', //服务名称
            'log_file' => ROOT_PATH . '/Storage/logs/proxy.server.log',  //日记文件
            'pid_file' => ROOT_PATH . '/Storage/pid/proxy.server.pid',  //服务PID文件
            'stdout_file' => '',  //屏幕打印输出到文件,不设置或者为空则打印到频幕
        )
    ),
);
协议配置:Config/***Conf.php [Http、Https、Ssh等]
<?php

return array(
    /**
     * 授权码,唯一码
	 * 服务器会验证此唯一码
     */
    \Mapping\Application\Library\Package\Attribute::ATTR_PRIMARY => 'test1',
    /**
     * 代理服务器 - 客户端用的
     */
    'channel_server'=>array(
        'ipaddress'=>'127.0.0.1',   // 客户端连接管道的目标IP,对应Config.php的channel_server.ipaddress
        'port'=>10000   // 客户端连接管道的目标端口,对应Config.php的channel_server.port
    ),
    /**
     * 被代理服务器 - 客户端用的
     */
    'proxy_client'=>array(
        'ipaddress'=>'127.0.0.1',  // 需要被映射出去的目标地址
        'port'=>80  // 需要被映射出去的目标端口
    ),
    /**
     * 允许授权的授权码与端口 - 服务器用的
     */
    'allow_auth' => array(
        // 唯一码 => array(port => 端口)
        'test1' => array(
            'ipaddress' => '0.0.0.0',
            'port' => 1231,  // 外网端口
        ),
    )
);
新增加协议
示例:telnet
配置:
新增加telnet协议配置文件(可复制HttpConf.php):Config/TelnetConf.php
开启telnet协议:Config/Config.php  -->  protocol_support加telnet
内核文件(可复制Http.php):
新增加telnet协议客户端处理文件:Application/Kernel/Protocol/Client/Telnet.php
新增加telnet协议服务端处理文件:Application/Kernel/Protocol/Server/Telnet.php
启动命令
安装依赖:
[root@localhost tcp-port-mapping]# composer install
客户端:
[root@localhost tcp-port-mapping]# php client start     // 开启客户端服务
[root@localhost tcp-port-mapping]# php client stop      // 关闭客户端服务
[root@localhost tcp-port-mapping]# php client restart   // 重启客户端服务
[root@localhost tcp-port-mapping]# php client reload    // 重载客户端服务
服务端:
[root@localhost tcp-port-mapping]# php server start     // 开启服务端服务
[root@localhost tcp-port-mapping]# php server stop      // 关闭服务端服务
[root@localhost tcp-port-mapping]# php server restart   // 重启服务端服务
[root@localhost tcp-port-mapping]# php server reload    // 重载服务端服务
运行过程