andyoung / think-tests
think-tests
Installs: 2
Dependents: 0
Suggesters: 0
Security: 0
Stars: 11
Watchers: 1
Forks: 1
Type:think-framework
pkg:composer/andyoung/think-tests
Requires
- php: >=7.0.0
- topthink/framework: 5.1.*
- topthink/think-helper: ^3.1
Requires (Dev)
- phpunit/phpunit: 8
- symfony/dom-crawler: ^5.0
This package is auto-updated.
Last update: 2026-01-29 03:58:09 UTC
README
本项目仅适用于运行 PHP7.2 以上的环境!对于低版本 PHP 请根据需要调整 PHPUnit 的版本!
声明
由于原项目 think-testing 长久不更新导致无法兼容最新版本的PHP和PHpstrom,无法像java一样进行单元调试。所以在此改造一番。
版本号参考
| PHP 版本 | PHPUnit 版本 |
|---|---|
| 7.3, 7.2 | 8 |
| 7.1 (仅安全更新,2019 年 12 月 1 日起停止支持) | 7 |
| 7.0 (已经停止支持) | 6 |
| 5.6 (已经停止支持) | 5 |
| 5.5, 5.4, 5.3 (已经停止支持) | 4 |
教程
-
首先你要学会使用 Composer,可以参考 laravel-china 的这篇教程,里面包含了从安装 Composer 开始到配置国内镜像加速源全套流程,速度不佳还可以尝试使用 Packagist / Composer 中国全量镜像(含安装教程) 或者 阿里云 Composer 全量镜像。请尽可能使用比较新的 Composer 版本!截止我写这篇文章时,我的 Composer 版本号是
Composer version 1.8.6 2019-06-11 15:03:05(使用composer --version查看) -
在自己的项目下安装 PHPUnit 扩展和必要的
symfony/dom-crawler扩展,以及使用的 think-testing 包中会用到的topthink/think-helper,参考命令:$ composer require phpunit/phpunit=^8 --dev $ composer require symfony/dom-crawler=^2.8.8 --dev $ composer require topthink/think-helper
请注意安装的版本号,再次强调:
**PHPUnit 的版本号要和 PHP 的版本相对应!并不是越高越好! ** 具体的版本号请参考开头的表格,把
=^8替换成对应的数字即可。symfony/dom-crawler扩展之所以使用 2.8.8~3.0 以前版本主要是为了模拟原 think-testing 项目中模拟爬取网页 DOM 节点部分所使用的包,因为我的开发不涉及页面部分故高版本未作测试。topthink/think-helper扩展会自动根据你当前的 ThinkPHP 主框架版本确定,所以无需指定版本号。 -
在自己的项目根目录下创建
tests文件夹,修改composer.json文件的"autoload"部分:在"psr-4"后面的列表中添加:"tests\\": "tests", "think\\": "thinkphp/library/think", "traits\\": "thinkphp/library/traits"
添加完成的
"autoload"部分应该长这样:"autoload": { "psr-4": { "app\\": "application", "tests\\": "tests", "think\\": "thinkphp/library/think", "traits\\": "thinkphp/library/traits" } }
完成后在项目根目录执行
composer update生成 autoload 文件 -
在任意位置新建文件夹并进入,在新建的这个文件夹里使用
composer require topthink/think-testing安装官方的 think-testing 项目,拷贝vendor/topthink/think-testing/src/目录下除config.php文件和command文件夹外所有文件到自己的项目根目录下的tests文件夹中,修改所有文件的namespace命名空间为tests。 -
在你的项目根目录创建名为
phpunit.xml的文件,用于指定自动测试,内容如下:<?xml version="1.0" encoding="UTF-8"?> <phpunit backupGlobals="false" backupStaticAttributes="false" colors="true" convertErrorsToExceptions="true" convertNoticesToExceptions="true" convertWarningsToExceptions="true" processIsolation="false" stopOnFailure="false"> <testsuites> <testsuite name="Application Test Suite"> <directory suffix=".php">./tests/</directory> </testsuite> </testsuites> <filter> <whitelist> <directory suffix=".php">application/</directory> </whitelist> </filter> </phpunit>
-
在
tests/TestCase.php文件中添加__construct方法如下:public function __construct(?string $name = null, array $data = [], string $dataName = '') { // 引入需要的环境 require_once __DIR__ . '/../thinkphp/base.php'; // 初始化 App 对象,并将 APP_PATH 指向项目的 application 目录 App::getInstance()->path(__DIR__ . '/../application/')->initialize(); parent::__construct($name, $data, $dataName); }
-
在
tests/TestCase.php文件中添加$baseUrl的成员变量如下:protected $baseUrl = '';
注意:如果开启了强制路由的选项,那这里要和你路由中配置的域名一致 ,如果不一致会报莫名其妙的 500 错误。
-
从根目录下运行
./vendor/bin/phpunit测试单元测试是否配置成功,如果出来的结果是类似于:$ ./vendor/bin/phpunit PHPUnit 8.2.4 by Sebastian Bergmann and contributors. Time: 6 ms, Memory: 2.00 MB No tests executed!那么恭喜你,环境是没啥问题了。
-
最后一步,编写一个简单的测试,在
tests文件夹中创建名为BasicTest.php的测试文件,内容如下:<?php namespace tests; class BasicTest extends \tests\TestCase { public function testBasicFunctions() { $this->assertTrue(true); $this->assertEquals(2, 1+1); $app = new \app\index\controller\Index(); // 假设 index/index/index 方法返回的字符串中包含 "index" $this->assertStringContainsString('index', $app->index()); } public function testThinkPHPStyleTests() { // 假设我访问 "/" 会看到 "index" $this->visit('/')->see('index'); } }
从根目录下运行
./vendor/bin/phpunit,如果出来的结果是类似于:$ ./vendor/bin/phpunit PHPUnit 8.2.4 by Sebastian Bergmann and contributors. .. 2 / 2 (100%) Time: 26 ms, Memory: 6.00 MB OK (2 tests, 5 assertions)
恭喜你,大功告成,你接下来就可以按照网上的 PHPUnit 的教程开始编写测试了。在我的测试环境下(OSX 10.13, Homebrew PHP 7.2, PHPUnit 8),所有的测试,只要是放到
tests文件夹下且保持命名空间正确就可以自动测试,按照需要测试的类首字母顺序进行。
常见问题
-
错误:xxx Not Found
一般是之前
composer require的部分没有装好,回去重新执行即可。 -
测试结果提示:
OK, but incomplete, skipped, or risky tests!
Tests: 4, Assertions: 10, Risky: 1.
或者是红字:
FAILURES!
Tests: 5, Assertions: 10, Failures: 1.
请参考 PHPUnit 相关资料,第一个可能是因为有测试里面什么都没执行,第二个是因为有测试失败了
-
完全不能执行,提示错误:
include(): Filename cannot be empty或者
think\exception\ErrorException: include(): Filename cannot be empty
之前
__construct那一步没做好,或者是base.php没引对,或者是 APP_PATH 配置错了 -
错误:
A request to xxx failed. Received status code 500.恭喜,最难搞的错误之一。原因很多,但是不明确,可能是使用了高版本的 PHP 搭配了低版本的 PHPUnit:比如 PHP 7.2 中的 each() 函数已经 deprecated 了,但是 PHPUnit 6 中仍有使用(也是造成我默认项目测试不了的原因);也可能是强制路由模式下路由配置不正确,没有命中任何路由;也有可能是因为
$baseUrl或者其他域名相关的配置不正确导致的。可以创建空项目进行尝试,如果空项目正常说明是原来项目配置有问题或者路由不对。 -
提示:
PHP Fatal error: Class tests\HttpException may not inherit from final class (PHPUnit\Framework\ExpectationFailedException) in /path/to/your/project/tests/HttpException.php on line 7
修改 InteractWithPages.php 第 484 行为:
throw new \PHPUnit\Framework\ExpectationFailedException($message);
并删除
tests/HttpException.php文件
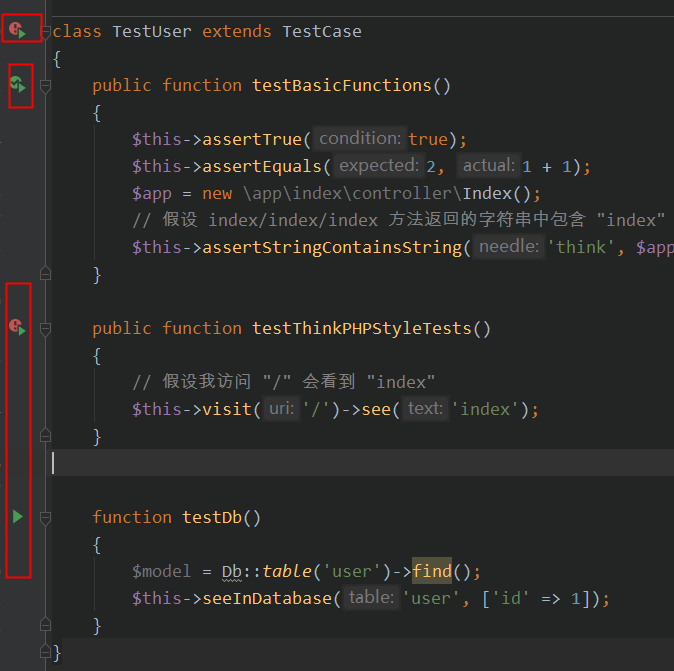
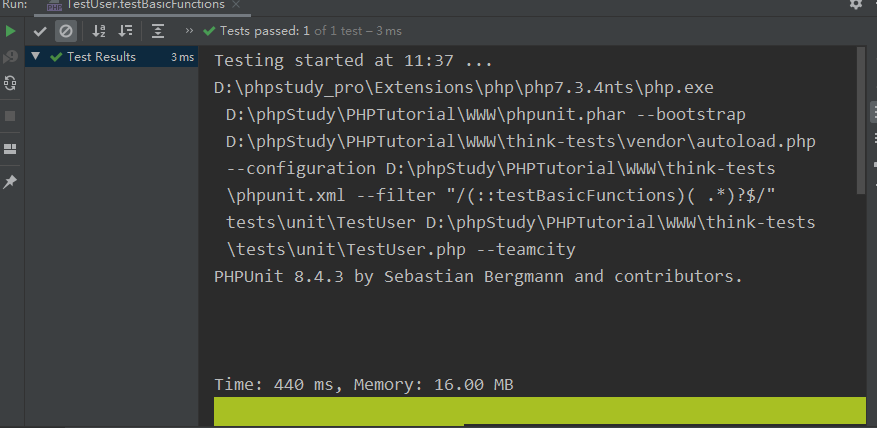
在PhpStorm 中使用单元调试
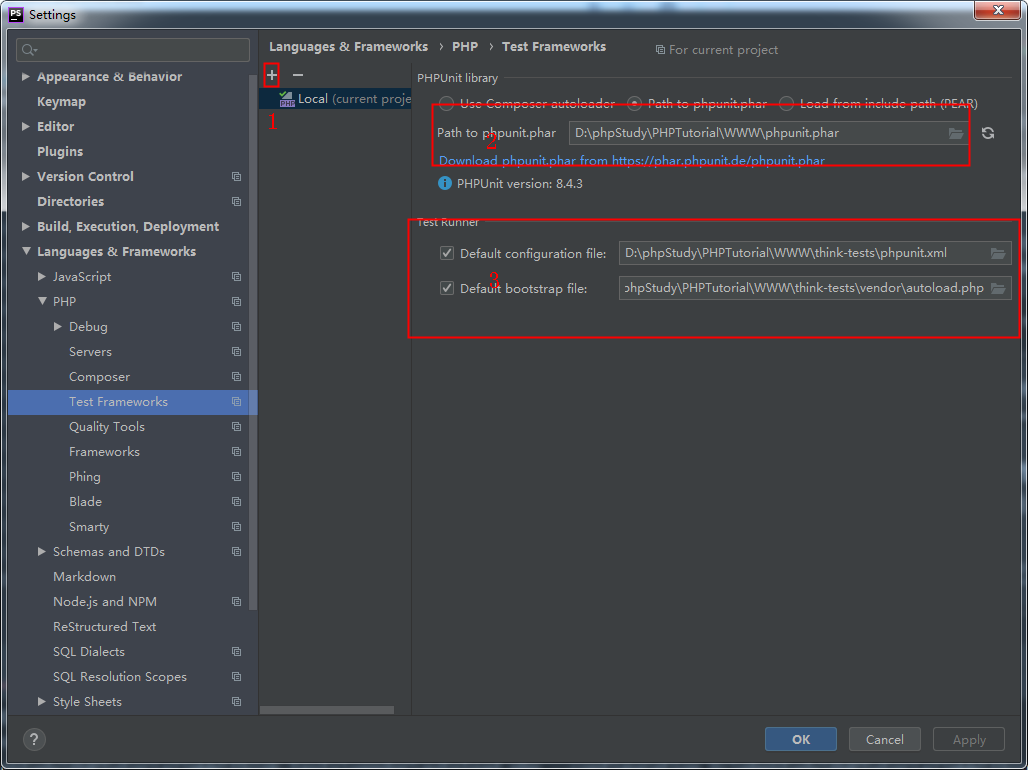
1. 配置PhpStorm
1.配置phpunit.phar路径
2.配置phpunit.xml路径
3.配置启动文件路径


